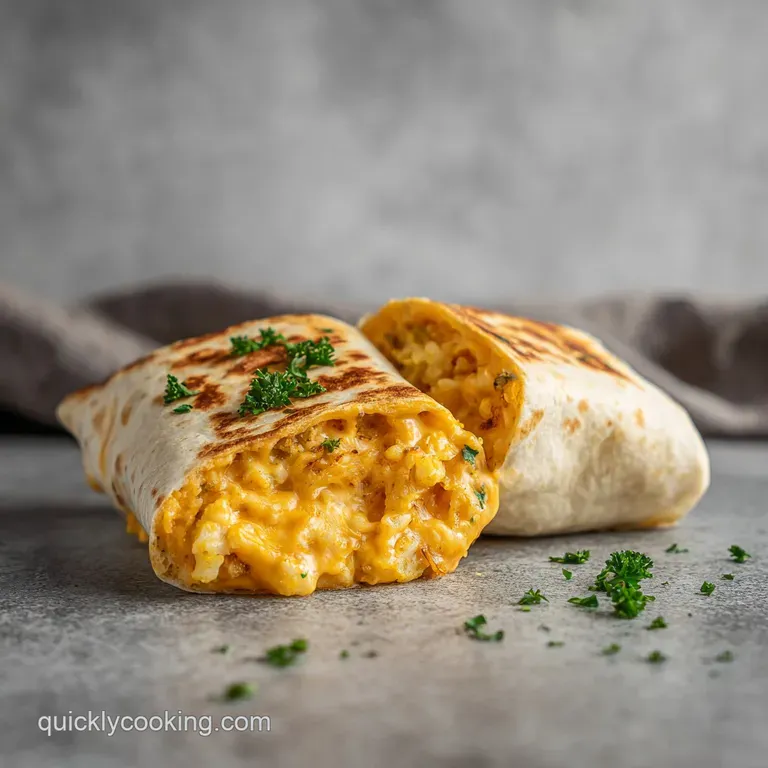
Cheesy Potato Burritos: Crispy and Savory
- Time: Active 10 minutes, Passive 20 minutes, Total 30 minutes
- Flavor/Texture Hook: Shattering potato crunch meeting velvety nacho cheese
- Perfect for: High efficiency weeknight dinners or rapid meal prep
- Create the Ultimate Cheesy Potato Burritos Recipe
- Efficiency Secrets for Maximum Texture and Flavor
- Component Analysis for the Best Burrito Build
- Essential Tools for High Speed Kitchen Execution
- Strategic Flow for a Thirty Minute Finish
- Preventing Common Assembly and Texture Failures
- Creative Twists on the Classic Spud Filling
- Longevity Tactics and Using Every Last Scrap
- Debunking Traditional Tex Mex Cooking Misconceptions
- Professional Plating and Dipping Sauce Pairings
- CRITICAL: Very High in Sodium
- Recipe FAQs
- 📝 Recipe Card
Create the Ultimate Cheesy Potato Burritos Recipe
Listen, we’ve all been there standing in the kitchen at 6:00 PM with zero energy but a massive craving for something that actually bites back with a crunch. The first time I tried making these, I made the amateur move of boiling the potatoes. Big mistake.
They turned into a mushy, sad interior that felt more like baby food than a burrito. Now? I don’t mess around. I wait for that specific sizzle when the frozen tots hit the preheated pan, knowing that in twenty minutes, they’ll have a crust so rigid it’ll practically shatter when you take that first bite.
The real win here isn't just the flavor; it’s the efficiency. We’re talking about a thirty minute turnaround from "I'm hungry" to "I'm sitting on the couch with a toasted wrap." By the time the aroma of smoked paprika and garlic powder starts wafting out of your oven, you’ve already got the beef browning in the skillet.
It’s a rhythmic, high speed flow that makes you feel like a pro without requiring a culinary degree. Trust me, once you hear that glassy clink of a properly seared tortilla against the plate, you’ll never go back to the drive thru version.
We’re focusing on the structural integrity of this cheesy potato burritos recipe. It’s about layering the components so the sour cream doesn’t turn the potatoes into a soggy mess before you even finish the first half.
I’ve refined this process to ensure every single bite has a bit of everything: the zip of the chili powder, the creaminess of the nacho sauce, and that essential sharp cheddar pull. Let’s get moving, because these aren't going to roll themselves.
Efficiency Secrets for Maximum Texture and Flavor
Success with this potato burritos recipe comes down to managing moisture and heat simultaneously. If the beef is too watery, the tortilla disintegrates; if the potatoes aren't hot enough, the cheese won't melt properly during the final sear.
We’re using a specific sequence of events to ensure every component hits its peak at the exact moment of assembly.
- Surface Area Optimization: Tater tots provide more jagged edges than cubed potatoes, leading to more crunch per square inch.
- Moisture Reduction: Draining the beef fat and simmering the added water ensures the seasoning coats the meat without creating a "soupy" filling.
- Thermal Transfer: Warming the tortillas first makes them pliable, preventing the "blowout" that happens when cold flour wraps are stretched.
- Direct Heat Sear: Placing the seam side down in a dry skillet acts as a "culinary glue," sealing the burrito shut while crisping the skin.
| Method | Time | Texture | Best For |
|---|---|---|---|
| Oven (Standard) | 20 minutes | Shattering crunch | Hands off multitasking |
| Air Fryer | 12 minutes | Maximum crisp | Speed obsessed cooks |
| Stovetop Skillet | 18 minutes | Even browning | Small batches |
Choosing the right method for your potatoes is the first big decision. While the air fryer is king of speed, the oven method described in this burritos recipe allows you to prep the beef and warm the tortillas without hovering over a basket.
It’s the superior choice for high efficiency cooking when you’re managing multiple components at once.
Component Analysis for the Best Burrito Build
Understanding what each ingredient brings to the table is how you move from just "following a recipe" to actually mastering it. We aren't just throwing things in a wrap; we're building a structural masterpiece where every gram counts.
| Ingredient | Science Role | Pro Secret |
|---|---|---|
| 80/20 Ground Beef | Fat based flavor carrier | Don't over drain; a tiny bit of fat helps the taco seasoning bloom. |
| Frozen Tater Tots | Structural starch | Roast them longer than you think to compensate for the steam inside the wrap. |
| Nacho Cheese Sauce | Emulsified moisture | Acts as a barrier between the wet beef and the dry potato. |
| Flour Tortilla | Elastic gluten wrap | Use "Burrito Size" to ensure enough overlap for a tight, leak proof seal. |
The nacho cheese is particularly vital here. Unlike shredded cheese, which can sometimes break into oil and solids if overheated, a processed nacho sauce stays velvety even after a trip to the skillet. It provides that nostalgic, creamy mouthfeel that contrasts beautifully with the seasoned beef.
Essential Tools for High Speed Kitchen Execution
Efficiency isn't just about how fast you move; it's about having the right gear so you aren't fighting your equipment. To get this cheesy potato burritos recipe done in thirty minutes, you need tools that distribute heat evenly and clean up fast.
1. 3 Essential Tools
You’ll want a heavy bottomed skillet cast iron is great, but a heavy stainless steel or a high-quality non stick pan works perfectly too. This is for browning the beef and, more importantly, for that final sear. You also need a large, rimmed baking sheet for the potatoes.
The rim is crucial because it lets you toss the tots with the paprika and garlic powder without sending them flying across the kitchen floor. Finally, a sturdy set of tongs is much better than a spatula for flipping the burritos during the searing phase; they give you the control needed to keep the wrap tight.
If you find yourself making these often for a crowd, you might want to look into my Stuffed Portobello Mushrooms as a side, which also utilizes that same baking sheet for a streamlined cleanup.
Strategic Flow for a Thirty Minute Finish
Follow these steps exactly to maintain the timeline. No lingering, no distractions just pure kitchen efficiency.
- Preheat your oven to 425°F (220°C). Arrange 450g frozen tater tots on a baking sheet and toss them with 0.5 tsp smoked paprika and 0.25 tsp garlic powder. Note: Coating them before they thaw slightly helps the spices stick to the icy surface.
- Bake the tater tots for 15-20 minutes until they achieve a deep golden, shattering exterior.
- While potatoes bake, brown 450g of 80/20 ground beef in a heavy bottomed skillet over medium high heat, breaking it into fine crumbles. Note: Fine crumbles ensure a more even distribution of flavor in every bite.
- Drain the excess fat from the skillet. Add 1 tbsp taco seasoning, 0.5 tsp chili powder, and 2 tbsp water. Simmer for 2-3 minutes until the liquid reduces and coats the beef.
- Warm the 4 large flour tortillas in the microwave for 15 seconds or in a dry pan. Spread 1/4 cup (60ml) of nacho cheese sauce onto each tortilla.
- Layer 2 tablespoons (30ml) of sour cream over the cheese, then divide the seasoned beef and crispy tater tots among the wraps.
- Top with 100g shredded sharp cheddar cheese, distributing it evenly. Note: Placing the shredded cheese on top of the hot beef helps the melting process start immediately.
- Fold and roll the burritos tightly. Place them seam side down in a dry skillet over medium heat for 1-2 minutes per side until the exterior is toasted and glassy.
Preventing Common Assembly and Texture Failures

Even a simple recipe can go south if you ignore the physics of the burrito. The most common mistake is the "Overstuffing Trap." We’ve all done it you want more beef, more potatoes, more cheese. But a burrito that won't close is just a messy taco.
1. The Soggy Bottom Syndrome
This happens when you don't drain the beef properly or you let the assembled burritos sit too long before searing. The moisture from the meat and the sour cream migrates into the tortilla, turning it into a paste. The solution is the immediate sear.
That dry heat creates a toasted barrier that locks the moisture inside.
2. The Exploding Burrito
If your burrito bursts in the pan, you either overfilled it or didn't tuck the sides in tight enough. Think of it like an envelope. Fold the sides in first, then roll from the bottom, keeping tension on the wrap the whole time.
| Problem | Root Cause | Solution |
|---|---|---|
| Cold center | Filling was cold during assembly | Warm the nacho cheese and beef right before rolling. |
| Tortilla tears | Tortilla was too cold or dry | Microwave with a damp paper towel for 20 seconds first. |
| Greasy finish | Beef fat wasn't drained | Use a colander or spoon to remove all liquid fat before seasoning. |
One mistake I once made was trying to use "light" sour cream. Honestly, don't even bother with low-fat versions here. They have a higher water content and tend to break down into a thin liquid when they hit the heat of the beef, contributing to the dreaded sogginess.
Stick to the full fat stuff for that velvety texture.
Common Mistakes Checklist
- ✓ Pat the potatoes dry if they have visible frost before seasoning (ensures the spices don't clump).
- ✓ Don't skip the water in the beef; it's necessary to hydrate the dry taco seasoning.
- ✓ Preheat the skillet for the final sear for at least 2 minutes (you want instant toast).
- ✓ Keep the seam side down first to "lock" the burrito's shape.
- ✓ Let the beef rest for 2 minutes after simmering so the sauce thickens slightly.
Creative Twists on the Classic Spud Filling
While this cheesy potato burritos recipe is a powerhouse on its own, you can easily pivot based on what's in your pantry. If you’re looking for a morning version, my Quick Breakfast Burritos use a very similar logic but swap the beef for eggs.
1. The "Fiesta" Veggie Swap
If you want to go meatless, swap the ground beef for a can of black beans. Just make sure to rinse and dry them thoroughly before tossing them in the skillet with the taco seasoning and chili powder. You'll still get that hit of protein without the grease.
2. The Loaded Bacon Twist
For an extra layer of crunch, add two strips of crumbled cooked bacon inside. The smoky saltiness of the bacon plays incredibly well with the smoked paprika on the tater tots. It turns this into a "loaded baked potato" in wrap form.
Chef's Tip: If you really want to deepen the flavor of the beef, add a teaspoon of instant espresso powder or cocoa powder to the meat while browning. It won't taste like coffee; it just makes the chili powder taste twice as rich.
Longevity Tactics and Using Every Last Scrap
These burritos are surprisingly resilient if handled correctly. Since we're using tater tots, they hold their structure better than mashed or boiled potatoes when reheated.
Storage Guidelines You can keep these in the fridge for up to 4 days. Wrap them individually in foil to prevent the tortillas from drying out. When you're ready to eat, don't just microwave them. A microwave will make the tortilla chewy and the potatoes soft.
Instead, use a toaster oven or the same dry skillet method to bring back that glassy crunch.
Freezing Instructions To freeze, wrap the assembled (but not yet seared) burritos in plastic wrap, then foil. They’ll stay good for 2 months. Thaw them in the fridge overnight before giving them that final sear in the pan. This is a massive time saver for busy weeks.
Zero Waste Tip Got leftover nacho cheese? Don't toss it. Thin it out with a little splash of milk and use it as a base for a quick mac and cheese the next day. Any leftover seasoned beef can be tossed over a salad or used as a topping for my Italian Stuffed Zucchini Boats if you're looking to cut carbs later in the week.
Debunking Traditional Tex Mex Cooking Misconceptions
There are a few "rules" people swear by that actually slow you down or hurt the final product. Let's clear those up so you can cook with confidence.
First, many people think you have to use fresh potatoes for an authentic "homemade" feel. In reality, frozen tater tots are a marvel of food engineering. They are par fried, which means they’ve already undergone the structural changes needed for a perfect crunch.
Using fresh potatoes requires soaking, drying, and double frying to get the same result. For a high efficiency meal, the freezer aisle is your best friend.
Second, there's a myth that searing the burrito "seals in the juices." Just like with steak, that's not how physics works. Searing is about the Maillard reaction creating new flavor compounds and changing the texture of the tortilla from soft and doughy to crisp and shatter prone.
It’s for taste and structural integrity, not moisture retention.
Professional Plating and Dipping Sauce Pairings
You've put in the work, now make it look like a million bucks. A burrito might seem humble, but the way you cut and serve it makes a huge difference in the eating experience.
1. The Cross Cut
Never just hand someone a whole burrito. Cut it on a sharp diagonal. This exposes the beautiful layers the golden tots, the dark seasoned beef, and the molten cheese. It also creates a "pocket" that’s perfect for scooping up extra salsa or guacamole.
2. The Dipping Duo
Serve these with a side of extra sour cream and a sharp, acidic salsa verde. The brightness of the green salsa cuts through the heavy, savory notes of the nacho cheese and beef. If you're feeling adventurous, mix a little hot sauce into some honey for a "hot honey" dip that bridges the gap between the smoked paprika and the salty cheddar.
| Serving Size | Ingredient Adjustments | Pan Size | Cook Time |
|---|---|---|---|
| 2 People | 225g tots, 225g beef | 10 inch skillet | 20 minutes |
| 4 People | 450g tots, 450g beef | 12 inch skillet | 30 minutes |
| 8 People | 900g tots, 900g beef | Two 12 inch skillets | 40 minutes |
If you're hosting a game night and serving these as the main event, you'll want a dessert that's just as efficient but feels premium. My Velvety Classic Cheesecake is the perfect follow up because it can be made ahead of time, leaving you free to focus on the burrito sear right before the guests arrive.
Now, let's get that skillet hot. You’re only thirty minutes away from the best cheesy potato burritos you’ve ever had. Remember: high heat for the tots, a dry pan for the sear, and don't skimp on the nacho cheese!

CRITICAL: Very High in Sodium
1680 mg 1680 mg of sodium per serving (73% 73% of daily value)
The American Heart Association recommends a limit of about 2,300mg per day, but an ideal limit of no more than 1,500mg per day for most adults.
Tips to Reduce Sodium
-
Choose Lower Sodium Cheese-15%
Swap the shredded sharp cheddar cheese for a reduced sodium version. Many brands offer sharp cheddar with significantly less sodium.
-
Opt for Low-Sodium Taco Seasoning-15%
Replace the standard 1 tablespoon of taco seasoning with a low-sodium variety. This single change can drastically cut down the overall sodium content.
-
Use Reduced Sodium Nacho Cheese Sauce-10%
Substitute the 240ml of nacho cheese sauce with a reduced sodium or lower sodium alternative. Alternatively, consider making your own cheese sauce with less salt.
-
Control Chili Powder
While chili powder itself is generally low in sodium, ensure you are using a pure chili powder and not a blend that may contain added salt. This tip has minimal impact but ensures good practice.
-
Boost Flavor with Fresh Herbs and Spices
Enhance the overall flavor profile by incorporating fresh ingredients like chopped cilantro, lime juice, or additional fresh garlic and onion. This strategy adds brightness without adding sodium.
Recipe FAQs
What are the 5 ingredient cheesy potatoes?
This combination relies on frozen tater tots, smoked paprika, garlic powder, nacho cheese, and shredded sharp cheddar. These components provide the signature crunch and flavor profile required for the base of the burrito.
How to recreate the cheesy potato burrito from Taco Bell?
Preheat your oven to 425°F and bake tater tots with paprika and garlic powder for 20 minutes until they develop a shattering exterior. Layer these crispy potatoes with browned ground beef, nacho cheese, sour cream, and sharp cheddar inside warm flour tortillas before toasting the finished wrap in a
dry skillet.
What's in a cheesy potato burrito?
The essential components are crispy tater tots, seasoned ground beef, warm nacho cheese, sour cream, and sharp cheddar. These are tightly wrapped in large flour tortillas to ensure the ingredients stay secure during the final pan-searing step.
What kind of cheese is best for cheesy potatoes?
Sharp cheddar is the best choice for its bold flavor profile and reliable melt. It pairs perfectly with the velvety nacho cheese sauce used to coat the beef and potato layers.
How to keep the potatoes from getting soggy inside the burrito?
Bake the tater tots at 425°F until they reach a deep golden, shattering exterior. If you enjoyed mastering the tender crumb structure in other recipes, you will appreciate how this high heat, moisture controlled baking method prevents the potatoes from losing their crunch when combined with the sour cream and cheese.
Is it true I must boil the potatoes first?
No, this is a common misconception. Boiling leads to a soft, mushy interior that lacks the necessary texture, so sticking to a high heat oven roast is vital for that required glassy crunch.
How to ensure the tortilla gets a glassy, toasted finish?
Place the folded burrito seam side down in a dry skillet over medium heat for 1-2 minutes per side. This process toasts the exterior to a rigid, golden brown while sealing the ingredients inside.
Cheesy Potato Burritos

Ingredients:
Instructions:
Nutrition Facts:
| Calories | 939 kcal |
|---|---|
| Protein | 45g |
| Fat | 53g |
| Carbs | 68g |
| Fiber | 5g |
| Sugar | 4g |
| Sodium | 1680mg |
