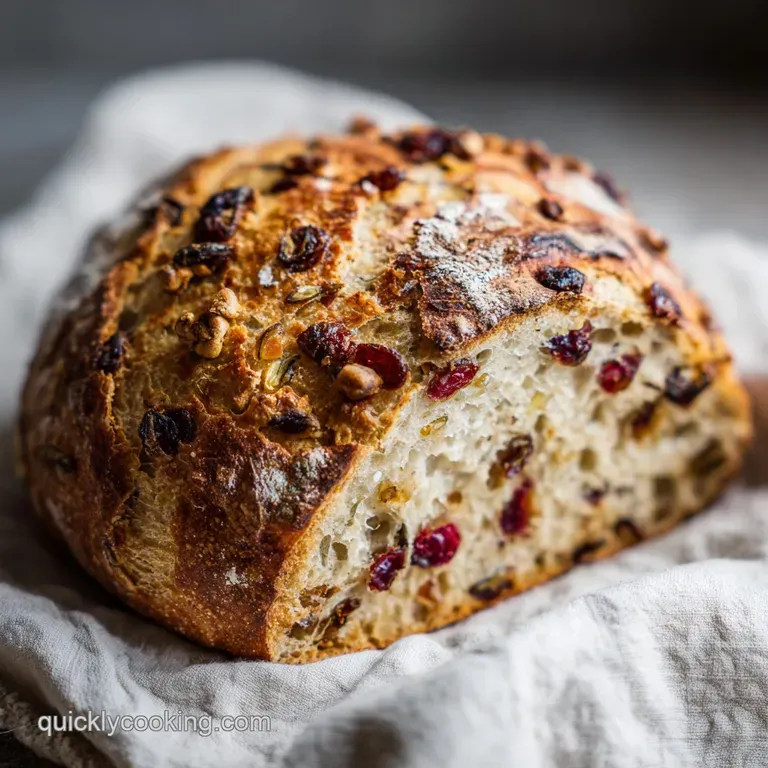
Cranberry Walnut Bread: Crusty Exterior
- Time: Active 30 minutes, Passive 2 hours 30 mins, Total 3 hours
- Flavor/Texture Hook: Crusty exterior with a velvety, fruit studded center
- Perfect for: Weekend brunch, holiday gifting, or a high efficiency meal prep session
- Mastering the Perfect Crusty Cranberry Walnut Bread
- Essential Timing and Yield Expectations
- The Science Behind Every Component
- Minimalist Tools for Maximum Results
- Executing the Perfect Loaf
- Solving Common Baking Hurdles
- Flavor Variations and Easy Substitutes
- Maintaining Freshness and Reducing Waste
- Strategic Pairings for Better Meals
- Recipe FAQs
- 📝 Recipe Card
Mastering the Perfect Crusty Cranberry Walnut Bread
There is nothing quite like the sound of a fresh loaf cooling on the counter. You know that tiny, high pitched crackling? It's the sound of the crust contracting as it hits the cool air, and in my kitchen, that’s the signal that something special is about to happen.
I remember the first time I nailed this Cranberry Walnut Bread. I had spent months trying to get that bakery style "shatter" without owning a professional steam oven, and when I finally pulled this mahogany beauty out, the aroma of toasted walnuts and warm cinnamon literally stopped me in my tracks.
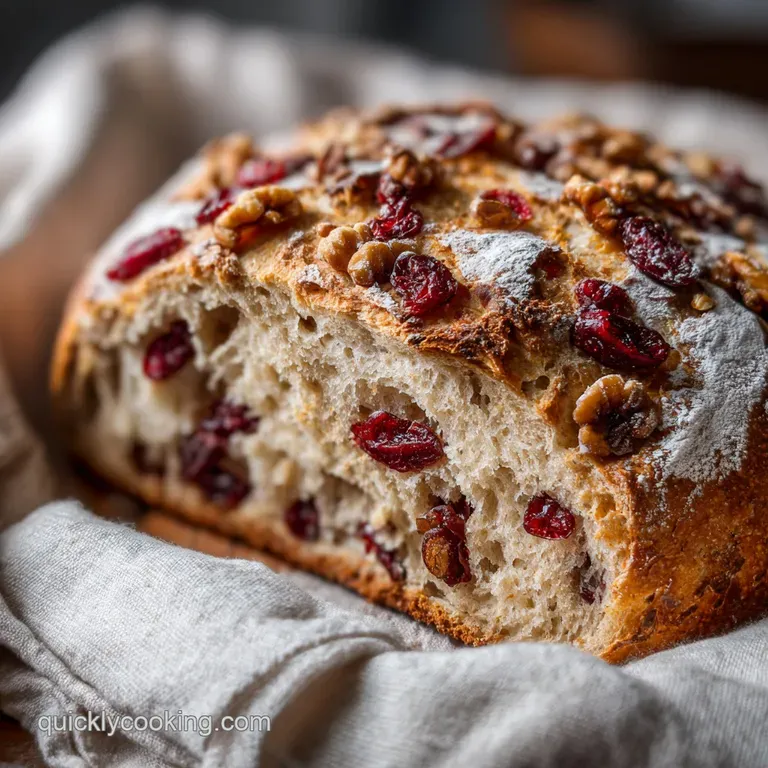
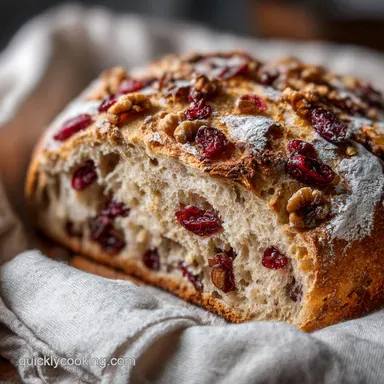
This isn't just another dense fruit loaf that sits heavy in your stomach. It is a light, airy, and deeply aromatic bread that balances the tartness of 125g dried cranberries with the earthy crunch of 100g chopped walnuts.
We are going for a texture that is sturdy enough for a thick slab of salted butter but soft enough to enjoy on its own. If you’ve been intimidated by yeast before, don't be. I’ve made all the mistakes, from "killing" the yeast with boiling water to forgetting the salt, and I’ve refined this process to be as efficient as possible.
We are going to focus on a "no fuss" approach that relies on high-quality ingredients and a few clever techniques. You don't need a dozen bowls or a fancy proofing basket. We’re keeping the tool list minimal so you can spend less time cleaning and more time enjoying the results.
Whether you’re a seasoned baker or this is your very first loaf, I promise the results will look like they came from a high end bistro. Let's get into why this specific method works so well.
Essential Timing and Yield Expectations
Before we get our hands messy, we need to look at the roadmap. Efficiency in the kitchen is all about knowing what to expect and when to intervene. This Cranberry Walnut Bread is designed to fit into a busy afternoon.
You’ll have chunks of "waiting time" where the yeast does all the heavy lifting, allowing you to catch up on a show or prep another meal.
The Physics of the Rise: Honey acts as a high speed fuel for the yeast, accelerating fermentation, while the orange zest provides a micro amount of acidity that helps strengthen the gluten bonds for a taller loaf. This combination ensures a reliable rise even if your kitchen is a bit chilly.
| Method Comparison | Active Effort | Final Texture | Best For |
|---|---|---|---|
| Dutch Oven (Recommended) | 30 minutes | Thick, shattering crust | Artisan style loaves |
| Standard Loaf Pan | 20 minutes | Soft, sandwich style crust | Morning toast and kids |
| Free Form Baking Sheet | 25 minutes | Rustic, uneven crunch | Casual dinner sides |
The Dutch oven method is my personal favorite because it traps steam, which is the secret to that professional looking crust. However, if you only have a standard loaf pan, don't worry. You can still get a great result by placing a small pan of water on the bottom rack of your oven to create a similar steam effect.
It's all about mimicking that high moisture environment in those first crucial 15 minutes of baking.
Similar to how I approach my Homemade Banana Bread Recipe, we are looking for a balance of moisture and structure. While banana bread relies on fruit puree for hydration, this bread uses a precise 350ml of warm water to activate the 7g of instant yeast, ensuring the 450g of bread flour can fully hydrate without becoming a sticky mess.
The Science Behind Every Component
Understanding your ingredients is the quickest way to becoming a better cook. We aren't just throwing things in a bowl; every item has a specific job to do. For example, using 10g of fine sea salt isn't just about seasoning.
Salt actually slows down the yeast slightly, preventing the dough from over proofing and collapsing. It also tightens the gluten, which gives the bread its "chew."
| Component | Science Role | Pro Secret |
|---|---|---|
| Bread Flour (450g) | High protein for structure | Sift it if your flour is clumpy to avoid dry pockets |
| Instant Yeast (7g) | Leavening agent | Ensure it's room temp before adding to water |
| Orange Zest (1 tbsp) | Essential oils and acidity | Zest directly into the flour to trap the oils |
| Chopped Walnuts (100g) | Fat and texture | Toast them for 5 mins before adding for a deeper flavor |
Chef Tip: Freeze your 125g of dried cranberries for 15 minutes before folding them into the dough. This prevents them from bleeding their color into the bread and keeps the crumb looking clean and bright.
The 21g of honey is another silent hero. Unlike granulated sugar, honey is hygroscopic, meaning it attracts and holds onto moisture. This is why a loaf of homemade walnut bread made with honey will stay soft a day or two longer than one made with white sugar.
It also contributes to that beautiful mahogany color on the crust through the Maillard reaction.
Minimalist Tools for Maximum Results
You don't need a stand mixer for this Cranberry Walnut Bread, though you can certainly use one. I actually prefer mixing this by hand with a sturdy wooden spoon or a dough whisk. It gives you a better "feel" for the hydration of the dough.
You’ll also need a large mixing bowl, a kitchen scale (this is non negotiable for consistent bread), and a Dutch oven or a heavy baking sheet.
- Bread Flour (450g): Essential for that chewy artisan texture. Why this? Bread flour has more protein than all purpose, creating stronger gluten walls.
- Substitute: All purpose flour (use 25ml less water as it’s less absorbent).
- Warm Water (350ml): Aim for 105°F. Why this? This is the "Goldilocks" temp for yeast not too cold, not too hot.
- Substitute: Warm milk for a richer, softer crumb.
- Instant Yeast (7g): No blooming required. Why this? It mixes directly into dry ingredients for faster prep.
- Substitute: Active dry yeast (must bloom in water for 10 mins first).
- Fine Sea Salt (10g): Controls fermentation. Why this? Fine grains dissolve evenly throughout the dough.
- Substitute: Table salt (use 8g as it is more dense).
- Honey (21g): For moisture and browning. Why this? Adds a subtle floral sweetness that complements the nuts.
- Substitute: Maple syrup or agave nectar.
- Dried Cranberries (125g): The star fruit. Why this? They provide tart "pops" of flavor.
- Substitute: Dried cherries or raisins.
- Chopped Walnuts (100g): For earthy crunch. Why this? Walnuts have the perfect fat content for baking.
- Substitute: Pecans or toasted hazelnuts.
- Orange Zest (1 tbsp): For bright aroma. Why this? Cuts through the richness of the nuts.
- Substitute: Lemon zest or 0.5 tsp orange extract.
- Ground Cinnamon (0.5 tsp): For warmth. Why this? Enhances the natural sweetness of the fruit.
- Substitute: Nutmeg or cardamom.
If you are in a rush and need something with even less prep, you might like this simple 3 ingredient recipe for muffins. But for those who want the full artisan experience, let's keep going with this loaf.
Executing the Perfect Loaf
Now we get to the fun part. The goal here is to handle the dough enough to develop strength but not so much that we squeeze out all the air. This Cranberry Walnut Bread likes a gentle touch.
- Whisk the 450g bread flour, 7g instant yeast, 10g salt, 1 tbsp orange zest, and 0.5 tsp cinnamon in a large bowl. Note: Mixing dry first ensures the yeast is evenly distributed.
- Combine the 350ml warm water and 21g honey, then pour into the dry ingredients.
- Stiruntil a shaggy, sticky dough forms and no dry flour remains.
- Fold in the 125g dried cranberries and 100g walnuts until evenly distributed through the sticky mass.
- Cover the bowl with a damp cloth and let it rest for 1 hour 30 mins until doubled in size.
- Transfer the dough onto a lightly floured surface and gently fold the edges toward the center to form a ball.
- Place the dough on a piece of parchment paper, cover, and let it rise again for 45 minutes until puffy and light.
- Preheat your oven to 400°F (200°C) with your Dutch oven inside for at least 30 minutes.
- Score the top of the loaf with a sharp knife and carefully lower it into the hot Dutch oven.
- Bake for 30 minutes with the lid on, then 15 minutes with the lid off until the crust is deep mahogany and sounds hollow when tapped.
Chef Tip: Don't skip the scoring! Slashing the top of the bread allows it to expand in a controlled way. If you don't score it, the bread will "blow out" at its weakest point, usually the side, resulting in an awkward shape.
Solving Common Baking Hurdles
Even the best bakers run into issues. Bread is a living thing, influenced by the humidity in your house and the age of your flour. If things aren't looking quite right, don't panic. Most bread "failures" are still delicious when toasted.
For a Shattering, Mahogany Crust
If your crust is pale and soft, it usually means there wasn't enough steam in the oven. Steam keeps the surface of the dough moist, allowing it to expand fully before the crust sets. This is why we use the Dutch oven lid. If you aren't using one, make sure you are using that pan of water on the bottom rack.
To Avoid Gummy Centers
A gummy interior usually happens when the bread is sliced while it's still hot. I know it’s tempting, but you have to wait. The bread continues to cook and set its structure as it cools. If you cut it too early, the steam escapes instantly, leaving the middle damp and sticky.
| Problem | Root Cause | Solution |
|---|---|---|
| Dough won't rise | Water was too hot or yeast is expired | Test yeast in warm water/sugar; it should bubble in 5 mins |
| Bread is too dense | Under proofing or too much flour | Ensure dough doubles in size and measure flour by weight |
| Burnt bottom | Oven floor is too hot | Place a baking sheet on the rack below your Dutch oven |
Common Mistakes Checklist: ✓ Always preheat your Dutch oven for at least 30 minutes (it needs to be screaming hot). ✓ Don't add extra flour during the folding stage; a sticky dough leads to a lighter crumb.
✓ Check the internal temperature; bread is done when it hits 190°F-200°F. ✓ Use a serrated knife for slicing to avoid crushing the airy structure. ✓ Toast your walnuts! It changes the entire flavor profile from "okay" to "incredible."
Flavor Variations and Easy Substitutes
Once you’ve mastered the base Walnut Bread, you can start playing with the profile. This recipe is a fantastic canvas for different flavors. For instance, if you want something that pairs better with a savory dinner like a Sheet Pan Chicken recipe, you could swap the cranberries for dried rosemary and increase the salt slightly.
To Make it Savory Sweet
Try adding 50g of crumbled blue cheese or sharp cheddar along with the walnuts. The funkiness of the cheese against the sweet cranberries is life changing. You can also swap the honey for black pepper and a touch of roasted garlic for a truly artisan savory loaf.
To Cut the Sugar
The 21g of honey is already quite low for a loaf this size, but you can reduce it to 10g if you prefer a less sweet profile. Just keep in mind the crust might not get as dark, and the bread may dry out a few hours sooner.
Let's look at how to scale this if you're baking for a crowd. If you want to double the recipe, use a large 5 quart Dutch oven or bake two separate loaves. For doubling, I recommend only using 1.5x the yeast (about 10-11g) to prevent a harsh fermented flavor.
If you are halving the recipe, use the full 7g of yeast to ensure it still has enough power to lift the smaller mass of dough.
Maintaining Freshness and Reducing Waste
Because this Cranberry Walnut Bread doesn't have preservatives, it will start to firm up after about 2 days. But honestly, that’s when it becomes perfect for other things. Never throw away a stale loaf!
- Room Temp
- Store in a paper bag for 2 days. Avoid plastic bags as they make the crust soft and rubbery.
- Freezer
- Slice the loaf first, then freeze in a freezer safe bag for up to 3 months. You can toast individual slices directly from the freezer.
- Reheating
- Spritz a whole loaf with a little water and pop it in a 350°F oven for 10 minutes to revive the crunch.
Zero Waste Tips: If you have a few ends left over, turn them into "Artisan Croutons." Toss cubes of the bread with a little melted butter and cinnamon sugar, then bake until crisp. They are incredible on top of yogurt or a winter salad.
You can also use stale slices for a decadent French toast; the walnuts and cranberries are already built in!
Strategic Pairings for Better Meals
This bread is a heavy hitter when it comes to serving. While it’s obviously great with a smear of butter, you can get much more creative. I love serving a toasted slice alongside a bowl of butternut squash soup the cinnamon and orange zest in the bread perfectly complement the sweetness of the squash.
For a high efficiency breakfast, top a toasted slice with ricotta cheese, a drizzle of extra honey, and a sprinkle of sea salt. If you’re hosting a wine and cheese night, this bread is the perfect partner for a creamy Brie or a sharp Manchego.
The acidity of the 125g cranberries cuts right through the richness of the cheese.
The "Walnut Bread" experience is really about that contrast the hard, crackly crust giving way to the soft, fruit filled interior. It’s a recipe that feels like it took all day but really only required a few minutes of your actual attention.
That’s the beauty of high efficiency baking: you get all the glory of an artisan baker with none of the stress. Trust the process, watch for those sensory cues, and enjoy the best toast of your life.

Recipe FAQs
Is store-bought cranberry walnut bread seasonal?
Yes, commercially sold versions often are. Major retailers typically feature cranberry walnut loaves heavily during the fall and winter holidays.
Is homemade cranberry walnut bread healthy?
It can be, depending on preparation. This recipe is relatively healthy, utilizing honey for moisture instead of large amounts of refined sugar, though it remains an energy dense treat.
Does Costco have cranberry walnut bread now?
Check your local warehouse for current stock. Large retailers like Costco often cycle this bread into their bakery rotation seasonally, usually starting in October.
How to eat Costco cranberry walnut bread?
Toast slices until crisp for best texture. Serve warm with cream cheese, salted butter, or alongside sharp cheddar cheese for a balanced flavor.
How to keep leftover cranberry walnut bread soft longer?
Wrap tightly in foil or plastic wrap, then store at room temperature. Avoid refrigeration, which actually causes bread to stale faster; freeze individual slices if storing past two days.
Can I substitute the honey in this recipe?
Yes, use maple syrup or agave nectar as direct substitutes. These alternatives provide similar hygroscopic (moisture retaining) properties and sweetness.
What internal temperature confirms cranberry walnut bread is fully baked?
The loaf is done when it reaches 190°F to 200°F internally. Use an instant read thermometer inserted into the center for perfect results every time.
Cranberry Walnut Bread Recipe
Ingredients:
Instructions:
Nutrition Facts:
| Calories | 228 calories |
|---|---|
| Protein | 5.1 grams |
| Fat | 5.8 grams |
| Carbs | 39.7 grams |
| Fiber | 2.2 grams |
| Sugar | 8.1 grams |
| Sodium | 322 milligrams |
