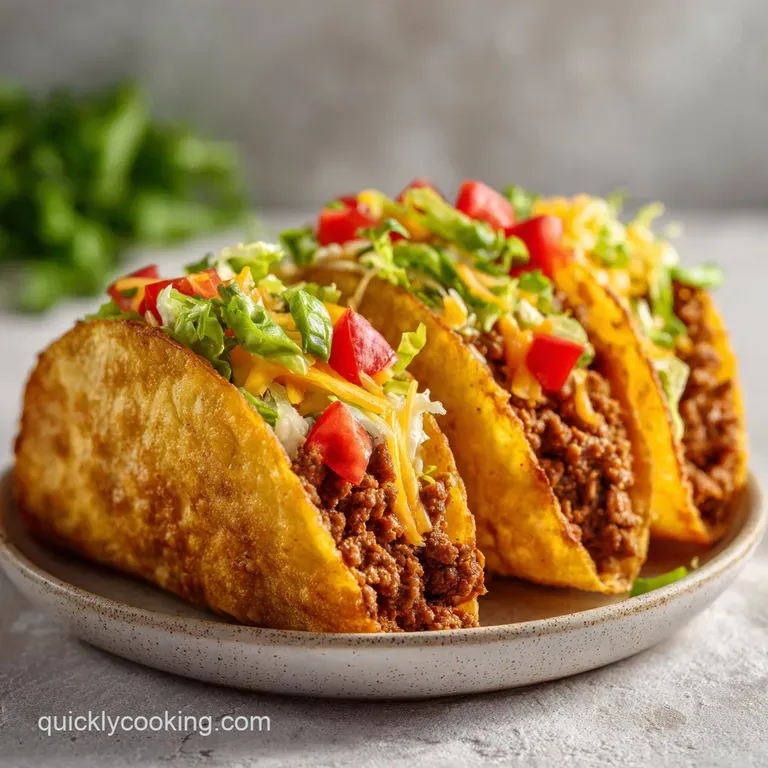
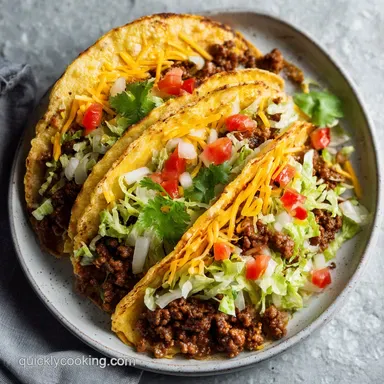
Crispy Ground Beef Tacos: Shatteringly Golden
- Time: Active 10 minutes, Passive 15 minutes, Total 25 minutes
- Flavor/Texture Hook: Shatter crispy golden shells with a silky, glazed beef center
- Perfect for: High efficiency weeknight dinners or rapid fire game day snacks
- Master the Ultimate Crispy Ground Beef Tacos
- The Secret Physics of the Crunch
- Selecting the Components for Impact
- The Tools for Rapid Production
- Executing the High Heat Technique
- Troubleshooting Texture and Flavor Flaws
- Innovative Variations for Every Palate
- Storing Your Tacos for Longevity
- The Best Sides to Serve
- Kitchen Myths and Facts
- Recipe FAQs
- 📝 Recipe Card
Master the Ultimate Crispy Ground Beef Tacos
Long before the drive thru window became a symbol of the American landscape, the "taco dorado" was a staple of Mexican home kitchens. It wasn't a pre formed, stale yellow shell from a cardboard box, but a soft corn tortilla folded over a savory filling and fried in a shallow pool of oil until it reached a golden, brittle perfection.
This dish represents the beautiful intersection of resourcefulness and texture. In the 1950s, this traditional method was adapted by enterprising cooks in Southern California, who realized that the "crispy" factor was what people craved most.
These Crispy Ground Beef Tacos pay homage to that transition, focusing on speed and the specific acoustic "crunch" that defines a truly great meal.
When you bite into one of these, you shouldn't just taste the cumin and beef, you should hear the shell give way. It's a sensory experience that relies on the contrast between the hot, rendering beef fat and the cooling crunch of fresh lettuce or sharp cheese.
I remember the first time I moved away from the "yellow box" shells and actually fried my own tortillas with the meat inside. It was a revelation. The beef fat actually seasons the shell as it cooks, creating a unified flavor profile that no pre baked shell can ever hope to match.
We aren't just making dinner here, we're practicing a form of culinary efficiency that maximizes flavor while minimizing the number of pans you have to wash.
The beauty of this recipe is its reliability. We are using a 1 lb (approx 450g) portion of ground beef, which is the standard size for most supermarket packs, making this incredibly easy to scale up for crowds. This isn't a "leisurely" Sunday roast.
This is a high speed, 25 minute mission to get the most satisfying texture possible onto your plate. We'll be using specific techniques like "blooming" our spices and creating a cornstarch glaze to ensure that every morsel of beef stays exactly where it belongs tucked inside that shatteringly crisp corn tortilla.
The Secret Physics of the Crunch
Understanding why these tacos work requires a quick look at how moisture and fat interact with corn. Most people end up with soggy tacos because they don't manage the "liquid to fat" ratio in the pan. If the beef is too watery, the tortilla absorbs that steam and becomes rubbery instead of crispy.
- Starch Gelatinization: By whisking 1 tsp of cornstarch into the beef broth, we create a "slurry" that thickens as it heats. This prevents the liquid from soaking into the tortilla and instead forms a velvety glaze that clings to the meat.
- The "Bloom" Technique: Adding spices like chili powder and cumin directly to the hot beef fat before adding liquid allows the fat soluble flavor compounds to release. This creates a more intense, layered flavor profile in under 60 seconds.
- Maillard Reaction Persistence: We leave the ground beef undisturbed for the first 3 minutes. This allows a deep, mahogany crust to form, which provides the "umami" base that makes the taco taste meaty rather than just salty.
- Fat as a Heat Conductor: The 80/20 fat ratio in the beef is essential. That rendered fat acts as a medium to "flash fry" the interior of the tortilla as you fold it, creating an internal moisture barrier.
| Meat Thickness | Internal Temp | Rest Time | Visual Cue |
|---|---|---|---|
| Crumbled (fine) | 160°F (71°C) | 2 mins | No pink visible, liquid is syrupy |
| Large Chunks | 160°F (71°C) | 3 mins | Deep brown exterior, juices clear |
| Flat Patty | 160°F (71°C) | 2 mins | Crusty edges, center firm |
Using a cast iron skillet is the most efficient way to maintain the high heat necessary for this process. The thermal mass of the iron prevents the temperature from dropping when you add the cold beef, which is the primary reason meat "steams" and turns grey rather than searing.
If you've ever wondered why restaurant tacos have that specific savory depth, it's almost always due to this over high heat retention.
Selecting the Components for Impact
The ingredients for these Crispy Ground Beef Tacos are simple, but their quality dictates the final texture. We are looking for high fat beef and fresh corn tortillas. Flour tortillas will not work for this specific "shatter" effect, as they contain too much gluten and will become chewy or leathery when fried in this manner.
- 1 lb (450g) ground beef (80/20 blend) Why this? The fat provides the flavor and the frying medium for the shell.
- 1 small yellow onion, finely diced (150g) Why this? Yellow onions have a higher sugar content for better caramelization.
- 2 cloves garlic, minced Why this? Fresh garlic provides a punch that powdered versions lack.
- 2 tbsp chili powder Why this? This is the base of the "taco" flavor profile.
- 1 tsp ground cumin Why this? Adds the signature earthy, smoky aroma.
- 1 tsp smoked paprika Why this? Provides a deep red color and subtle wood smoke notes.
- 1/2 tsp onion powder Why this? Concentrates the savory "allium" flavor throughout the meat.
- 1/2 tsp dried oregano Why this? Adds a necessary herbal brightness to the heavy beef.
- 1/2 tsp sea salt Why this? Enhances all other spices; use more if using unsalted broth.
- 1/4 tsp black pepper Why this? Provides a foundational back heat.
- 1/2 cup (120ml) beef broth (low sodium) Why this? The vehicle for the cornstarch slurry.
- 1 tsp cornstarch Why this? The "glue" that keeps the taco filling from being runny.
- 12 corn tortillas (15cm/6 inch) Why this? Corn provides the structural integrity and "snap" when fried.
- 2 cups sharp cheddar cheese, shredded Why this? High acidity cuts through the richness of the beef.
- 1/4 cup (60ml) neutral oil Why this? High smoke point oil (like canola) prevents acrid flavors.
| Ingredient | Science Role | Pro Secret |
|---|---|---|
| Ground Beef (80/20) | Fat Delivery | Don't drain the fat; it seasons the corn shells. |
| Cornstarch | Moisture Control | Mix with cold liquid first to avoid "clumping." |
| Chili Powder | Flavor Base | Bloom it in oil for 45 seconds to double the aroma. |
| Corn Tortilla | Structural Base | Heat them slightly before folding to prevent cracking. |
For a variation on the savory theme, some cooks like to experiment with different textures in their weeknight rotations. If you find yourself with extra beef, you might enjoy the hearty nature of a Beef Rigatoni Cheese Bake, which uses a similar flavor foundation but applies it to pasta for a different kind of comfort.
The Tools for Rapid Production
Efficiency in the kitchen starts with having the right gear staged and ready. Because this recipe moves fast once the "bloom" happens, you don't want to be hunting for a spatula while your spices are scorching.
- Cast Iron Skillet (25-30cm): This is non negotiable for the best crust. A stainless steel pan can work, but you'll need to be more aggressive with your oil usage to prevent sticking.
- Flat Edged Wooden Spoon or Metal Spatula: You need something sturdy to scrape the "fond" (the brown bits) off the bottom of the pan. This is where the flavor lives.
- Small Whisk and Bowl: For the cornstarch slurry. Using a fork often leaves lumps that turn into "jelly" spots in your taco meat.
- Kitchen Tongs: Essential for folding and holding the tortillas in the oil without burning your fingers.
- Paper Towel Lined Plate: To catch any excess oil after the tacos come out of the pan.
If you don't have a cast iron skillet, a heavy bottomed non stick pan can work, though you won't get quite the same mahogany sear on the beef. The key is to avoid "crowding" the pan.
If the meat is stacked too deep, it will release moisture faster than it can evaporate, and you'll end up boiling the beef in its own juices. This results in that "grey meat" look that lacks any real flavor.
Executing the High Heat Technique

This process is broken down into two distinct phases: creating the "glaze bound" beef and the "pan side" assembly.
Phase 1: The Beef Filling
- Place the large cast iron skillet over medium high heat for 3 minutes until a drop of water flicked onto it dances and evaporates instantly.
- Add the 1 lb (450g) ground beef. Break it into 4 or 5 large chunks but do not crumble it yet. Let it sit undisturbed for 3 minutes.
- Once a dark brown crust has formed on the bottom, use your spatula to break the meat into smaller crumbles.
- Add the 150g of diced onions. Cook for 2-3 minutes until the onions are soft and starting to brown at the edges.
- Stir in the minced garlic. Cook for only 30 seconds to avoid burning the delicate sugars in the garlic.
- Whisk the 1 tsp of cornstarch into the 1/2 cup of beef broth in a separate bowl until completely smooth.
- Push the meat to the edges of the pan, creating a hole in the center. Add the chili powder, cumin, paprika, onion powder, oregano, salt, and pepper into this hole.
- Let the spices sizzle in the rendered fat for 45-60 seconds until the aroma fills the room. This is the "bloom."
- Pour the broth cornstarch mixture over the spices and stir everything together. Simmer for 2 minutes until the liquid thickens into a glossy glaze that coats every piece of beef. Remove the meat from the pan and set aside.
Phase 2: The Crispy Assembly
- Wipe the skillet clean (or use a second pan) and add the 1/4 cup of neutral oil. Heat over medium heat.
- Lay a corn tortilla in the oil for 10 seconds to soften.
- Place 2 tablespoons of the beef mixture and a sprinkle of cheddar cheese on one half of the tortilla.
- Fold the tortilla over and press down gently with your spatula.
- Fry for 1-2 minutes per side until the shell is golden brown and rigid.
- Remove to a paper towel lined plate and repeat with the remaining tortillas.
Chef's Note: If you're cooking for a group, keep the finished tacos on a wire rack over a baking sheet in a 200°F (95°C) oven. This keeps them shatter crisp while you finish the batch. Never stack them, or the steam will ruin the crunch.
Troubleshooting Texture and Flavor Flaws
The most common issue with Crispy Ground Beef Tacos is the "soggy bottom" syndrome. This usually happens because the oil wasn't hot enough when the tortilla went in, or the beef filling had too much "free" liquid.
Why Your Shells Are Chewy
If your shells aren't snapping, the oil temperature likely dropped too low. Corn tortillas need to hit that "frying" stage immediately to drive out moisture. If they just "soak" in warm oil, they become heavy and grease laden.
Why Your Meat Is Dry
Surprisingly, "dry" meat often comes from using beef that is too lean (like 93/7). Without that 20% fat, there is nothing to carry the flavor of the spices. If you must use lean beef, add a tablespoon of olive oil when blooming the spices.
| Problem | Root Cause | Solution |
|---|---|---|
| Shell Cracks | Tortilla is too dry/cold | Microwave tortillas under a damp towel for 20 seconds before frying. |
| Blurry Spices | Spices were old or didn't bloom | Ensure spices "sizzle" in fat for at least 45 seconds before adding liquid. |
| Greasy Tacos | Oil wasn't hot enough | Wait until oil shimmers. Use a small piece of tortilla as a "test" fry. |
Common Mistakes Checklist
- ✓ Don't drain the fat: That 80/20 fat is what makes the spices taste "round" and helps fry the shell.
- ✓ Avoid "pre formed" shells: They are often stale and lack the structural integrity of a freshly fried tortilla.
- ✓ Preheat your pan: A cold pan is the enemy of the Maillard reaction.
- ✓ Starch is mandatory: Do not skip the cornstarch; it's the only way to get that "saucy but not runny" consistency.
- ✓ Don't overcrowd: Fry only 2 or 3 tacos at a time so the oil temperature stays consistent.
If you are looking for another high speed beef option that focuses on efficiency, my Fast Ground Beef Stir Fry is a great way to use that same 1 lb of beef in a completely different flavor profile when you're short on time.
Innovative Variations for Every Palate
While the classic "Tex Mex" style is the gold standard, you can easily pivot this recipe to fit different dietary needs or flavor preferences without losing that essential crunch.
- The Baked Method: If you're cooking for 10+ people, you can't fry them one-by-one. Brush both sides of the tortillas with oil, fill them, and stand them up in a baking dish (leaning against each other). Bake at 400°F (200°C) for 10-12 minutes. The texture is more "toasted" than "fried," but it's much faster for a crowd.
- The Lean Swap: If you prefer ground turkey or chicken, you must add 2 tablespoons of oil to the pan. Poultry lacks the saturated fat of beef, so it won't "fry" the spices or the shell on its own.
- Vegetarian "Beef": high-quality plant based crumbles work exceptionally well here because they are designed to mimic the fat release of beef. Follow the instructions exactly as written.
| Original Ingredient | Substitute | Why It Works |
|---|---|---|
| Ground Beef (1 lb) | Ground Turkey (93/7) | Lower calorie. Note: Requires adding extra oil to prevent a dry, "sawdust" texture. |
| Beef Broth (1/2 cup) | Vegetable Broth | Same liquid volume. Note: Slightly less savory depth; add a dash of soy sauce to compensate. |
| Sharp Cheddar | Pepper Jack | Melts similarly. Note: Adds a significant spicy kick from the jalapeño flecks. |
Adjusting the scale of this recipe is straightforward. If you are cutting it in half (for 2 people), use the full amount of spices but only half the broth and starch. If you are doubling it (for 8 people), do not double the salt immediately; start with 1.5x the salt and taste, as saltiness concentrates differently in larger batches.
Storing Your Tacos for Longevity
Tacos are notoriously difficult to store once assembled, but you can prep the components for maximum efficiency later in the week.
In the Fridge: Store the beef filling in an airtight container for up to 4 days. Keep the tortillas in their original packaging. When you're ready to eat, simply fry the shells fresh. Never store an assembled crispy taco in the fridge; it will become a soggy mess within an hour.
In the Freezer: The beef filling freezes beautifully for up to 3 months. Let it cool completely, then flat pack it in a freezer bag to save space. To reheat, thaw in the fridge overnight and hit it in a hot pan with a splash of water to loosen the glaze.
- - Onion Scraps
- Save the onion skins and garlic ends in a bag in your freezer to make a rich vegetable stock later.
- - Leftover Tortillas
- If you have 2 or 3 corn tortillas left over, cut them into triangles and fry them in the leftover taco oil to make homemade chips.
- - Beef Fat
- If you do decide to drain excess fat, don't throw it away. Use it to roast potatoes the next night for an incredible flavor boost.
The Best Sides to Serve
To round out the meal, you need acidity and freshness to cut through the richness of the fried beef.
- Cilantro Lime Slaw: Shredded cabbage tossed with lime juice and fresh cilantro provides a crunch that stays "awake" longer than lettuce.
- Pickled Red Onions: These take 5 minutes to make (vinegar, sugar, salt) and the bright pink color makes the plate pop.
- Smoky Black Beans: Simmer canned black beans with a bit of the leftover taco seasoning and a splash of the beef broth.
Comparison: Stovetop Frying vs Oven Baking
| Method | Time | Texture | Best For |
|---|---|---|---|
| Stovetop | 25 mins | Shatter crisp, oily, rich | Authentic flavor, small batches |
| Oven | 30 mins | Crunchy, dry, toasted | Healthy option, feeding 6+ people |
| Air Fryer | 20 mins | Very brittle, light | Single servings, ultra fast cleanup |
Kitchen Myths and Facts
There's a lot of "old wives' tale" advice when it comes to tacos, and most of it actually slows you down or ruins your results.
- Myth: You must drain all the fat from the beef for a "clean" taco.
- Fact: Fat is where the flavor molecules from the chili powder and cumin reside. Draining it all leaves the meat tasting like cardboard. The cornstarch glaze is what "holds" the fat so it doesn't leak out.
- Myth: You need to buy "taco shells" to make crispy tacos.
- Fact: store-bought shells are just stale tortillas that have been fried and sat in a warehouse. Frying a fresh corn tortilla for 60 seconds provides a vastly superior flavor and a more satisfying "snap."
- Myth: Searing meat "locks in the juices."
- Fact: Searing actually causes moisture to evaporate, but it creates the Maillard reaction (browning), which provides the savory depth. The "juiciness" in this recipe comes from the beef broth and cornstarch glaze, not the sear itself.
By following this high efficiency plan, you can turn a basic pound of ground beef into a meal that rivals any upscale "taco night" spread. The key is in the timing let the beef sear, bloom those spices, and don't be afraid of a little hot oil. That's where the magic happens. Happy cooking!

Recipe FAQs
Why is my taco shell soggy instead of crispy?
The oil temperature is likely too low, or your beef filling is too wet. Ensure the oil is hot before adding the tortilla, and make sure the beef broth mixture has reduced fully into a glaze so no excess liquid remains.
How to store leftovers for the best results?
Store the beef filling and tortillas separately. Keep the beef in an airtight container in the fridge for up to 4 days, then fry fresh shells only when you are ready to serve to prevent the filling from softening the crust.
Is it true I should avoid browning the meat too quickly?
No, this is a common misconception. You must let the ground beef sit undisturbed for 3 minutes over medium high heat to develop a deep, mahogany colored crust for maximum flavor.
How to get the most flavor out of the spices?
Sizzle the spices in the center of the skillet for 45-60 seconds. This blooming process releases the fat-soluble compounds in the chili powder and cumin, creating a much bolder flavor profile. If you enjoyed this technique of blooming spices, see how we achieve deep flavors in our Chicken Jollof Rice.
Can I freeze the beef mixture?
Yes, the filling freezes perfectly for up to 3 months. Allow the mixture to cool completely before transferring it to a flat packed freezer bag to save space and ensure even thawing.
How to achieve the perfect meat-to-cheese ratio?
Layer the cheese directly onto the hot beef inside the folded tortilla. Using 2 cups of sharp cheddar distributed across 12 tortillas allows the residual heat from the meat to melt the cheese perfectly while the shell crisps in the oil.
How to ensure the onion is fully cooked?
Sauté the diced onions in the rendered beef fat until translucent. This step happens immediately after browning the meat, allowing the onions to soften and fully absorb the savory juices before you add the spices and broth.
Crispy Ground Beef Tacos
Ingredients:
Instructions:
Nutrition Facts:
| Calories | 671 kcal |
|---|---|
| Protein | 38.3 g |
| Fat | 40.6 g |
| Carbs | 35.5 g |
| Fiber | 6.3 g |
| Sugar | 2.1 g |
| Sodium | 758 mg |
