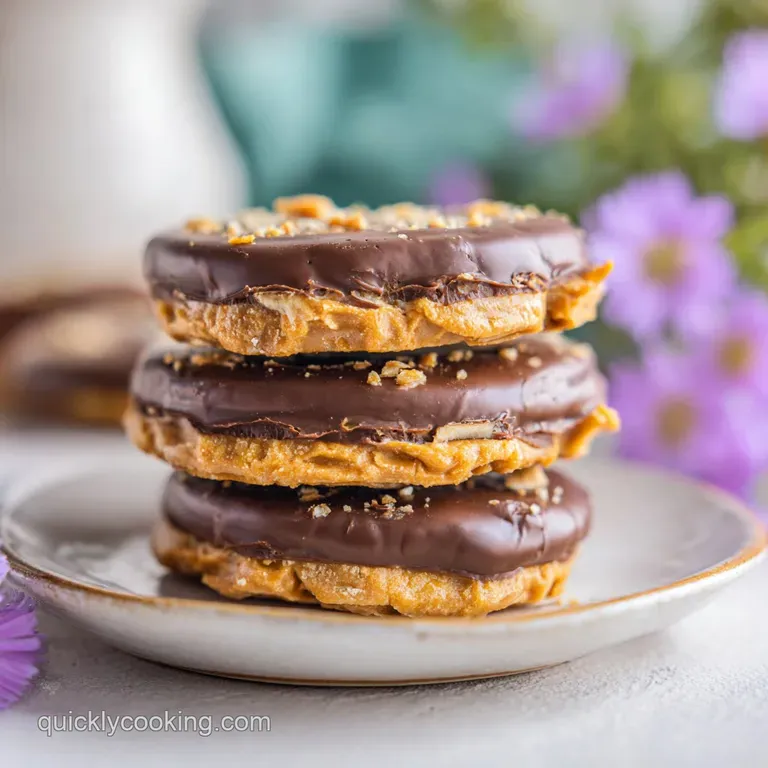
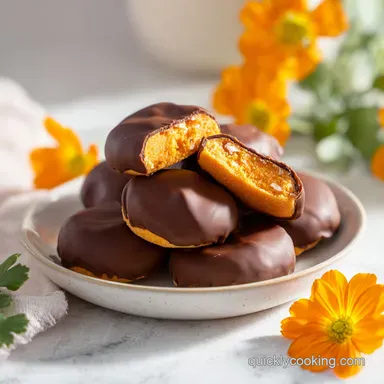
Butterfinger Balls: No Bake and Creamy
- Time:15 minutes active + 30 minutes chilling = 45 minutes total
- Flavor/Texture Hook: Shattering chocolate shell with a salty sweet peanut butter crunch
- Perfect for: Last minute holiday platters, game day snacks, or low effort meal prep treats
- Creating the Ultimate Butterfinger Balls at Home
- What Actually Makes the Centers Stay Crunchy
- Component Analysis and Texture Roles
- The Simple Grocery List and Smart Swaps
- Minimal Tools for a Clean Kitchen
- The Step-by-Step Path to Candy Perfection
- Solving Sticky Dough and Seized Chocolate Messes
- Adjusting the Batch for Parties or Cravings
- Busting Common Candy Making Misconceptions
- Keeping Your Treats Fresh and Using Scraps
- Flavor Combinations That Pair with Peanut Butter
- Recipe FAQs
- 📝 Recipe Card
Creating the Ultimate Butterfinger Balls at Home
The first time I tried to make a candy based truffle, I assumed I needed a professional pastry degree and a marble cooling slab. I spent an entire afternoon hovering over a double boiler, only to end up with a grainy, greasy mess that looked nothing like the photos.
It was a classic case of overthinking a simple pleasure. The myth that homemade candy must be "artisanal" or "sophisticated" to be good is exactly what keeps people from the joy of a 45 minute kitchen win.
You don't need fancy tempering machines or expensive gourmet chocolate to achieve that perfect "snap" when you bite into one of these. In fact, some of the best kitchen hacks come from using basic pantry staples in clever ways.
The aroma of toasted peanuts and warm chocolate filling the kitchen is enough to bring everyone to the counter before the chocolate has even had a chance to set. It's about that specific, airy crunch that only comes from real Butterfinger bars, balanced by the tang of cream cheese.
Honestly, forget everything you've heard about needing specialized candy making equipment. We are going for maximum flavor with minimum stress. This recipe is a staple in my house because it relies on high impact ingredients that do the heavy lifting for you.
We’re going to lean into the saltiness of the peanut butter to cut through the sugar, ensuring these aren't just sweet they're addictive. Let's get into the mechanics of why this specific combination works so well.
What Actually Makes the Centers Stay Crunchy
The biggest hurdle with no bake treats is the "soggy factor." If you mix candy into a wet base, it usually dissolves into a sticky goo within an hour. Here is why this specific method prevents that.
- Moisture Barrier: The fats in the creamy peanut butter and cream cheese coat the Butterfinger shards, creating a protective layer that keeps the candy from absorbing moisture.
- Starch Stabilization: Graham cracker crumbs act as tiny sponges, soaking up excess oils from the peanut butter so the balls hold their shape without becoming rock hard.
- Thermal Shock: The 20 minute freezer "flash chill" solidifies the fats instantly, making the balls sturdy enough to withstand being dunked in warm chocolate.
| Method | Total Time | Texture | Best For |
|---|---|---|---|
| Food Processor | 45 minutes | Sandy & Uniform | Speed and consistency |
| Hand Crushed | 55 minutes | Chunky & Rustic | Extra crunch lovers |
| Stand Mixer | 50 minutes | Ultra Smooth | Large holiday batches |
Using a food processor is my preferred shortcut because it creates a more "unified" dough. When the graham crackers and candy bars are pulverized into a sandy texture together, they distribute the flavor more evenly than if you were just folding in large chunks.
This ensures every single bite has that hit of toffee flavor without any one ball being a "dud."
Component Analysis and Texture Roles
Understanding what each part of the recipe contributes helps you troubleshoot on the fly. We aren't just tossing things in a bowl; we are building a structural masterpiece that happens to taste like a candy bar.
| Ingredient | Science Role | Pro Secret |
|---|---|---|
| Cream Cheese | Binding Agent | Use full fat for a cleaner "snap" in the center. |
| Graham Crackers | Structural Integrity | Pulse until fine; they prevent the peanut butter from "leaking." |
| Coconut Oil | Viscosity Modifier | This lowers the chocolate's melting point for a thinner, crisper shell. |
| Powdered Sugar | Moisture Absorber | Sift it first to avoid "sugar pockets" in the final dough. |
A common mistake I once made was using low-fat cream cheese. Don't even bother with it here. The higher water content in "light" versions will turn your dough into a puddle, and the chocolate will slide right off.
You need the full fat block to act as the structural "glue" that keeps the peanut butter from separating at room temperature.
The Simple Grocery List and Smart Swaps
You likely have most of this in your pantry already. This is a budget friendly recipe that doesn't demand a trip to a specialty grocery store. For the best results, stick to standard creamy peanut butter the "natural" oily kind can be too unpredictable for this specific dough.
- 2 cups Butterfinger bars, crushed (approx. 6 standard 1.9 oz bars)
- Substitute: Any honeycomb toffee style candy bar. Why this? The aerated peanut butter center provides the signature light crunch.
- 1 cup creamy peanut butter
- Substitute: SunButter for a nut free option (note the color change). Why this? Provides the fat base and essential salty sweet profile.
- 4 oz cream cheese, softened
- Substitute: Mascarpone for a richer, less tangy flavor. Why this? Acts as the stabilizer and binder for the dry crumbs.
- 1.5 cups powdered sugar, sifted
- Substitute: You can pulse granulated sugar in a blender, but the texture may be slightly grittier. Why this? Sweetens and dries out the dough for rolling.
- 1.5 cups graham cracker crumbs
- Substitute: Digestive biscuits or vanilla wafers. Why this? Neutral starch that provides structure without overpowering the candy.
- 12 oz semi sweet chocolate chips
- Substitute: Dark chocolate (60% cacao) for a more "adult" flavor profile. Why this? Melts predictably and sets firm at room temperature.
- 1 tsp coconut oil
- Substitute: Vegetable shortening or a small knob of butter. Why this? Thins the chocolate so the coating isn't too thick and clunky.
- 2 tbsp Butterfinger bits (reserved for garnish)
- Substitute: A sprinkle of flaky sea salt. Why this? Visual cue for what's inside and added texture on the shell.
Minimal Tools for a Clean Kitchen
The beauty of this recipe is that it’s a "dirty one bowl" situation. You don't need a massive array of gadgets to get this done. If you have a microwave and a fork, you’re basically a professional chocolatier already.
Chef's Tip: If you don't have a food processor, put the candy bars and graham crackers in a heavy duty gallon freezer bag and use a rolling pin. It’s a great way to get out some frustration while keeping your counters clean!
Focus on having a flat baking sheet that fits in your freezer. If your freezer is packed (like mine usually is), you can use a smaller plate and work in two batches. The "flash chill" step is the only non negotiable part of the process.
If the centers are warm, they will melt into the chocolate, and you'll end up with a swirl instead of a clean coating.
The step-by-step Path to Candy Perfection

- Pulse the graham crackers and Butterfinger bars in a food processor until they reach a sandy texture with some pea sized shards remaining. Note: Don't over process into a dust; those tiny shards provide the "shatter" texture we want.
- In a large mixing bowl, beat the softened cream cheese and creamy peanut butter together until completely unified and smooth.
- Gradually fold the sifted powdered sugar and the crushed Butterfinger/graham cracker mixture into the peanut butter base until a stiff, moldable dough forms.
- Scoop rounded tablespoons of the mixture and roll them between your palms to form 1 inch spheres. Place them on a baking sheet lined with parchment paper.
- Place the baking sheet in the freezer for exactly 20 minutes to firm up. Note: This is the "flash chill" that prevents the centers from disintegrating during the dipping process.
- In a microwave safe bowl, combine the chocolate chips and coconut oil. Heat in 30 second intervals, stirring between each, until the chocolate is completely fluid and glossy.
- Using a fork or dipping tool, submerge each chilled ball into the melted chocolate. Tap off the excess until the coating is thin and even, return to the parchment paper, and immediately garnish with reserved Butterfinger bits.
- Allow the chocolate to set completely in the refrigerator until the shell is hard and matte before serving.
Solving Sticky Dough and Seized Chocolate Messes
Even the simplest recipes can go sideways if the environment is too humid or if the ingredients aren't at the right temperature. If your dough feels more like a batter, it’s usually because the peanut butter was too warm or the cream cheese was overly melted.
Why Your Chocolate Coating Is Streaky or Thick
This usually happens if the chocolate is overheated or if there isn't enough fat to thin it out. Chocolate is temperamental; even a single drop of water can cause it to "seize" and turn into a gritty paste.
| Problem | Root Cause | Solution |
|---|---|---|
| Sticky Dough | Over softened cream cheese | Chill the dough for 15 mins before rolling. |
| Clumpy Chocolate | Water contamination | Keep all tools bone dry; add 1/2 tsp oil to smooth it out. |
| Balls Melting in Dip | Skipped the freezer step | Return balls to the freezer for 10 more minutes. |
If you find yourself struggling with the chocolate, try using a deep, narrow bowl rather than a wide, shallow one. This gives you more depth for dipping without needing to double the amount of chocolate.
Common Mistakes Checklist
- ✓ Sift the powdered sugar to prevent tiny white lumps in the peanut butter center.
- ✓ Ensure the cream cheese is truly at room temperature before mixing to avoid "cheesecake chunks."
- ✓ Use a fork to lift the balls out of the chocolate; the tines allow the excess to drip off easily.
- ✓ Don't overcrowd the freezer sheet - if the balls touch, they will freeze together and tear.
- ✓ Garnish immediately after dipping; once the chocolate sets, the bits won't stick.
Adjusting the Batch for Parties or Cravings
This recipe yields 34 balls, which is usually enough for a standard party platter, but sometimes you need to scale things up or down. If you're a fan of no bake treats, you might also like my Oreo Balls recipe which follows a very similar workflow.
Scaling Down (Making 17 balls): Halving this recipe is incredibly easy. Use exactly half of all ingredients. Since there are no eggs to split, you don't need any complex hacks. Just use a 2 oz portion of cream cheese and follow the same 20 minute chill time.
Scaling Up (Making 68+ balls): When doubling the recipe, keep your salt and spices at 1.5x rather than a full 2x to keep the flavor balanced. Work in batches for the dipping phase. If you have 60 balls sitting on the counter, the last 20 will be too warm by the time you get to them.
Keep half in the freezer while you dip the first half.
| Yield Goal | Butterfinger Quantity | Chocolate Needed | Prep Adjustment |
|---|---|---|---|
| Small Batch (17) | 3 bars | 6 oz | No changes needed |
| Standard (34) | 6 bars | 12 oz | Fits on one sheet |
| Party Size (68) | 12 bars | 24 oz | Work in two dip batches |
Busting Common Candy Making Misconceptions
One of the biggest myths in home kitchens is that you need a double boiler to melt chocolate safely. While a double boiler provides gentle heat, a microwave is perfectly fine if you are patient. The trick is the 30 second interval. If you try to do it all at once, the center will burn while the edges stay solid.
Another common misconception is that searing the chocolate or "tempering" is required for a good finish. For a no bake treat that lives in the fridge, a simple melt with coconut oil provides a beautiful, professional looking sheen without the stress of checking temperatures with a probe.
The coconut oil also gives it a softer bite so the chocolate doesn't shatter into a million pieces and fall off the ball when you take a bite.
Keeping Your Treats Fresh and Using Scraps
These treats are quite hardy because of the high fat and sugar content. They won't spoil quickly, but they can lose their "crunch" if they aren't stored correctly. If you have leftovers from a big dinner featuring Mississippi Meatballs, these make the perfect sweet ending.
Storage: Store Butterfinger Balls in an airtight container in the refrigerator for up to 2 weeks. Use parchment paper between layers to prevent them from sticking together.
Freezing: These freeze beautifully. You can keep them in a freezer safe bag for up to 3 months. I actually prefer eating them straight from the freezer for an extra firm snap!
Zero Waste Tip: If you have leftover melted chocolate and Butterfinger crumbs, don't throw them away! Stir the crumbs into the remaining chocolate, spread it thin on parchment paper, and let it set. You've just made "kitchen sink" bark that is just as good as the truffles themselves.
You can also use any broken graham cracker pieces as a base for a quick yogurt parfait the next morning.
Flavor Combinations That Pair with Peanut Butter
While these are incredible on their own, the salty sweet profile of a Butterfinger ball makes it a great companion for other flavors. If you are building a dessert board, think about contrast.
- Tartness: Pair these with fresh raspberries or green apple slices to cut through the richness.
- Bitterness: A strong cup of black coffee or a dark roast espresso balances the heavy sugar content perfectly.
- Salt: If you find them too sweet, a tiny pinch of Maldon sea salt on top of the chocolate shell before it sets changes the entire experience.
If you enjoy the rich, creamy texture of these, you'll definitely want to try a Dark Chocolate Ganache Tart for your next gathering. It uses a similar chocolate to fat ratio but delivers a more "sit down dessert" vibe. Between the crunch of the candy and the smoothness of the peanut butter, these balls are a guaranteed hit that will have everyone asking for the recipe and you can honestly tell them it only took 45 minutes of your day.

Recipe FAQs
Is it true I must freeze the balls for 20 minutes before dipping?
Yes, this is essential. The flash chill firms the centers so they hold their shape and do not disintegrate or melt into the warm chocolate during the dipping process.
How to prevent white lumps in the peanut butter dough?
Sift the powdered sugar before folding it into the mixture. Adding sifted sugar ensures a smooth, uniform texture throughout the centers without any powdery pockets.
Can I use a different fat instead of coconut oil for the chocolate coating?
No, the recipe relies specifically on coconut oil. It provides the perfect fluid consistency and glossy finish required for easy dipping, which you might find useful if you ever want to try a quick weeknight dinner involving specialized melting techniques.
Is it true that I should skip sifting the powdered sugar if I am in a hurry?
No, this is a common misconception. Skipping the sifting step almost always results in unpleasant white lumps in your finished peanut butter spheres.
How to get a clean finish without excess chocolate pooling at the bottom?
Use a fork to lift the spheres out of the melted chocolate. The tines allow the excess chocolate to drip back into the bowl, preventing a thick, uneven base.
Why did my garnish bits fall off the balls?
You waited too long to apply them. The garnish must be added immediately after dipping while the chocolate coating is still completely liquid.
How to ensure the cream cheese blends perfectly into the peanut butter?
Ensure the cream cheese is at room temperature before mixing. If it is too cold, you will end up with small chunks of cheese in your dough that won't smooth out during the beating process.
Easy No Bake Butterfinger Balls
Ingredients:
Instructions:
Nutrition Facts:
| Calories | 192 kcal |
|---|---|
| Protein | 3.2 g |
| Fat | 11.2 g |
| Carbs | 21.8 g |
| Fiber | 1.1 g |
| Sugar | 17.4 g |
| Sodium | 98 mg |
