Bunny Quesadillas: Crispy and Golden
- Time: Active 15 minutes, Passive 0 minutes, Total 25 minutes
- Flavor/Texture Hook: Shatter crisp golden tortilla with a molten, savory chicken center
- Perfect for: Stress free Easter brunch or a whimsical kid friendly weeknight dinner
- Master the Art of Crafting Bunny Quesadillas
- Essential Performance Metrics for Success
- Selecting the Best Components for Flavor
- Tools to Achieve the Perfect Crunch
- Executing the Perfect Golden Sear
- Solving Common Structural Integrity Issues
- Creative Variations for Every Palate
- Keeping Your Leftovers Crispy
- Perfect Side Dishes and Dips
- Kitchen Myths Debunked
- CRITICAL Sodium Warning
- Recipe FAQs
- 📝 Recipe Card
Master the Art of Crafting Bunny Quesadillas
You know what drives me nuts? Those "perfect" social media snacks that require a 3D printer and a degree in structural engineering just to feed a toddler. People always assume you need a specific, expensive bunny shaped mold to make Bunny Quesadillas look decent, but that is a total myth.
Honestly, I used to be the person buying every single festive gadget at the store, only for them to sit in my junk drawer gathering dust. Forget that. All you need is a standard cereal bowl and a sharp knife to get these shapes right.
The secret to a successful festive dish isn't about having the right tools, it's about understanding how the ingredients behave under pressure. When we are building something with "ears" and "heads," we aren't just making a sandwich; we are building a structure.
I remember my first attempt at this I didn't use enough "glue" (the cheese), and the ears literally slid off the bunny's head the moment I tried to flip it. It was a tragedy of molten cheddar. But we have fixed that logic now, so yours will come out looking like a masterpiece every time.
We are going for a mahogany colored finish here. Not a pale, sad yellow, and certainly not a charred black. We want that specific sizzle that tells you the cheese is melting into the tortilla fibers, creating a bond stronger than most friendships.
It is fast, it is budget friendly, and it actually tastes like a real meal instead of just a cute gimmick. Let's get into the mechanics of why this works so well.
Essential Performance Metrics for Success
Protein Bonding: As the cheese shreds heat up, the proteins denature and tangle with the starch in the tortilla, creating a structural "seal" at the edges.
Capillary Action: Brushing oil onto the tortilla rather than pouring it into the pan ensures a micro thin layer of fat that fries the surface evenly without making it heavy.
Steam Release: Using finely diced chicken ensures there are no large gaps for steam to get trapped, which is the main cause of those annoying soggy spots.
Maillard Reaction Control: Keeping the heat at a steady medium allows the sugars in the flour tortilla to brown deeply before the cheese separates or becomes greasy.
| Method | Cook Time | Texture | Best For |
|---|---|---|---|
| Stovetop | 5-6 minutes | Shatter crisp edges | Maximum crunch and speed |
| Oven (180°C) | 10-12 minutes | Evenly toasted | Batch cooking for large groups |
| Air Fryer | 4-5 minutes | Very dry and flaky | Individual servings |
Choosing the right method depends on how many bunnies you are herding at once. If you are just doing one or two, the skillet is your best friend because you can hear the sizzle and monitor the color in real time.
If you are feeding a whole neighborhood of kids, the oven is the way to go, though you might sacrifice that specific buttery crisp texture that only a hot pan provides.
Selecting the Best Components for Flavor
| Component | Science Role | Pro Secret |
|---|---|---|
| Flour Tortillas | Flexible starch base | Use room temperature ones to prevent cracking during the cutting phase |
| Sharp White Cheddar | High protein binder | Grate it yourself from a block for a smoother, less grainy melt |
| Monterey Jack | High moisture fat | This provides the "stretch" and prevents the filling from drying out |
| Avocado Oil | High smoke point fat | Brushing it on prevents the tortilla from absorbing too much oil and getting floppy |
I cannot stress this enough: do not buy the pre shredded cheese in a bag. It is coated in potato starch or cellulose to keep the shreds from clumping, which is great for the bag, but terrible for your Bunny Quesadillas.
That starch prevents the cheese from fusing together properly, and you need that fusion to keep the bunny ears attached to the head. Trust me, five minutes with a box grater makes a world of difference.
For the base, we are using 8 large flour tortillas. These are the canvas for our art. You'll also need 2 tbsp neutral avocado or grapeseed oil for that golden finish.
For the "glue" and flavor, grab 225g sharp white cheddar and 115g Monterey Jack cheese. The cheddar gives us the sharp punch, while the Jack gives us the gooey melt.
For the filling and face, we need 75g rotisserie chicken breast, finely diced. Make sure it is tiny! Why this? Small pieces ensure the tortilla lays flat and the face doesn't look lumpy. You will also need 1 tsp mild taco seasoning for that classic flavor.
For the features, keep 4 black beans (halved), 4 small triangles of red bell pepper, and 1 bunch fresh chives on hand for whiskers.
Tools to Achieve the Perfect Crunch
You don't need a specialized kit, but a few specific items make this 100% easier. A 3 inch circular cutter is great for the heads, but if you don't have one, a sturdy drinking glass or a small cereal bowl works perfectly. You just press down and run a paring knife around the edge.
Speaking of knives, make sure yours is sharp. A dull knife will tear the tortilla fibers instead of slicing them, leading to frayed ears that look more like zombies than bunnies.
A wide spatula is non negotiable. Since the bunny shape is wider than a standard triangle, you need a tool that can support the "ears" and the "head" at the same time during the flip. If your spatula is too small, the ears will hang off the side and likely snap or fold over when you try to turn it.
A non stick skillet is also your best friend here to ensure that "cheese glue" stays with the tortilla and doesn't get left behind on the pan.
Chef's Tip: If your tortillas feel a bit stiff or dry, pop them in the microwave for 10 seconds under a damp paper towel. This makes the starch more pliable so they won't snap when you are cutting out the long, delicate ear shapes.
Executing the Perfect Golden Sear
For a Structurally Sound Shape
Place two tortillas on top of each other. Use your 3 inch circular cutter to press out the 'head' from the center. Now, don't throw away those scraps! Use a paring knife to cut two long ear shapes from what is left. Repeat this until you have all 4 servings ready to go.
Note: Cutting both layers at once ensures the top and bottom match perfectly.
For the Bunny Structure
Lay one circular head and two ears on a flat surface. Position the ears so they are slightly tucked under the head. This is a vital architectural move. By tucking them under, the weight of the head helps hold them in place while the cheese begins to melt and fuse the pieces together into one solid unit.
For No Leak Filling Integrity
Apply a thin layer of shredded cheese at the very edges of the head and ears. This is your sealant. Place the diced chicken and the rest of the cheese in the center, then sprinkle that taco seasoning over the top. Keep the filling away from the very edge of the ears so it doesn't spill out and burn in the pan.
For the Molten Filling
Place the matching tortilla head and ears on top of your cheese and chicken pile. Lightly brush the exterior with the neutral oil. I prefer using a pastry brush because it gets into the "nooks and crannies" of the ear joints without moving the tortillas around too much.
Phase 3: The Golden Sear
Heat your large non stick skillet over medium heat. Carefully and I mean carefully—transfer the bunny assembly to the pan. You might want to use your hand to support the head while the spatula supports the ears during the move.
The Mahogany Finish
Cook for 2-3 minutes per side. You are looking for a mahogany colored finish. This is where the flavor lives! Flip it carefully with that wide spatula. You should hear a distinct "crack" or "crunch" sound when the spatula slides under the toasted tortilla. If it sounds soft, give it another 30 seconds.
The Finishing Touch
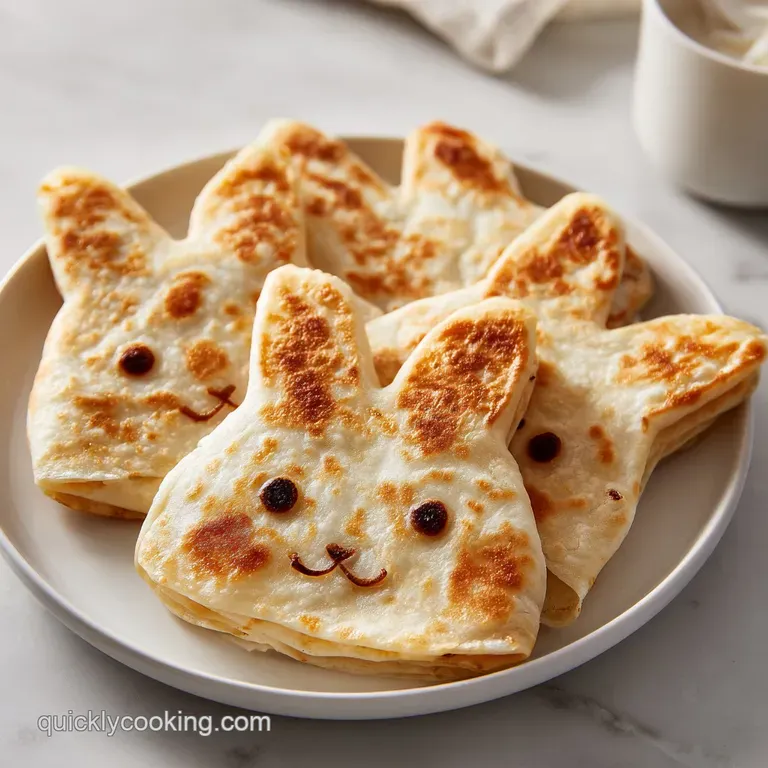
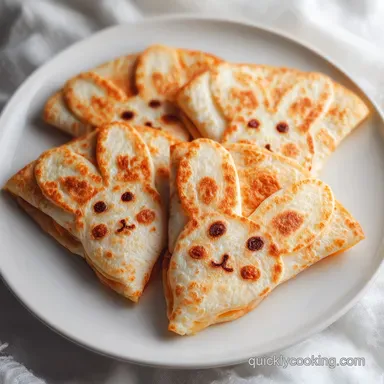
Remove from the heat and move the bunny to a plate. Now for the fun part: decoration. Use the black bean halves for eyes, the red pepper triangles for noses, and the chive snips for whiskers.
Do this while the tortilla is still hot so the "face" sticks slightly to the residual melted cheese or the warm oil on the surface.
Solving Common Structural Integrity Issues

The Ears Falling Off
This is the most common heartbreak in the Bunny Quesadillas world. Usually, it happens because the "seal" wasn't strong enough. If the ears detach, it is because there wasn't enough cheese at the junction where the ear meets the head. The cheese acts as a bridge.
If the bridge is too thin, it snaps under the weight of the flip.
The Tortilla is Soggy, Not Crispy
If your bunny feels limp, you either used too much oil or the pan wasn't hot enough. A cold pan allows the oil to soak into the flour rather than frying the surface. Also, make sure your rotisserie chicken isn't dripping with excess juice. Pat it dry with a paper towel if it seems particularly moist before you dice it.
| Problem | Root Cause | Solution |
|---|---|---|
| Ears won't stick | Not enough cheese glue | Add a "bridge" of cheese shreds over the ear head joint |
| Tortilla burns fast | Heat is too high | Lower heat to medium and use oil with a high smoke point |
| Filling is cold | Diced chicken too large | Dice chicken into 5mm cubes for faster heat penetration |
Maintaining the right temperature is key. If you see smoke, you have gone too far. If you don't hear a sizzle when the tortilla hits the pan, you started too soon. It is all about that middle ground where the cheese turns into a molten lava that binds everything together.
Common Mistakes Checklist
- ✓ Don't use pre shredded cheese; the anti clumping starch ruins the "glue" effect.
- ✓ Always tuck the ears slightly under the head for better support.
- ✓ Pat the chicken dry to prevent internal steam from ruining the crunch.
- ✓ Use a wide spatula; a small one will cause the bunny to "break its neck" during the flip.
- ✓ Brush the oil on the tortilla, don't pour it in the pan, to ensure an even, thin coat.
Creative Variations for Every Palate
If you want a Protein Packed Breakfast version, you can swap the chicken for very finely scrambled eggs and tiny bits of crispy bacon. Just make sure the eggs are "dry" scrambles if they are too runny, they will leak out the sides and turn your bunny into a messy yellow puddle.
The structural rules remain the same: cheese on the bottom, filling in the middle, cheese on top.
For a gluten-free Option, you can use almond flour or cassava flour tortillas. Be warned, though: these are often more fragile than standard flour tortillas. You will definitely need to warm them up before cutting to prevent them from snapping like a cracker.
They also tend to brown much faster, so keep a very close eye on the pan and maybe drop the heat to medium low.
| Target | Swap | Flavor Impact |
|---|---|---|
| Vegetarian | Finely chopped mushrooms | Adds earthy umami; sauté them first to remove moisture |
| Spicy | Pepper Jack cheese | Adds a significant kick but melts just as well as Monterey Jack |
| dairy-free | Vegan "Mozzarella" | Note: Doesn't "glue" as well; might need a toothpick for ears |
If you are feeling extra creative, you can turn these into "Garden Bunnies" by adding a thin layer of finely chopped spinach inside. Just remember the golden rule of quesadilla building: any vegetable you add must be as dry as possible. Water is the enemy of the crunch.
Keeping Your Leftovers Crispy
Storage Guidelines You can keep these in the fridge for up to 3 days. However, the microwave is the absolute enemy of a leftover quesadilla. It will turn that beautiful mahogany crust into a rubbery, sad mess. Instead, use a dry skillet over medium heat for about 2 minutes per side.
This revives the "cheese glue" and brings back that shatter crisp texture we worked so hard for.
Freezing Instructions Yes, you can freeze these! I recommend freezing them before you cook them but after you assemble them. Lay them flat on a baking sheet to flash freeze for an hour, then stack them with parchment paper in between and put them in a freezer bag.
They will stay good for up to 2 months. When you're ready to eat, you can cook them straight from frozen just add about 2 extra minutes per side on a lower heat so the inside thaws before the outside burns.
Zero Waste Tips Don't you dare throw away those tortilla scraps! Toss them in a bowl with a little oil, salt, and cinnamon sugar, then bake them at 180°C for 5-8 minutes. They make the best "chef's snack" while you're waiting for the main bunnies to cook.
Alternatively, chop them into small squares and fry them to make homemade croutons for a salad later in the week.
Perfect Side Dishes and Dips
Every bunny needs a garden to play in. I love serving these with a "Garden Dip" basically just a bowl of guacamole topped with a few sprigs of cilantro to look like grass. It adds a fresh, creamy contrast to the salty, crispy quesadilla.
If you want to keep the theme going, a side of "baby carrots" (actual carrots, not the bagged kind) roasted with a little honey and cumin ties the whole Easter vibe together.
For those who want a bit more heft, a side of black bean salad with corn and lime juice provides a bright acidity that cuts through the richness of the double cheese filling. The goal is to balance the "molten" nature of the bunny with something crisp and fresh.
- The "Garden" Dip: Guacamole with "grass" made of chive snips.
- High Protein Side: A small scoop of seasoned black beans and corn.
- Quick Crunch: Radish slices and cucumber rounds to mimic garden stones.
Kitchen Myths Debunked
One of the biggest myths in Mexican inspired cooking is that you need a huge amount of oil or butter to get a "fried" texture. In reality, too much fat makes the tortilla soggy because it saturates the flour.
A thin, brushed on layer of neutral oil actually conducts heat more efficiently, leading to a crispier result with less grease.
Another misconception is that "searing meat seals in the juices." While searing the chicken adds flavor, the real reason we use rotisserie chicken in Bunny Quesadillas is because it's already cooked and stable.
The "juices" in a quesadilla mostly come from the melting fat of the cheese, not the meat itself. By using pre cooked chicken, we avoid the steam release that happens when raw meat cooks, which is what actually prevents the tortilla from getting crispy.
Finally, don't believe the idea that you have to flip a quesadilla multiple times. The more you move it, the more likely the bunny ears are to detach. One confident flip is all you need.
Wait for those visual cues the mahogany color and the smell of toasted grain before you even think about sliding that spatula underneath. Confidence is the most important ingredient in the kitchen!

CRITICAL Sodium Warning
1420 mg 1420 mg of sodium per serving (62% 62% of daily value)
The American Heart Association recommends limiting sodium intake to no more than 2,300mg per day, with an ideal limit of under 1,500mg for most adults.
Tips to Reduce Sodium in Your Recipe
-
Low-Sodium Cheese Swap-15%
Replace half of the sharp white cheddar and Monterey Jack cheese with low-sodium versions or a blend that includes reduced sodium options. This is a significant contributor to the overall sodium.
-
Rinse Rotisserie Chicken-10%
Rinse the finely diced rotisserie chicken breast under cool water before dicing. Rotisserie chickens are often brined, which adds a considerable amount of sodium. Pat it dry before adding to the recipe.
-
Homemade Taco Seasoning-5%
Prepare your own taco seasoning using spices like chili powder, cumin, paprika, garlic powder, and onion powder. This allows you to control the salt content completely, as store-bought versions are often high in sodium.
-
Amplify Natural Flavors
Use fresh herbs like chives generously. You can also add other fresh aromatics like cilantro or a squeeze of lime juice to enhance flavor without relying on salt.
Recipe FAQs
What does a birria quesadilla look like?
This recipe does not feature birria. Bunny quesadillas are shaped like rabbit heads with distinct ears, featuring a mahogany colored tortilla exterior and molten white cheddar and Monterey Jack filling.
What are different types of quesadillas?
Quesadillas range from simple folded flour tortillas to elaborate shaped creations like these bunny designs. While some recipes vary by filling, this version strictly uses rotisserie chicken, taco seasoning, and a specific blend of white cheddar and Monterey Jack.
How to make a quesadilla shape?
Use a 3 inch circular cutter to press out the head from the center of the tortilla, then use a paring knife to hand cut two long ear shapes from the scraps. Position the ears slightly tucked under the head on a flat surface before applying the cheese sealant and top layer.
What are some common quesadilla mistakes?
Using pre-shredded cheese is a major error because the anti clumping starch prevents the cheese from acting as a proper glue. Other mistakes include failing to tuck the ears under the head for support or using a small spatula, which causes the bunny to break during the flip.
How to prevent the bunny from breaking when flipping?
Use a wide spatula to support the entire bunny assembly during the flip. A small tool lacks the surface area required to keep the ears and head connected, which often results in the bunny "breaking its neck."
Is it true I can use pre-shredded cheese to save time?
No, this is a common misconception. You must freshly shred the white cheddar and Monterey Jack, as the starch coating on pre-shredded bags prevents the cheese from melting into the essential "glue" that holds the bunny together.
How to achieve the perfect mahogany finish?
Brush the avocado or grapeseed oil directly onto the tortilla surface rather than pouring it into the skillet. This ensures an even, thin coat that allows the tortilla to reach a perfect mahogany colored finish in just 2-3 minutes per side over medium heat.
Festive Bunny Quesadillas
Ingredients:
Instructions:
Nutrition Facts:
| Calories | 848 kcal |
|---|---|
| Protein | 37.6 g |
| Fat | 46.1 g |
| Carbs | 72.4 g |
| Fiber | 3.8 g |
| Sugar | 3.2 g |
| Sodium | 1420 mg |
