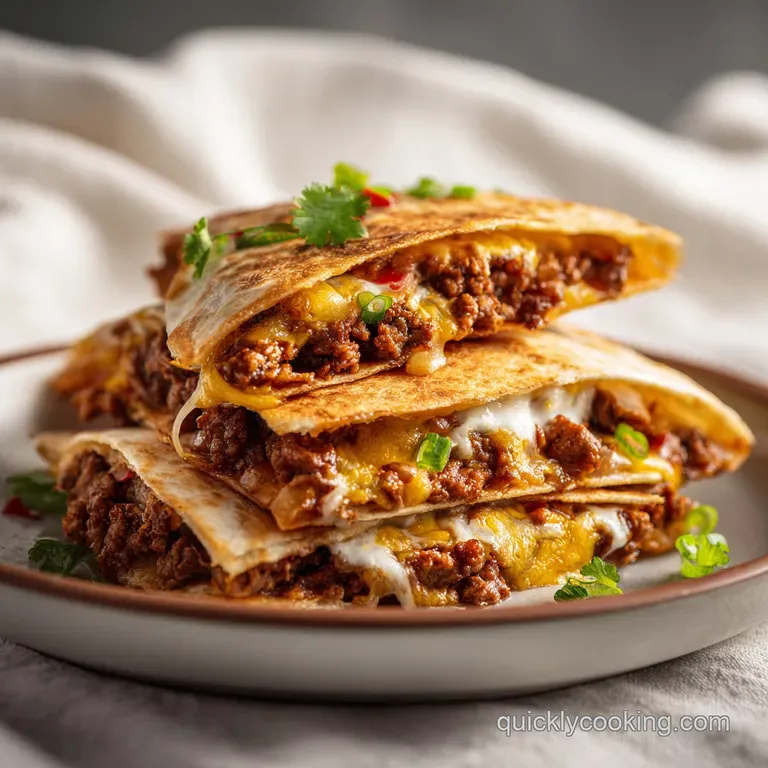
Smashburger Quesadillas: Crispy and Beefy
- Time: Active 10 minutes, Passive 10 minutes, Total 20 minutes
- Flavor/Texture Hook: Shatter crisp beef edges with velvety melted American cheese
- Perfect for: High efficiency weeknight dinners or budget smart meal prep
Create Best Smashburger Quesadillas
Have you ever noticed how the best part of a burger isn't the thick, center cut of meat, but those tiny, crispy bits that hang off the edge of the patty? That's the result of over high heat contact, and it's exactly what we're chasing here.
Most people think you need a fancy grill to get that result, but I've found that a simple cast iron skillet and a heavy spatula are all you really need to transform cheap ground beef into something extraordinary.
I remember the first time I tried making these. I was tired, the fridge was nearly empty, and I didn't have any buns. I had some tortillas and a pound of 80/20 beef. I decided to smash the meat directly onto the tortilla, thinking it might save time.
What I didn't expect was how the tortilla would act as a heat shield, allowing the beef to sear at an incredibly high temperature without drying out the top side. It was a revelation in efficiency and flavor.
This cheeseburger quesadilla recipe is about more than just convenience, though. It's about the physics of the smash. When we press that meat thin, we increase the surface area that hits the hot metal. This creates a mahogany colored crust that is packed with concentrated savory notes.
We're skipping the fluff and focusing on what actually makes food taste good, heat, salt, and fat.
Essential Recipe Details
Efficiency is the name of the game when you're hungry and on a budget. This quick smashburger quesadillas method ensures you spend less time hovering over the stove and more time eating.
We use a high fat beef blend because it provides its own cooking oil, meaning you don't need to waste money on extra butter or expensive sprays. The 80/20 ratio is the sweet spot for flavor and texture.
Heat Intensity: Your skillet needs to be screaming hot. If it isn't wisps of-smoke hot, you'll end up steaming the meat instead of searing it. I usually let my cast iron sit on medium high for at least three to four minutes before the first beef ball even touches the surface.
This ensures immediate crust formation, which is the hallmark of any homemade smashburger quesadillas.
| Stovetop Method | Oven Method | Why Stovetop Wins |
|---|---|---|
| Direct over high heat contact | Indirect ambient heat | Creates the signature "shattered" beef edges |
| 2-3 minutes per side | 12-15 minutes total | Saves over 10 minutes of active cooking time |
| Instant visual feedback | Hidden behind a door | You can see exactly when the cheese reaches peak melt |
The difference between a soggy tortilla and a crispy one often comes down to the moisture in your toppings. That’s why we dice our onions finely and use dill pickle chips that have been patted dry. We want the fat from the beef to fry the tortilla, not the water from the vegetables to steam it.
Trust me, that small step of drying your pickles makes a world of difference in the final crunch.
Why This Method Wins
There is a lot of talk about how to get the "perfect" burger, but much of it is just noise. To make the best smashburger quesadillas, we rely on a few specific mechanical triggers that happen when heat meets protein.
- Conductive Searing: Pressing the beef thin forces the proteins into direct contact with the hot iron, accelerating the browning process.
- Tortilla Steam Shield: The flour tortilla sits on top of the raw meat, trapping escaping moisture and using it to gently "steam cook" the top of the patty while the bottom fries.
- Fat Cap Frying: As the 80/20 beef renders, the fat leaks out and coats the bottom of the tortilla once flipped, effectively deep frying the bread for a shatter crisp texture.
- Capillary Action: The loose packed beef balls allow the salt and spices to penetrate the interior of the meat more quickly than a tightly packed patty would.
By understanding these few points, you can stop guessing and start cooking with precision. We aren't just making a ground beef quesadilla recipe, we're engineering a specific texture profile that balances the soft, pillowy tortilla with the gritty, salty crunch of the beef.
The Critical Components
When you're working with a budget smart mindset, every ingredient has to pull its weight. We don't use fillers or expensive seasonings. We use high impact basics that deliver maximum results for minimal cost.
| Ingredient | Science Role | Pro Secret |
|---|---|---|
| 80/20 Ground Beef | Provides fat for frying | Keep it cold until the second it hits the pan |
| Flour Tortillas | Structural moisture barrier | Use "soft taco" size for the best meat to carb ratio |
| American Cheese | High moisture emulsifier | It contains sodium citrate which keeps the melt silky |
| Smoked Paprika | Adds "flame grilled" aroma | Toast it in the sauce to wake up the oils |
- 1 lb ground beef (80/20 blend)
- Why this? The fat renders out to fry the tortilla and keep the meat juicy.
- 1 tsp kosher salt
- Why this? Essential for denaturing proteins and creating that savory crust.
- 1/2 tsp cracked black pepper
- Why this? Provides a sharp contrast to the rich, fatty beef.
- 1/2 tsp garlic powder
- Why this? Adds a savory depth without the risk of burning fresh garlic.
- 4 large flour tortillas
- Why this? Large ones allow for a full fold without losing the fillings.
- 1 cup sharp cheddar cheese, shredded
- Why this? Provides the punchy, aged flavor that American cheese lacks.
- 4 slices American cheese
- Why this? Acts as the "glue" that keeps the quesadilla together.
- 1/2 cup white onion, finely diced
- Why this? Adds crunch and a sharp bite to cut through the fat.
- 1/2 cup dill pickle chips
- Why this? Acidity is required to balance the heavy salt and grease.
- 1/4 cup mayonnaise
- Why this? The fat rich base for our signature burger sauce.
- 1 tbsp yellow mustard
- Why this? Provides the classic tang associated with diner style burgers.
- 1 tbsp sweet pickle relish
- Why this? Adds a tiny bit of sweetness and texture to the sauce.
- 1/2 tsp smoked paprika
- Why this? Mimics the flavor of a charcoal grill in a standard kitchen.
If you find yourself with extra tortillas, you can actually use them for other creative snacks. For example, check out my Festive Bunny Quesadillas for a fun twist that uses similar folding techniques. It’s a great way to use up those leftover flour wraps.
Tools for Speed
To get this cheesy smash burger quesadillas experience right, you need tools that can handle high heat and heavy pressure. A flimsy plastic spatula isn't going to cut it here. You need something that can really put the weight of your arm behind the smash.
- Cast Iron Skillet: This is non negotiable for the best sear. It holds heat better than stainless steel or non stick, which would cool down too much when the cold meat hits the pan.
- Heavy Duty Spatula: Look for a metal one with no slots. If it has slots, the meat will squeeze through them instead of flattening out.
- Burger Press (Optional): If you make these often, a cast iron press is a great investment for even pressure.
- Small Mixing Bowl: For the sauce.
- Chef's Knife: For that fine dice on the onions.
Chef's Tip: If you don't have a burger press, use a second smaller heavy pan or even a sturdy brick wrapped in foil to press down on the spatula. The more pressure you apply in those first 10 seconds, the better the crust will be.
Simple Preparation Steps

Right then, let's get into the actual cooking. We have 10 minutes of prep and 10 minutes of cook time. We are going to move fast, so have everything laid out before you turn on the burner. Efficiency is about eliminating the "where is the salt?" moments.
- Whisk the sauce. In a small bowl, combine the mayonnaise, yellow mustard, sweet pickle relish, and smoked paprika. Note: Mixing this first allows the flavors to meld while you prep the meat.
- Portion the beef. Divide your 1 lb of beef into four 4 ounce balls. Note: Keep them loose; do not pack them into tight meatballs or they won't smash easily.
- Season the meat. Sprinkle the salt, pepper, and garlic powder over the beef balls.
- Heat the pan. Get your cast iron skillet over medium high heat. Wait until you see a faint wisp of smoke.
- The Smash. Place one beef ball in the pan, then immediately put a tortilla on top.
- Apply pressure. Press down hard with your spatula for 10 seconds until the beef is paper thin and reaches the tortilla edges.
- Sear the base. Cook for 2-3 minutes until the edges of the beef are dark brown and crispy.
- The Flip. Slide the spatula under the beef and flip the whole thing over so the tortilla is now touching the pan.
- Layer the fillings. Immediately add one slice of American cheese, a sprinkle of cheddar, onions, and pickles.
- Fold and finish. Fold the tortilla in half until the cheese is bubbling and the tortilla is golden brown.
Repeat this for the remaining three portions. If you have a large enough flat top griddle, you can do two at a time to save even more time. The key is that 2-3 minute window of over high heat contact. Don't be tempted to peek; let that crust build!
Solving Common Issues
Even the most straightforward easy smashburger quesadillas can go sideways if the heat or timing is off. The most common complaint is that the meat doesn't stick to the tortilla, or it falls out during the flip. Usually, this is because the beef was too cold or the pan wasn't hot enough to create an immediate "grip."
Beef Separating From Tortilla
If your beef patty is sliding around under the tortilla, you probably didn't press hard enough or the beef was too lean. The 80/20 fat content acts like a glue as it renders. Ensure you are using a heavy duty spatula and applying consistent pressure across the entire surface of the tortilla during the initial 10 seconds.
The Tortilla Is Burning
If the tortilla is getting dark before the meat is cooked, your heat is likely too high or you're using a tortilla with high sugar content. Lower the flame slightly, but only after the initial smash. You want that first hit of heat to be high, then you can modulate it down to medium to finish the melting process.
| Problem | Root Cause | Solution |
|---|---|---|
| Soggy Tortilla | Too much moisture in toppings | Pat pickles dry and dice onions very fine |
| Grey Meat (No Crust) | Pan wasn't hot enough | Wait for the smoke point before adding beef |
| Cheese Not Melting | Tortilla folded too early | Add cheese immediately after flipping and wait 30 seconds before folding |
One thing I've learned from my own mistakes: don't overcrowd the pan. If you try to jam two large tortillas into a 10 inch skillet, the edges will curl up and won't get that direct contact with the heat. Cook them one at a time if you have to; it only takes 3 minutes per burger.
Common Mistakes Checklist
- ✓ Never use extra lean beef (90/10 or 93/7); it will be dry and won't sear well.
- ✓ Don't move the tortilla once you've smashed it; let it sit to build the crust.
- ✓ Avoid using cold cheese; let it sit at room temp for 10 minutes for a faster melt.
- ✓ Pat your pickles and onions dry with a paper towel to prevent steam.
- ✓ Use a metal spatula; plastic will melt or flex too much during the smash.
Smart Dietary Swaps
We are focused on a budget smart approach, but that doesn't mean you can't adapt this to your needs. If you're looking for a lighter version or have dietary restrictions, there are several ways to modify this cheeseburger quesadilla recipe without losing the soul of the dish.
- Ground Turkey: You can use turkey, but you'll need to add a teaspoon of oil to the pan since it's leaner than beef.
- gluten-free: Swap the flour tortillas for large corn tortillas or gluten-free wraps. Note that corn tortillas are less flexible and may crack when folding.
- Low Carb: Use "carb cutter" or keto friendly tortillas. These often brown faster than regular flour versions, so keep an eye on the heat.
- Vegetarian: Use a plant based ground "meat" and follow the same smash technique. Some brands actually sear quite well.
| Original Ingredient | Substitute | Why It Works |
|---|---|---|
| 80/20 Ground Beef | Ground Turkey (93/7) | Lower calorie. Note: Add 1 tsp oil to prevent sticking. |
| Flour Tortilla | Corn Tortilla | gluten-free. Note: Texture will be more brittle and less chewy. |
| American Cheese | Vegan Cheddar Slices | dairy-free. Note: Takes longer to melt; cover pan with a lid. |
If you are looking for more ways to use tortillas in a budget friendly way, check out some other ground beef quesadilla recipes that focus on different flavor profiles like taco or BBQ. The technique of smashing is versatile enough to work with many different seasonings.
Storing Your Leftovers
Smashburger quesadillas are definitely best eaten fresh, straight from the pan when the edges are still at their peak crunch. However, life happens, and sometimes you have leftovers. The goal with storage is to prevent the tortilla from becoming a soggy mess.
- Fridge
- Store in an airtight container for up to 3 days. Place a piece of paper towel in the container to absorb any rising moisture.
- Freezer
- Wrap individual quesadillas in foil, then place in a freezer bag. They will keep for about 2 months.
- Zero Waste Tip
- If you have leftover beef and onions but no tortillas, crumble the cooked meat over a bowl of rice or a salad. The "smash" crust is still delicious even when it's not in a quesadilla.
To reheat, avoid the microwave at all costs. It will turn the tortilla into rubber. Instead, throw the quesadilla back into a dry skillet over medium heat for 2 minutes per side. This will re crisp the exterior and melt the cheese through to the center.
If you're in a real rush, an air fryer at 350°F (180°C) for 3-4 minutes works wonders.
Serving Your Creation
Presentation might not seem important for a 20 minute meal, but cutting these into triangles makes them much easier to dip into that signature sauce. I usually serve these with a side of extra pickles or a simple slaw. Since this is a high efficiency meal, don't feel like you need a complex side dish.
If you want to go the extra mile, a side of crispy fries or even some simple potato chips provides the perfect salt on-salt experience. The acidity in the sauce is really the star here, so make sure you don't skip the relish or the mustard in the prep phase.
Decision Shortcut: If you want Maximum Crunch, use a cast iron skillet and don't skimp on the 10 second smash. If you want Gooey Texture, use extra American cheese and a lid for 30 seconds during the melt phase.
If you want Speed, prep the sauce and dice the onions the night before.
Searing meat does not "seal in juices." This is a common myth that has been debunked by science. Moisture loss occurs regardless of the sear. The real reason we sear is for the flavor development and the textural contrast between the crunchy exterior and the juicy interior.
Another myth is that you shouldn't salt your meat until right before it hits the pan. While it's true that salt can draw out moisture over long periods, for a smashburger, salting the balls right before smashing helps the meat stick to the tortilla and creates a better crust.
Trust the process, keep your pan hot, and you'll have the best smashburger quesadillas on the table in under 20 minutes.

CRITICAL Sodium Alert
1380 mg 1380 mg of sodium per serving (60% 60% of daily value)
The American Heart Association recommends a limit of no more than 2,300mg of sodium per day, with an ideal limit of no more than 1,500mg per day for most adults.
Tips to Reduce Sodium in Your Recipe
-
Choose Lower Sodium Cheeses-15%
Swap American cheese for lower sodium varieties, and reduce the cheddar cheese by half. This significantly cuts down on added sodium from dairy.
-
Reduce Added Salt-25%
Significantly reduce the 1 teaspoon of kosher salt. You can omit it entirely and rely on other seasonings for flavor.
-
Opt for Fresh Pickles-20%
Dill pickle chips and relish are often high in sodium. Consider using unsalted fresh cucumber slices or a homemade, low-sodium relish instead.
-
Lighten Up the Condiments-15%
Mayonnaise and yellow mustard can contribute sodium. Look for 'light' or 'reduced sodium' versions of these condiments.
-
Boost Flavor with Herbs and Spices
Enhance taste with a generous amount of fresh herbs like parsley or cilantro, and other spices like cumin or chili powder, instead of salt.
-
Select Leaner Ground Beef-5%
While not a primary sodium source, leaner beef blends often have slightly less sodium than higher fat ones, offering a small overall reduction.
Recipe FAQs
Is it necessary to use extra lean ground beef for this recipe?
No, this is a common misconception. You must use 80/20 ground beef, as extra lean meat will be dry and fail to develop the necessary mahogany colored sear.
How to ensure the cheese melts perfectly inside the folded tortilla?
Let your shredded cheddar and American cheese slices sit at room temperature for 10 minutes before cooking. This small head start ensures the cheese transitions to a molten state rapidly before the tortilla burns.
Is a plastic spatula okay to use for smashing the burger?
No, avoid using plastic tools. Use a heavy duty metal spatula, as plastic will flex too much or potentially melt under the high heat required to flatten the beef into the tortilla.
How to keep the tortilla from becoming soggy with onions and pickles?
Pat your finely diced onions and dill pickle chips dry with a paper towel before adding them to the skillet. Removing excess surface moisture prevents steam from trapped liquid, keeping your tortilla crispy.
How to achieve the best crust on the beef patty?
Place the beef ball on the skillet and leave the tortilla undisturbed for 2-3 minutes after smashing. Moving the tortilla before the beef has finished searing prevents the development of that signature deep, dark crust.
Can I prepare the signature sauce in advance?
Yes, whisk the mayonnaise, yellow mustard, sweet pickle relish, and smoked paprika together whenever you like. Keeping it set aside while you prepare the meat ensures the flavors have time to meld.
How to store leftovers so they stay crisp?
Store in an airtight container for up to 3 days with a paper towel inside. The paper towel is essential for absorbing rising moisture, which prevents the tortilla from turning into a soggy mess while in the fridge.
Smashburger Quesadillas Recipe

Ingredients:
Instructions:
Nutrition Facts:
| Calories | 794 calories |
|---|---|
| Protein | 41 g |
| Fat | 51 g |
| Carbs | 42 g |
| Fiber | 2 g |
| Sugar | 5 g |
| Sodium | 1380 mg |
