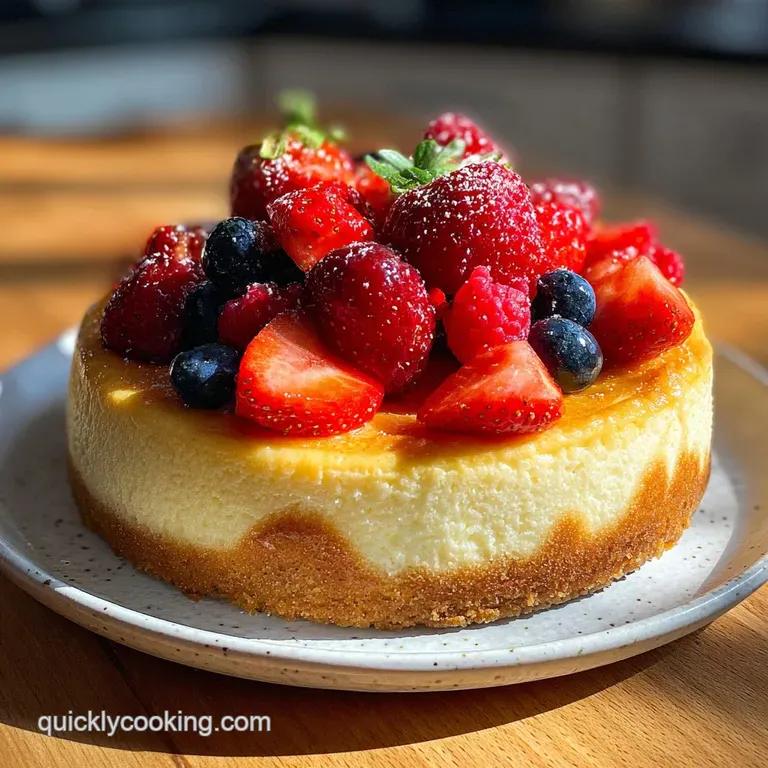
Classic Cheesecake: Velvety and Crack-Free
- Time: Active 25 minutes, Passive 1 hour 15 minutes, Total 1 hour 40 minutes
- Flavor/Texture Hook: Velvety, tangy filling with a shattering graham cracker base
- Perfect for: High impact celebrations or a weekend baking project
- Achieving Flawless Texture in a Classic Cheesecake
- Essential Metrics for This Iconic Baked Dessert
- Selecting Premium Elements for the Best Result
- Assembling the Components and Smart Swaps
- Minimizing Tools for a Streamlined Baking Process
- Mastering Every Stage of the Velvet Filling
- Fixes for Common Dessert Baking Roadblocks
- Scaling Your Recipe for Different Crowds
- Debunking Popular Kitchen Cheesecake Myths
- Preserving Every Slice and Reducing Kitchen Waste
- Expert Presentation Tips for a Flawless Finish
- Recipe FAQs
- 📝 Recipe Card
Achieving Flawless Texture in a Classic Cheesecake
Imagine pulling that springform pan apart to reveal a wall of ivory, velvety cream cheese without a single fissure or crack. The first bite hits you with that cold, tangy richness before the buttery graham cracker base begins to shatter against your tongue.
It is the kind of dessert that stops conversation, and honestly, it is much easier to achieve than the internet makes it out to be if you stop overworking the batter.
I used to be terrified of the dreaded water bath. I once spent a whole afternoon prepping a cake only to have the foil leak, turning my crust into a soggy, grey mess that looked like wet cardboard.
I almost gave up on the traditional method entirely until I realized the secret isn't just about the water - it is about how you emulsify the fats and manage the cooldown. This recipe is the one I pull out for birthdays and big dinners because it works every single time without the unnecessary drama.
We've all seen those supermarket versions that are either too airy or strangely gelatinous. This is the opposite. It is heavy, rich, and unapologetically decadent. We are going to use a few high efficiency tricks to ensure the interior is perfectly smooth while keeping the tools to a bare minimum.
If you've been searching for that iconic New York style bite, you have found it.
Essential Metrics for This Iconic Baked Dessert
The Physics of the Protein Mesh: Gently heating the eggs allows them to form a delicate protein structure that traps fat and moisture without curdling. The starch in the flour acts as a safety net, binding to egg proteins to prevent them from over coagulating and splitting the surface.
| Thickness | Internal Temp | Rest Time | Visual Cue |
|---|---|---|---|
| 7 cm (Full height) | 65°C - 68°C | 1 hour (in oven) | Edges set, 5 cm center jiggles like jelly |
| 5 cm (Thin style) | 65°C | 45 minutes (in oven) | Edges puffed, center barely wobbles |
| 2 cm (Bars) | 63°C | 20 minutes (on counter) | Matte surface, no shine in the middle |
If you are looking for a different texture profile, such as something lighter or perhaps more kid friendly, you might enjoy the crunch of an Oreo Cheesecake recipe. However, for the purest expression of tangy cream cheese, we are sticking with the classic bake today.
Selecting Premium Elements for the Best Result
| Ingredient | Science Role | Pro Secret |
|---|---|---|
| Full fat Cream Cheese | Provides the structural fat and lactic tang. | Use brick style only; tub spreads contain too much air and water. |
| Large Eggs | Acts as the primary emulsifier and binder. | Add one at a time to prevent the batter from breaking. |
| Heavy Cream | Thins the dense cheese for a melt in-the mouth feel. | Do not whip it; stir it in to keep the density high. |
| All purpose Flour | Prevents "weeping" and stabilizes the egg proteins. | Sift it in to avoid tiny white flour pockets in the filling. |
Assembling the Components and Smart Swaps
To get that professional result, we need to be precise with our weights. Here is exactly what you need for a 23 cm springform pan:
- 180g graham cracker crumbs: Why this? Provides the structural foundation and iconic honey wheat flavor profile.
- 85g unsalted butter, melted: Why this? Acts as the "glue" that turns dry crumbs into a crisp crust.
- 25g granulated sugar: Why this? Assists in caramelization and crunch during the initial crust par bake.
- 1 pinch salt: Why this? Sharpens the sweetness and cuts through the heavy fat of the cheese.
- 900g full fat cream cheese: Why this? The high fat content ensures the filling remains silky rather than rubbery.
- 200g granulated sugar: Why this? Sweetens while helping to break down the cheese into a smooth paste.
- 240ml heavy cream: Why this? Introduces liquid fat for that "New York" velvety finish.
- 4 large eggs: Why this? The protein source that sets the cake into a sliceable solid.
- 1 tbsp vanilla extract: Why this? Provides the essential aromatic backbone for the entire dessert.
- 1 tsp fresh lemon juice: Why this? The acid brightens the flavor and helps tighten the dairy proteins.
- 16g all purpose flour: Why this? Adds just enough starch to prevent the eggs from over tightening and cracking.
| Original Ingredient | Substitute | Why It Works |
|---|---|---|
| Graham Cracker Crumbs | Digestive Biscuits | Similar dry texture. Note: Slightly less sweet, common in UK/Europe. |
| Heavy Cream | Sour Cream | Adds more tang and a slightly thicker, denser consistency. |
| Granulated Sugar | Caster Sugar | Finer grains dissolve faster, reducing the risk of over mixing. |
If you want to skip the oven entirely and need something on the table in record time, my No Bake Chocolate recipe is a fantastic alternative that uses similar ingredients but relies on refrigeration rather than heat.
Minimizing Tools for a Streamlined Baking Process
You don't need a kitchen full of gadgets to pull this off. A standard 23 cm springform pan is non negotiable because it allows you to release the sides without flipping the cake. For the mixing, a stand mixer or a sturdy hand mixer works best to get that cheese completely smooth.
The most important "tool" is actually your wide heavy duty aluminum foil. You need the extra wide rolls to ensure you can wrap the bottom of the pan in one solid sheet. If you use two overlapping sheets, the water from the bath will find its way through the seam every single time.
Trust me on this, I have lost many crusts to "waterproof" seams that were anything but.
Mastering Every Stage of the Velvet Filling

1. Constructing the Graham Cracker Foundation
Mix 180g graham cracker crumbs, 85g melted butter, 25g sugar, and salt in a bowl. Press this mixture firmly into the bottom of your springform pan. Note: Use the flat bottom of a measuring cup to get a perfectly even, compacted surface.
2. Hardening the Base
Bake the crust at 175°C for 10 minutes until it smells like toasted honey and looks slightly darkened. Set it aside to cool completely before adding the filling.
3. Waterproofing the Vessel
Wrap the outside of the cooled pan in two layers of heavy duty foil, coming all the way up the sides. Place the wrapped pan inside a larger roasting pan.
4. Emulsifying the Velvet Filling
Beat 900g room temperature cream cheese and 200g sugar at medium speed until the mixture looks like smooth frosting with no visible lumps. Note: Scrape the bottom of the bowl frequently to catch hidden chunks.
5. Incorporating the Liquids
Add 16g flour, 1 tbsp vanilla, and 1 tsp lemon juice. Mix on low speed just until combined. Note: Low speed prevents air bubbles from forming, which cause cracks later.
6. Adding the Heavy Cream
Pour in 240ml heavy cream and mix on low for 30 seconds. The batter should look glossy and pourable.
7. Gentle Egg Integration
Add the 4 eggs one at a time, mixing on the lowest setting just until the yellow disappears. Stop mixing the moment the last egg is incorporated to avoid whipping air into the batter.
8. Executing the Gentle Bake
Pour the batter over the crust. Place the roasting pan in the oven and carefully pour boiling water into the roasting pan until it reaches halfway up the sides of the springform. Bake for 1 hour 15 minutes until the edges are puffed and the center jiggles like firm gelatin.
9. Curing for Texture
Turn off the oven and prop the door open slightly with a wooden spoon. Let the cake sit in the cooling oven for 1 hour. Note: This gradual temperature drop is the ultimate secret to a crack free surface.
10. The Final Chill
Remove from the water bath, take off the foil, and refrigerate for at least 6 hours. The cake will fully set and the flavors will develop during this time.
Fixes for Common Dessert Baking Roadblocks
Why Your Filling Is Lumpy
If you see small white dots in your batter, your cream cheese was too cold when you started. The fat doesn't emulsify with the sugar if it's chilled, leaving you with "cheese freckles."
Chef Tip: If your cheese is cold, unwrap the blocks and microwave them for 15 seconds at a time until they feel like soft butter, but not melted.
Rescuing a Lumpy Batter
If the lumps have already formed, don't keep beating it - that just adds air. Instead, pass the entire batter through a fine mesh sieve into a clean bowl. Use a spatula to push the lumps through the mesh to break them down.
Solving the Soggy Crust
This usually happens because of a leaky water bath. If you realize your foil has failed, carefully remove the cake from the water and finish baking it on a dry sheet. The crust won't be as crisp, but the filling will still be saved.
| Problem | Root Cause | Solution |
|---|---|---|
| Deep Center Crack | Oven temperature too high or over beaten eggs. | Use a water bath and mix on the lowest speed possible. |
| Rubbery Texture | Over baking past the 68°C internal mark. | Pull the cake when the center still has a significant jiggle. |
| Grainy Mouthfeel | Eggs were added too quickly or at high speed. | Add eggs one at a time and stir them in gently by hand or low speed. |
Common Mistakes Checklist
- ✓ Ensure all ingredients, especially eggs and cheese, are at true room temperature.
- ✓ Tap the filled pan firmly on the counter to pop surface air bubbles before baking.
- ✓ Never open the oven door during the first 60 minutes of baking.
- ✓ Grease the sides of the springform pan so the cake can shrink downward without sticking and tearing.
- ✓ Use a thermometer to check for 65°C if you are unsure about the "jiggle" test.
Scaling Your Recipe for Different Crowds
If you are cooking for a smaller group, you can easily halve this recipe. Use a 15 cm or 18 cm pan and reduce the baking time by about 20 minutes. For half an egg, simply beat one in a cup and use half of the liquid.
When doubling the recipe for two cakes, keep the salt and spices at 1.5 times the original amount to avoid overwhelming the delicate dairy flavors. It is best to bake them in separate pans but on the same oven rack if possible, ensuring they aren't touching so the heat circulates evenly. If you need a secondary dessert that is equally impressive but different in profile, consider making a Sugar Cookie Cheesecake recipe alongside the classic one.
| Premium | Budget | Flavor Impact | Savings |
|---|---|---|---|
| Vanilla Bean Paste | Vanilla Extract | Paste adds beautiful black specks. | Save $10-15 |
| Philadelphia Brand | Store Brand Cheese | Store brands can sometimes be more watery. | Save $4-6 |
| Fresh Organic Lemon | Bottled Lemon Juice | Fresh is more vibrant but bottled works fine. | Save $1-2 |
Debunking Popular Kitchen Cheesecake Myths
Many people believe that a water bath is an optional step that can be replaced by simply putting a bowl of water on the bottom rack. That is a myth. The water bath (bain marie) works because water cannot exceed 100°C, providing a literal heat shield that prevents the edges of the cake from cooking faster than the middle.
Without it, you will almost certainly get a browned, rubbery edge and a cracked center.
Another common misconception is that you must use sour cream for a "true" New York style. While sour cream adds a lovely tang, using heavy cream results in a much more luxurious, velvety mouthfeel.
Both are "authentic" in their own right, but for the highest efficiency bake with a premium texture, heavy cream wins every time.
Preserving Every Slice and Reducing Kitchen Waste
Storage: This cake lives in the fridge. Keep it tightly wrapped or in an airtight container for up to 5 days. If you leave it uncovered, it will absorb every "fridge smell" nearby, and onion flavored cheesecake is a mistake you only make once.
Freezing: Cheesecake freezes beautifully. Wrap individual slices in plastic wrap and then foil. They will stay perfect for up to 3 months. Thaw them in the fridge overnight - never on the counter, or the texture will turn mushy.
Zero Waste: If you have leftover graham cracker crumbs, don't toss them! Toast them in a pan with a little butter and sprinkle them over yogurt or ice cream. Any broken cheesecake bits can be folded into softened vanilla ice cream for a DIY cheesecake swirl.
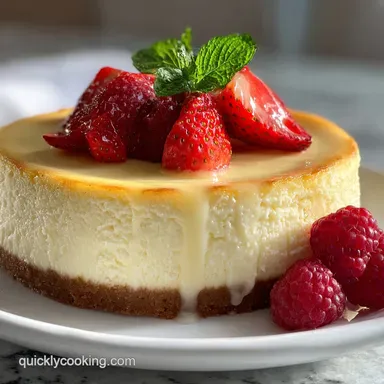
Expert Presentation Tips for a Flawless Finish
For those clean, sharp edges you see in professional photos, you need a tall glass of hot water and a clean towel. Dip a thin, sharp knife into the hot water, wipe it dry, and make one clean slice. Repeat the dipping and wiping for every single cut.
It sounds tedious, but it is the difference between a messy plate and a masterpiece.
Right then, you have the science, the steps, and the secrets. This classic cheesecake is all about patience and respecting the temperature of your ingredients. Once you pull that ivory beauty out of the oven, you'll see why the traditional method remains the gold standard. Let me know how that first slice turns out!

Recipe FAQs
What is a traditional cheesecake?
A dense, baked dessert featuring a rich, smooth filling made primarily from cream cheese, eggs, and sugar on a thin crust. It relies on precise oven temperature control and a water bath to achieve its signature velvety texture.
What is the 3 ingredient cheesecake?
No, this recipe is not a 3-ingredient version. A true traditional cheesecake requires binders like eggs and stabilizing starches for its baked structure and classic mouthfeel.
What is the difference between New York cheesecake and classic cheesecake?
The primary difference is density and fat content. New York cheesecake traditionally uses more heavy cream or sour cream, resulting in a slightly denser, richer filling than many standard classic recipes.
What is the secret to New York cheesecake?
The secret is using high fat dairy and gentle mixing to incorporate minimal air. When you master controlling the protein denaturation during the bake, you achieve that signature melt-in-your mouth quality. If you enjoyed mastering the texture here, see how the same principle of fat incorporation works in our Chocolate Mousse Cake recipe.
How to prevent my cheesecake from cracking during cooling?
Turn off the oven and allow the cake to cool slowly inside with the door propped open. Rapid temperature changes cause the set proteins to contract too quickly, leading to surface fissures. This gradual cooling process prevents shrinkage.
Is it true I must use a water bath (bain marie) for a creamy cheesecake?
Yes, using a water bath is highly recommended for the creamiest result. It provides moist, gentle, consistent heat which stabilizes the egg proteins, ensuring the edges don't overbake before the center is set.
Can I substitute graham crackers for another type of crust ingredient?
Yes, digestive biscuits or shortbread cookies work well as substitutes. If you enjoy exploring different base flavors, consider how we adapt texture control for a contrasting dessert in the Homemade Marble Cake Recipe.
Velvety Classic Cheesecake Recipe
Ingredients:
Instructions:
Nutrition Facts:
| Calories | 544 kcal |
|---|---|
| Protein | 8.2g |
| Fat | 41.5g |
| Carbs | 35.6g |
| Fiber | 0.5g |
| Sugar | 22.4g |
| Sodium | 315mg |
