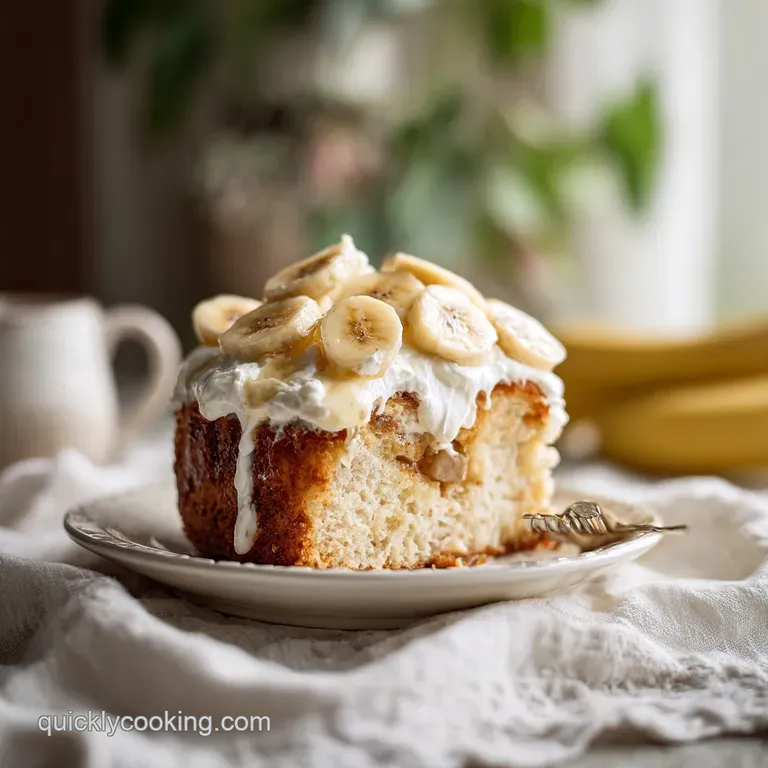
Banana Pudding Poke Cake: Creamy and Lush
- Time: Active 20 minutes, Passive 30 minutes, Total 50 minutes
- Flavor/Texture Hook: Velvety pudding soaked sponge topped with airy whipped cream and crunchy vanilla wafers.
- Perfect for: Potlucks, family reunions, and Budget-friendly weekend treats.
- Mastering the Perfect Banana Pudding Poke Cake
- Essential Recipe Specs and Decision Guide
- Why This Technique Works So Well
- Budget Friendly Components for Lush Results
- Simple Kitchen Tools You Need Right Now
- Bringing the Layers Together Step by Step
- Fixes for the Most Common Sogginess Issues
- Tasty Variations for Your Unique Flavor Profile
- Debunking Some Common Kitchen Myths
- Keeping Your Leftovers Fresh and Tasty
- What Pairs Best With This Creamy Dessert
- Recipe FAQs
- 📝 Recipe Card
Mastering the Perfect Banana Pudding Poke Cake
When we talk about Southern hospitality, it is impossible not to mention the classic banana pudding. It is the dish that shows up at every church social, backyard barbecue, and family reunion from Kentucky to Florida. Historically, this dessert grew out of a need for something sweet, satisfying, and easy on the wallet.
In the mid-20th century, the "refrigerator cake" became a staple, using affordable pantry items like vanilla wafers and instant pudding to create something that tasted much more expensive than it actually was.
This specific Banana Pudding Poke Cake is a modern spin on that heritage. It takes the soul of a traditional pudding and marries it with the poke cake craze that took off in the 1970s.
By poking holes into a warm cake, we are creating tiny reservoirs for that liquid gold a mix of sweetened condensed milk and banana cream pudding to seep into. This ensures that every single bite is moist, flavorful, and incredibly lush.
It is the kind of dessert that feels nostalgic even if you didn't grow up eating it.
I remember the first time I brought this to a neighborhood block party. I was worried it might be too simple, but it was the first tray to be scraped clean. There is something about the combination of the cold, creamy topping and the soft, pudding filled cake that makes people go back for seconds.
It is a Budget friendly way to feed fifteen people with ingredients you can find at any corner store. Trust me, once you see how the layers come together, you will never want a plain sheet cake again.
Essential Recipe Specs and Decision Guide
Before you start cracking eggs, it helps to know exactly what you are getting into. This isn't a "set it and forget it" kind of cake, but it isn't a complex multi day project either. The magic happens during the cooling phase.
Because we are using a boxed yellow cake mix as our base, we are saving a massive amount of time and money on individual dry ingredients like cake flour or specialized leaveners. We are focusing our energy on the "soak" and the topping, which is where the real flavor lives.
One of the biggest questions I get is about the method. Should you use the oven or is there a way to do this on the stovetop? While the cake itself obviously needs the oven, the pudding mixture is a cold set process, which saves you from standing over a bubbling pot of custard.
This makes it a great "summer bake" because the oven is only on for about half an hour, and the rest of the time, the cake is chilling in the fridge, keeping your kitchen cool.
If you are looking for a more traditional texture, you might find my Southern Style Banana Pudding hits that classic mark, but if you want something more substantial and cake like, this poke version is your best bet. It holds up better during transport and is much easier to slice into clean, beautiful squares for a crowd.
Cook Method Comparison: Oven vs. Alternative
| Method | Time | Texture | Best For |
|---|---|---|---|
| Standard Oven | 30 minutes | Fluffy & Structured | The classic, reliable result for clean slices. |
| Toaster Oven | 35 minutes | Denser Crumb | Small batches or when you don't want to heat the house. |
| Air Fryer (Bake) | 25 minutes | Crispy Edges | Smaller pans; requires careful temp monitoring. |
Why This Technique Works So Well
The brilliance of a poke cake lies in a few simple physical reactions that happen right on your kitchen counter. It isn't just about pouring liquid on a cake; it is about timing and temperature.
- Capillary Action: When you poke holes in the cake while it is still warm, the steam escaping the crumb creates a vacuum effect. As the cake begins to cool, it naturally pulls the liquid pudding mixture deep into the center of the sponge.
- Protein Stabilization: Using softened cream cheese in the pudding soak provides a structural "backbone." Without it, the pudding would be too runny and would just make the cake soggy. The fat in the cream cheese binds with the starches in the pudding to create a velvety, semi solid layer.
- Starch Gelatinization: The instant pudding mix reacts with the cold milk to thicken quickly. Because we add sweetened condensed milk, we are increasing the sugar solids, which prevents the pudding from weeping or separating over time.
- Moisture Migration: As the cake sits in the fridge for those 4 hours, the moisture levels equalize. The cake doesn't get "wet"; it becomes "tender."
Ingredient Deep Dive
| Ingredient | Science Role | Pro Secret |
|---|---|---|
| Yellow Cake Mix | Provides the structural "honeycomb" for the soak. | Add an extra egg for a richer, more "from scratch" crumb. |
| Sweetened Condensed Milk | Acts as a humectant to keep the cake moist for days. | Store at room temp so it flows easily into the holes. |
| Cream Cheese | Controls the pH and adds a slight tang to balance the sugar. | Must be completely soft to avoid "pudding lumps." |
| Heavy Whipping Cream | Provides the airy, fat rich contrast to the dense cake. | Chill your bowl and beaters to get maximum volume. |
Budget Friendly Components for Lush Results
Making a dessert for 15 people can get expensive if you aren't careful. That is why I love this specific ingredient list. We are using high impact, low cost items that punch way above their weight class.
For example, using vanilla bean paste in the whipped cream might seem like a splurge, but you only need a teaspoon to get those beautiful black flecks that make people think you spent hours in the kitchen. If you are on a strict budget, you can easily swap it for standard vanilla extract.
When it comes to the bananas, don't buy the "perfect" bright yellow ones if you plan to bake today. Look for the ones with a few brown speckles they have a higher sugar content and a much stronger aroma.
However, for the sliced layer on top, you want bananas that are just ripe so they don't turn into mush under the whipped cream.
- 15.25 oz yellow cake mix: The foundation of our project.
- 1 cup water: Standard hydration for the mix.
- 0.5 cup vegetable oil: Keeps the crumb tender even when cold.
- 3 large eggs: Provides the lift and structure.
- 1 tsp pure vanilla extract: A little extra boost for the cake base.
- 3.4 oz instant banana cream pudding mix: The flavor engine.
- 14 oz sweetened condensed milk: For that signature sticky sweet soak.
- 8 oz cream cheese, softened: Why this? It adds a cheesecake like richness that prevents the cake from being overly sweet.
- 1.5 cups whole milk: Use full fat for the best mouthfeel.
- 2 cups heavy whipping cream: For a fresh, airy topping that beats any tub of whipped topping.
- 0.5 cup confectioners' sugar: Stabilizes the cream so it doesn't deflate.
- 1 tsp vanilla bean paste: Why this? It provides intense flavor and visual "gourmet" cues.
- 4 large bananas, sliced: Freshness in every bite.
- 11 oz Nilla Wafers: The essential crunch factor.
| Original Ingredient | Substitute | Why It Works |
|---|---|---|
| Heavy Whipping Cream | Whipped Topping (8 oz) | Budget friendly and holds its shape longer at room temp. |
| Banana Cream Pudding | Vanilla Pudding | Use this if you want a milder banana flavor; still works perfectly. |
| Vegetable Oil | Melted Butter | Adds a nutty, rich flavor but can make the cake firmer when cold. |
Simple Kitchen Tools You Need Right Now
You don't need a professional pastry kitchen to pull this off. In fact, one of the best "tools" for this recipe is likely sitting in your utensil drawer right now: a wooden spoon. The rounded handle of a wooden spoon is the perfect diameter for poke cake holes.
If the holes are too small (like from a fork), the thick pudding won't sink in. If they are too big, the cake will lose its structural integrity and fall apart when you slice it.
I also highly recommend using a 9x13-inch glass or ceramic baking dish. Glass is great because you can actually see the pudding layers as they settle into the cake. It makes for a great presentation when you pull it out of the fridge.
A hand mixer or a stand mixer (like a KitchenAid) is pretty much essential for the cream cheese and the whipped cream steps doing those by hand is a serious workout that usually ends in lumpy pudding.
Chef's Tip: Put your metal mixing bowl and whisk attachment in the freezer for 10 minutes before you whip the heavy cream. The colder everything is, the faster the fat globules will bond together, giving you stiff, stable peaks that won't melt the moment they hit the cake.
Bringing the Layers Together step-by-step
- Preheat your oven to 350°F (180°C) and grease a 9x13-inch baking dish. Note: Proper greasing ensures the edges don't tear when you lift out the first slice.
- In a large mixing bowl, combine the yellow cake mix, water, vegetable oil, eggs, and vanilla extract. Beat on medium speed for 2 minutes until the batter is smooth and pale.
- Pour the batter into the prepared baking dish and bake for 28–32 minutes, or until a toothpick inserted into the center comes out clean.
- While the cake is still warm, use the rounded handle of a wooden spoon to poke holes across the entire surface of the cake, spaced roughly 1 inch apart. Note: Doing this while warm allows the cake to "drink" the liquid better.
- In a medium bowl, beat the softened cream cheese until smooth. Gradually whisk in the sweetened condensed milk, instant banana pudding mix, and cold whole milk until the mixture is fully combined and starting to thicken.
- Pour the pudding mixture over the warm cake, using a spatula to push the liquid down into the holes. Allow the cake to cool to room temperature, then refrigerate for at least 4 hours to set.
- In a chilled bowl, whip the heavy cream, confectioners' sugar, and vanilla bean paste until stiff peaks form and the whisk leaves clear tracks.
- Layer the sliced banana coins over the set pudding layer. Spread the whipped cream evenly over the bananas using an offset spatula.
- Top with a combination of whole and crushed Nilla Wafers just before serving until the surface is covered in golden crunch.
Fixes for the Most Common Sogginess Issues
The biggest fear with any poke cake is that it will turn into a mushy mess. This usually happens for one of two reasons: either the cake wasn't baked long enough, or the pudding was too thin when it was poured.
If your cake feels "wet" rather than "moist," it is likely because it didn't have enough structure to hold the liquid.
Another common issue is the bananas turning brown. This is a natural reaction called oxidation. While it doesn't hurt the flavor, it doesn't look very appetizing. The trick is to hide them!
By layering the bananas under the whipped cream, you are cutting off their access to oxygen, which keeps them looking fresh for much longer.
Quick Fix Table
| Problem | Root Cause | Solution |
|---|---|---|
| Pudding sits on top | Holes were too small or cake was too cold. | Poke more holes and gently wiggle the spoon handle to widen them. |
| Runny topping | Cream wasn't whipped to stiff peaks. | Beat the cream longer; it should hold its shape on the whisk. |
| Soggy cookies | Wafers were added too early. | Always add the cookies right before you walk the cake to the table. |
Common Mistakes Checklist
- ✓ Ensure the cream cheese is at room temperature before mixing (prevents white lumps in your pudding).
- ✓ Don't skip the 4 hour chill time; the pudding needs to "set" or it will run out of the cake when sliced.
- ✓ Use a "poking" tool that is about 0.5 inches wide (the size of a standard wooden spoon handle).
- ✓ Spread the pudding all the way to the edges of the pan to seal the cake.
- ✓ Only slice the bananas when you are ready to assemble to prevent premature browning.
Tasty Variations for Your Unique Flavor Profile
If you want to move away from the classic banana profile, there are so many ways to adapt this base. For instance, if you have a bunch of overripe bananas sitting on your counter, you might want to try my Homemade Banana Bread Recipe instead, but for a poke cake, we want the structure of the yellow cake mix.
One "budget hack" I love is the "Banana Nut" variation. Simply toast 0.5 cups of chopped walnuts or pecans and sprinkle them on top of the pudding layer before adding the whipped cream. It adds a savory depth and a great textural contrast to the soft cake.
- Downscaling (Small Batch): If you only need 6-8 servings, use a 9x9-inch square pan. Use half the cake mix (save the rest in a Ziploc), 1 egg, and reduce the bake time by 5-7 minutes.
- Upscaling (Party Size): For a massive crowd, double the recipe and use a full size hotel pan. Keep the pudding to milk ratio exact, but you can usually get away with 1.5x the whipped cream to save on cost.
- Baking Prep: If you are doubling the recipe in one large pan, lower the oven temp to 325°F (165°C) and bake for an extra 10-15 minutes to ensure the middle cooks through without burning the edges.
If you want X, do Y
- If you want a richer flavor, swap the water in the cake mix for whole milk.
- If you want maximum crunch, use double the Nilla Wafers and line the bottom of the pan with them before pouring in the batter.
- If you want a tangier finish, increase the cream cheese to 12 oz and reduce the milk by 0.25 cups.
Debunking Some Common Kitchen Myths
There is a myth that you should wait for the cake to be completely cold before poking holes. In reality, a cold cake has already set its crumb structure, making it harder for the pudding to penetrate. Poking while warm (not hot!) allows the cake to be more "absorbent."
Another misconception is that "instant pudding" is somehow inferior to "Cook and-serve." In the context of a poke cake, instant pudding is actually superior. It sets faster and has a lighter texture that complements the whipped cream.
Cook and-serve pudding can sometimes be too dense, weighing down the cake and making it feel heavy.
Finally, some people think you need to brush the bananas with lemon juice to stop browning. While this works, it adds a sour note that clashes with the sweet banana cream. As long as you tuck the bananas under a thick blanket of whipped cream, they will stay yellow and beautiful on their own.
Keeping Your Leftovers Fresh and Tasty
Storage: This cake must be kept in the refrigerator. Because of the cream cheese, milk, and fresh bananas, it is not shelf stable. Cover the dish tightly with plastic wrap or a lid. It will stay fresh and delicious for up to 3 days.
After that, the bananas may start to weep and the cake can become a bit too soft.
Freezing: I do not recommend freezing the fully assembled cake. Bananas do not thaw well they turn grey and slimy. However, you can bake the cake base, poke the holes, and freeze just the sponge for up to 3 months.
When you are ready to serve, thaw the cake and then proceed with the pudding soak and toppings.
Zero Waste Tip: If you have leftover Nilla Wafers that have gone slightly stale, don't throw them out! Toss them in a food processor with a tablespoon of melted butter and press them into a pie plate to make a quick crust for a future dessert.
You can also use the leftover pudding mixture (if you made too much) as a dip for apple slices or graham crackers the next day. For the banana peels, if you have a garden, they make incredible fertilizer when soaked in water for 24 hours.
What Pairs Best With This Creamy Dessert
Since this Banana Pudding Poke Cake is quite sweet and rich, you want to serve it with something that provides a bit of contrast. A strong, dark roast coffee is the perfect companion. The bitterness of the coffee cuts right through the sweetened condensed milk and balances the palate.
If you are serving this at a summer party, a tart lemonade or an unsweetened iced tea with a sprig of mint works wonders. You want something refreshing that cleanses the tongue between those lush, creamy bites.
As for other food, this is a heavy hitter, so it usually stands alone as the "main event" of the dessert table. However, if you are doing a full spread, it sits beautifully next to a fruit platter or some simple shortbread cookies.
Honestly, the best way to enjoy this is straight out of the fridge on a warm afternoon. There is something incredibly satisfying about the cold, pudding filled cake hitting your tongue while you sit on the porch.
It is a little slice of Southern comfort that doesn't require a plane ticket or a huge grocery bill to enjoy. Enjoy every bite!

Recipe FAQs
Can I use a different fruit instead of bananas?
Yes, you can substitute other fruits. If you enjoyed using fresh fruit here, the same balance of sweetness works well in our mini carrot cake with pineapple recipe.
Is it necessary to chill the cake for 4 hours?
Yes, the long chill time is essential for the texture. Skipping this will result in the pudding mixture running out of the holes instead of staying set within the cake.
How to prevent lumpy pudding filling?
Beat the cream cheese until completely smooth before adding other liquids. Ensuring the cream cheese is at room temperature before you start is the most effective way to prevent those stubborn white lumps.
How to stop bananas from turning brown?
Slice your bananas only when you are ready to assemble the cake. Adding them right before serving keeps them looking fresh and appetizing.
How to ensure the pudding soaks deep into the cake?
Use the rounded handle of a wooden spoon to poke holes about 1 inch apart. Ensure the cake is still warm when you pour the mixture so the holes readily absorb the liquid.
Why did my Nilla Wafers get soggy?
Top the cake with wafers immediately before serving. Placing them on the cake too early causes the moisture from the cream and pudding to ruin their crunch.
How to tell when the cake is fully baked?
Insert a toothpick into the center of the cake at the 28-minute mark. The cake is ready to come out of your 350°F oven as soon as the toothpick comes out clean.
Banana Pudding Poke Cake

Ingredients:
Instructions:
Nutrition Facts:
| Calories | 604 kcal |
|---|---|
| Protein | 5.1 g |
| Fat | 31.2 g |
| Carbs | 68.5 g |
| Fiber | 1.4 g |
| Sugar | 46.2 g |
| Sodium | 442 mg |
