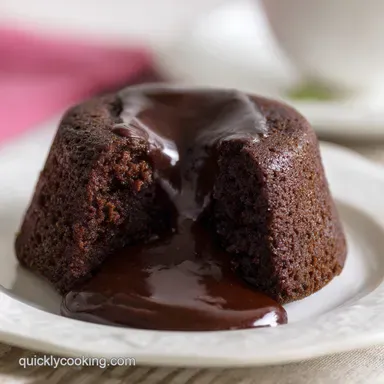
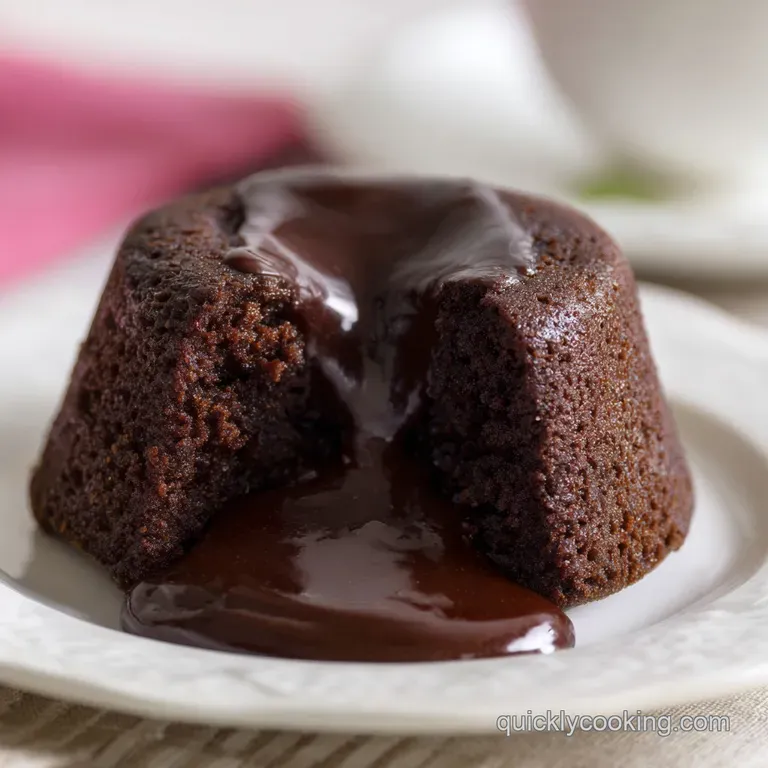
Chocolate Poke Cake: Ultra Moist and Rich

- Time: 20 min active + 25 min baking + 4 hours chilling = Total 4 hours 45 mins
- Flavor/Texture Hook: Fudgy, moist sponge topped with a cloud like cocoa cream
- Perfect for: Family potlucks, birthday crowds, or any Budget-Friendly dessert craving
Easy Chocolate Poke Cake
Thwack. That is the sound of a wooden spoon hitting a warm cake. It is not the most graceful sound, but in my kitchen, it is the sound of victory. I remember the first time I tried this for a neighborhood get together.
I was terrified that poking holes in a cake was basically destroying it, but as soon as that pudding mixture started seeping into the sponge, I knew I had something special.
The real hero here is the sweetened condensed milk. While most people just use pudding, the condensed milk adds a sticky, rich density that keeps the cake from feeling like a sponge cake and makes it feel like a decadent fudge bar.
It transforms a cheap box mix into something that tastes like it took hours of labor, even though we are basically just assembling parts.
You can expect a dessert that is heavy on the chocolate but light on the effort. This Chocolate Poke Cake doesn't try to be a fancy French pastry, and that is why it works. It is honest, sweet, and unapologetically rich. We are going for a texture that is velvety on top and almost gooey in the middle.
Why the Liquid Works
- Moisture Channels: Poking holes creates direct paths for the liquid to travel. Instead of sitting on top, the pudding fills the cake's internal structure.
- Sugar Binding: The condensed milk creates a syrupy bond. It stops the cake from drying out by coating the starch granules in sugar and fat.
- Temperature Gap: Pouring warm filling into a warm cake helps the liquid penetrate deeper. If the cake is cold, the pores close up and the filling just slides off.
- Fat Stabilization: Using chilled heavy cream for the topping ensures the air bubbles stay trapped. This creates that light contrast against the dense cake base.
| Method | Time | Texture | Best For |
|---|---|---|---|
| Box Mix (Shortcut) | Fast | Consistent & Spongy | Budget parties |
| From Scratch (Fresh) | Slower | Richer & Denser | Special occasions |
| No Bake Version | Fastest | Mousse like | Summer heat |
Essential Component Breakdown
Before we get into the mixing, it is helpful to understand what each part is actually doing. I used to think the pudding was just for flavor, but it is actually the structural glue of the filling. According to USDA FoodData, condensed milk is highly concentrated, which is why it provides that specific "chewy" mouthfeel without needing to add flour or cornstarch.
| Ingredient | Science Role | Pro Secret |
|---|---|---|
| Cake Mix | Structural Base | Add an extra egg for a tighter crumb |
| Condensed Milk | Moisture Lock | Chill before use for a thicker pour |
| Heavy Cream | Aeration | Use a metal bowl chilled in the freezer |
| Cocoa Powder | Flavor Depth | Sift it to avoid tiny bitter clumps |
Budget Friendly Pantry List
I have kept this list simple because the goal is to keep costs down. You don't need expensive organic cocoa or fancy butter to make this work. The magic is in how the ingredients interact.
- 1 box (15.25 oz / 432g) chocolate cake mix Why this? Fast, reliable, and costs pennies per serving
- 1 cup (240ml) water Why this? Standard hydration for the mix
- 1/2 cup (115g) vegetable oil Why this? Keeps the cake moist longer than butter
- 3 large eggs Why this? Provides the necessary lift and bind
- 1 package (3.4 oz / 96g) instant chocolate pudding mix Why this? Thickens the filling instantly
- 2 cups (480ml) cold whole milk Why this? Activates the pudding starch
- 1/2 cup (150g) sweetened condensed milk Why this? Adds a fudgy, velvety texture
- 2 cups (480ml) heavy whipping cream, chilled Why this? Necessary for stiff peaks
- 1/2 cup (60g) powdered sugar Why this? Sweetens without adding grit
- 2 tbsp (15g) unsweetened cocoa powder Why this? Cuts the sweetness of the cream
- 1 tsp (5ml) vanilla extract Why this? Rounds out the chocolate notes
| Original Ingredient | Substitute | Why It Works |
|---|---|---|
| Vegetable Oil | Melted Butter | Richer flavor. Note: Cake may be slightly denser |
| Whole Milk | Coconut Milk | Similar fat. Note: Adds a tropical hint |
| Powdered Sugar | Granulated Sugar | Same sweetness. Note: Grainy texture in topping |
| Water | Brewed Coffee | Enhances chocolate. Note: No caffeine if using decaf |
Right then, let's talk about the tools. You don't need a professional kitchen for this, but a few basics make it way faster.
Simple Kitchen Tools
- 9x13 inch baking pan (glass or metal)
- Electric hand mixer or stand mixer
- Large mixing bowl
- Wooden spoon (with a round handle)
- Rubber spatula for scraping
- Measuring cups and spoons
Chef Note: If you don't have a wooden spoon, a chopstick or the back of a pencil (cleaned!) works great for poking the holes. Just make sure the tool is roughly 1/2 inch wide.
Step-by-step Baking Guide
Let's crack on with the actual process. Trust me on this, don't skip the chilling time, or your topping will just slide right off.
- Preheat your oven to 350°F (180°C). Combine cake mix, water, oil, and eggs in a bowl. Beat until smooth and pour into a greased 9x13 inch baking pan.
- Bake 25 mins until a toothpick inserted in the center comes out clean and the edges begin to pull away from the pan sides.
- While the cake is still warm, use the round end of a wooden spoon to poke holes every 1 inch across the entire surface. Note: Don't poke all the way to the bottom or the liquid will leak out.
- In a separate bowl, whisk the pudding mix, milk, and condensed milk together until smooth.
- Slowly pour this mixture over the warm cake, ensuring the liquid fills every hole. Wait until the liquid is fully absorbed before moving on.
- Place a chilled metal bowl on your counter. Pour in the heavy cream, powdered sugar, cocoa powder, and vanilla.
- Beat on high until stiff peaks form (this means when you lift the whisk, the cream stands straight up without drooping).
- Spread the whipped topping evenly over the cooled cake using a spatula.
- Refrigerate for 4 hours until the cake feels firm and chilled to the touch.
Fixing Common Texture Issues
The most common complaint with a Chocolate Poke Cake is either a "soggy bottom" or a "flat topping." Usually, this comes down to temperature. If you pour the filling into a cake that's too cold, it won't sink. If you put the cream on a cake that's too warm, it will melt.
Why Your Cake Sinks
If the center of your cake dips, you likely over mixed the batter or opened the oven door too early. This lets the heat escape and the structure collapse before it sets.
Why Topping Melts
Heavy cream is sensitive. If your bowl isn't cold, or the cake hasn't cooled completely, the fat in the cream breaks down and it turns into a soup.
| Problem | Root Cause | Solution |
|---|---|---|
| Liquid pools on top | Cake too cold | Poke holes while cake is warm |
| Topping is runny | Over beaten cream | Stop mixing as soon as peaks form |
| Dry edges | Over baked | Remove from oven 2 mins earlier |
Mistake Checklist:
- ✓ Did you grease the pan? (Prevents sticking)
- ✓ Are the holes 1 inch apart? (Even distribution)
- ✓ Is the cream chilled? (Essential for volume)
- ✓ Did you wait 4 hours to chill? (Sets the texture)
- ✓ Did you sift the cocoa? (No lumps)
Customizing Your Dessert
If you want to change things up, you can easily tweak this. For those who love a different kind of treat, you might enjoy the richness of a Classic Cheesecake recipe, but for this cake, we can keep it simple.
Decision Shortcut: If you want more richness → Use melted butter instead of oil. If you want a fruity twist → Fold in cherry pie filling before adding the topping. If you want it less sweet → Use dark cocoa powder (Dutch processed).
Making it gluten-free
You can use a 1:1 gluten-free chocolate cake mix. The process remains the same, but the cake may be slightly more fragile, so be gentle when poking the holes.
Adjusting the Batch Size
If you are making this for a smaller group, you can halve the recipe. Use an 8x8 inch pan instead. Reduce the baking time by about 20% and beat one egg, then use half of it. For larger batches, work in two separate pans rather than one deep one to ensure the filling reaches the center.
Storage and Waste Tips
This cake is actually better the second day because the flavors have more time to meld. Keep it in the fridge in an airtight container or cover the pan tightly with foil.
Storage Guidelines:Fridge: Stays fresh for 4-5 days. Freezer: You can freeze the baked base for 2 months, but I don't recommend freezing the finished cake with the cream topping, as the texture of the whipped cream changes.
Zero Waste Hacks: If you have leftover whipped cream, don't toss it! Use it as a topping for a Homemade Banana Bread slice for a fancy breakfast. Any leftover pudding mixture can be poured into a small jar and eaten as a chocolate mousse.
Sweet Pairing Suggestions
Since this Chocolate Poke Cake is incredibly rich, you need something to cut through the sweetness. A tart raspberry coulis or a handful of fresh strawberries on top works wonders. If you are serving it at a party, a pot of strong, bitter black coffee is the best companion.
The acidity of the coffee balances the heavy fats from the cream and condensed milk.
For a more balanced dessert platter, serve a slice alongside some fresh orange slices. The citrus oils cleanse the palate, making every bite of the chocolate feel just as intense as the first one. Trust me, your guests will thank you for the balance.
Recipe FAQs
Can I use coconut milk instead of whole milk for the soak?
Yes, coconut milk works well. If you enjoy the flavor profile of our coconut cream poke cake, this is a great way to add a tropical twist to the chocolate base.
How to keep the whipped topping from sliding off the cake?
Cool the cake completely before spreading the cream. Adding topping to a warm cake melts the fat in the heavy cream, causing the structure to collapse and slide.
Is it true that the cake must be completely cold before poking the holes?
No, this is a common misconception. Poke the holes while the cake is still warm to ensure the pudding mixture penetrates deeply into the sponge.
How long can I store this cake in the refrigerator?
It stays fresh for 4-5 days. Store it in an airtight container or cover the pan tightly with foil to prevent the cake from drying out.
Why did my cake come out dry?
You likely overbaked it. Remove the pan from the oven the moment a toothpick inserted in the center comes out clean and the edges pull away from the sides.
Can I freeze the finished cake with the whipped topping?
No, avoid freezing the completed cake. The texture of the whipped cream changes and becomes grainy upon thawing, though the baked base alone freezes for 2 months.
How to ensure the pudding soak fills every hole?
Pour the mixture slowly and evenly. Use a steady stream across the entire surface to make sure the liquid settles into every poked opening.
Chocolate Poke Cake