Dark Chocolate Ganache Tart: Silky and Decadent

- Time: Active 30 minutes, Passive 20 minutes, Total 50 minutes
- Flavor/Texture Hook: A shattering dark chocolate crust meets a velvety, melt in-the mouth center.
- Perfect for: Impressing guests at dinner parties, holiday celebrations, or a budget-friendly date night.
- Mastering the Ultimate Chocolate Ganache Tart for Every Occasion
- Understanding the Fast Versus Classic Dessert Approach
- Selecting Quality Ingredients Without Breaking Your Bank
- Basic Tools for a Professional Bakery Result
- Step by Step Method for a Flawless Finish
- Solving Common Textural Issues and Baking Flaws
- Simple Ways to Adjust for Dietary Needs
- Adjusting the Recipe for Different Sizes
- Debunking Common Kitchen Myths
- Keeping Your Tart Fresh and Savoring Leftovers
- Perfect Pairings and Garnishes for Elegant Presentation
- Recipe FAQs
- 📝 Recipe Card
Mastering the Ultimate Chocolate Ganache Tart for Every Occasion
The first time I tried a true tarte au chocolat was in a tiny, dimly lit bakery in the Marais district of Paris. I remember the bell chiming as I walked in, the air thick with the scent of toasted flour and dark, expensive cocoa.
The tart sat behind glass, looking almost too perfect to eat, with a mirror like sheen that reflected the gold leaf on top. When I finally took a bite, the crust didn't just crumble; it snapped like a thin wafer, followed immediately by a filling so smooth it felt like silk.
I walked away convinced I could never recreate that at home without a degree in pastry arts and a bank account full of euros.
But here is the secret I learned after years of tinkering in my own kitchen: that professional "snap" and "sheen" aren't about expensive equipment or secret ingredients. They are about temperature and patience. You don't need a marble slab or a $500 tempering machine to make a world class Chocolate Ganache Tart.
You just need to understand how fat and liquid play together. In this guide, I’m showing you how to get that high end French bakery finish using a basic food processor and ingredients you can find at any local grocery store.
It’s a total flavor hack that makes you look like a pro while keeping things fast and budget friendly.
We are going to focus on the contrast of textures here. A great tart relies on a crust that is sturdy enough to hold its shape but delicate enough to shatter under a fork. Then, we pour in a ganache that is stable enough to slice but soft enough to melt the moment it hits your tongue.
It sounds like a high wire act, but it’s actually one of the most forgiving desserts you can make once you know the tricks. Let’s get into why this method works so well.
Understanding the Fast Versus Classic Dessert Approach
When it comes to high end desserts, there is often a "classic" way that takes all day and a "fast" way that saves your sanity. For this Chocolate Ganache Tart, the classic French method involves rubbing butter into flour by hand for 20 minutes to ensure the perfect crumb. My budget friendly hack?
The food processor. It keeps the butter colder, works faster, and actually prevents you from over handling the dough with your warm hands, which is the number one cause of a tough, chewy crust.
Temperature Control: Using cold, cubed butter is non negotiable because those tiny bits of solid fat create steam pockets as they bake, leading to a flaky, shortbread texture.
The Emulsion Secret: Stirring the ganache from the center outward allows the fat from the chocolate and the water from the cream to bond slowly, creating a stable, glossy finish rather than a greasy, split mess.
Sugar Stability: We use powdered sugar in the crust instead of granulated sugar because it dissolves instantly, ensuring the crust is perfectly smooth without any gritty pockets.
Fat Content: High fat heavy cream (36% or higher) is essential for the filling to set properly; anything lower will leave you with a tart that is more of a chocolate soup.
| Feature | Classic French Method | My Fast Budget Method | Flavor Impact |
|---|---|---|---|
| Crust Prep | Hand rubbed butter (20 mins) | Food processor pulses (2 mins) | Processor version is actually crispier |
| Filling | Tempered chocolate base | Simple hot cream emulsion | Same velvety mouthfeel |
| Ingredients | Single origin craft bars | high-quality grocery store bittersweet | Rich and decadent without the $20 price tag |
Choosing the right approach depends on your goals, but for a busy home cook, the fast method delivers 95% of the quality with 10% of the stress. By focusing on the emulsion rather than complex tempering, we ensure the filling stays glossy and set every single time.
Selecting Quality Ingredients Without Breaking Your Bank
You don’t need to spend a fortune to make a decadent dessert. The beauty of this recipe is that it uses pantry staples like all purpose flour and cocoa powder to build a foundation for the "hero" ingredient: the chocolate.
Since the filling is mostly chocolate and cream, that is where you should put your focus, but even there, a good store brand bittersweet bar will outshine a cheap milk chocolate every time.
| Ingredient | Science Role | Pro Secret |
|---|---|---|
| All purpose Flour | Provides the structure and "snap" | Sift it with the cocoa to prevent bitter lumps |
| Cold Unsalted Butter | Creates steam for flakiness | Cube it and put it back in the fridge for 10 mins before using |
| Heavy Whipping Cream | Emulsifies the chocolate into silk | Never let it boil; a gentle simmer is all you need |
| Bittersweet Chocolate | Sets the tart and provides depth | Chop it very finely so it melts evenly without scorching |
When choosing your chocolate, look for something in the 60% to 70% cocoa range. This provides enough bitterness to balance the sugar in the crust while ensuring there is enough cocoa butter to help the tart set firmly.
If you use a lower percentage (like milk chocolate), the tart will be too sweet and might remain soft even after chilling.
For the crust, 1.5 cups (190g) of all purpose flour and 0.25 cup (25g) of Dutch processed cocoa powder are your base. The cocoa adds color and a deep earthy flavor that mimics the expensive chocolate tarts found in European cafes.
We use 0.5 cup (60g) of powdered sugar to keep things light and 0.25 tsp of sea salt to make the chocolate flavors pop. The binders are 1 large egg yolk and 1 tbsp of heavy cream, which give the dough enough moisture to hold together without becoming sticky.
For the filling, you'll need 12 oz (340g) of finely chopped bittersweet chocolate. Combine this with 1.25 cups (300ml) of heavy whipping cream. To get that signature shine, we add 2 tbsp of room temperature unsalted butter and 1 tsp of vanilla bean paste at the very end.
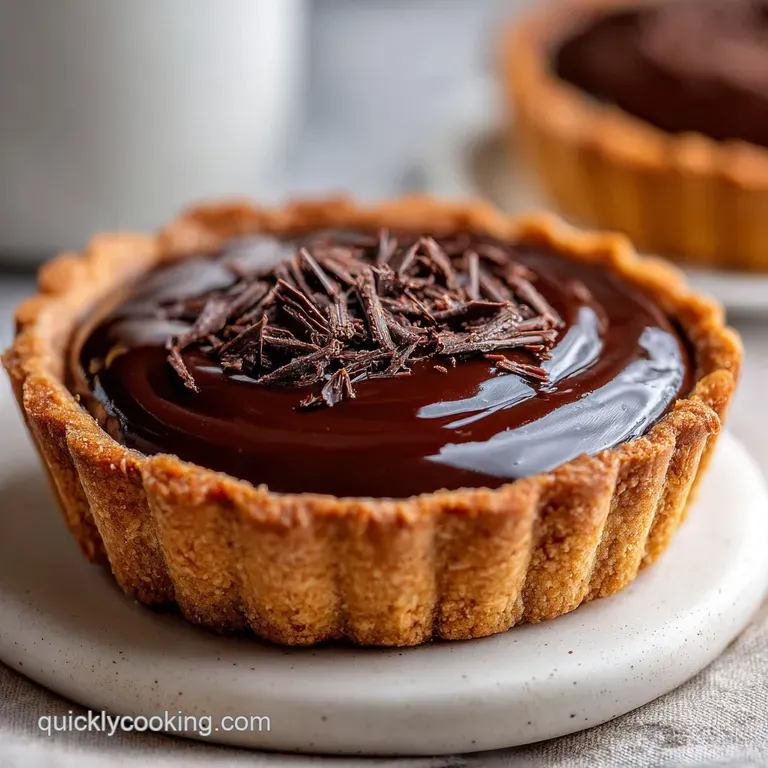
Finally, a sprinkle of 0.25 tsp Maldon flaky salt on top is the budget friendly hack that makes this look like a $50 bakery item.
Basic Tools for a Professional Bakery Result
One of the biggest myths in baking is that you need a kitchen full of gadgets. For this tart, we are sticking to the essentials. A 9 inch tart pan with a removable bottom is the only "specialty" item you really need. This allows you to lift the tart out easily so you can show off those beautiful fluted edges.
If you don't have one, a standard pie dish works, though you won't get those sharp, professional sides.
You will also need a food processor. This is my favorite budget friendly tool for crusts because it works so fast the butter doesn't have time to melt. If you don't have one, a pastry cutter or even two forks will work, but you'll need to work quickly.
For the filling, a heat proof glass or stainless steel bowl is best. Avoid plastic bowls, as they can retain odors and don't distribute heat as evenly as glass or metal.
A small saucepan is needed to simmer the cream. You don't need anything fancy here, just something with a heavy bottom to prevent the cream from scorching. Finally,, a rubber spatula is your best friend for the ganache.
Unlike a whisk, which incorporates air and creates bubbles, a spatula allows you to stir gently, keeping the filling dense, dark, and perfectly smooth.
Chef Tip: If your kitchen is warm, put your food processor blade and bowl in the freezer for 15 minutes before starting. This ensures the butter stays solid during the pulsing phase, which is the key to a shattering crust.
step-by-step Method for a Flawless Finish
Making this Chocolate Ganache Tart is a three phase process: the crust, the filling, and the set. Don't rush any of them. The total time of 50 minutes (excluding chilling) is mostly active work, so let's walk through it carefully to ensure you get that velvety result.
- Pulse the dry base. In your food processor, combine 1.5 cups all purpose flour, 0.25 cup cocoa powder, 0.5 cup powdered sugar, and 0.25 tsp sea salt. Note: Pulsing first ensures the cocoa is distributed so you don't get dark streaks.
- Cut in the fat. Add 0.75 cup cold, cubed butter. Pulse 10-12 times until the mixture looks like coarse sand with pea sized bits.
- Bind the dough. Add the egg yolk and 1 tbsp heavy cream. Pulse just until the dough begins to clump. Note: Stop immediately once it clumps to avoid developing too much gluten.
- Chill and press. Form the dough into a disk, wrap in plastic, and chill for 30 minutes. Press it firmly into your 9 inch tart pan, ensuring the sides are even.
- Blind bake the shell. Line the crust with parchment and pie weights. Bake at 350°F (175°C) for 15 minutes, remove weights, and bake 5 more minutes until the surface looks dry and matte.
- Prep the chocolate. Place 12 oz finely chopped chocolate in a glass bowl. Heat 1.25 cups heavy cream in a saucepan until tiny bubbles form around the edges.
- Create the emulsion. Pour the hot cream over the chocolate. Let it sit for 2 minutes, then stir slowly with a spatula from the center outward until the mixture becomes glossy and dark.
- Finish the shine. Gently stir in 2 tbsp room temperature butter and 1 tsp vanilla bean paste.
- The final pour. Pour the ganache into the cooled tart shell. Tap the pan gently on the counter to release any trapped air bubbles.
- Set the tart. Chill in the fridge for at least 4 hours. Wait until the center is firm to the touch before garnishing with Maldon salt and slicing.
Solving Common Textural Issues and Baking Flaws
Even with a simple recipe, things can go sideways. The most common heartbreak with a Chocolate Ganache Tart is a "split" filling where the oil separates from the solids, leaving you with a grainy, greasy mess. This usually happens if the cream was boiling too hard or if you stirred it too vigorously.
Why Your Crust Is Tough or Shrinking
If your crust pulls away from the edges or feels hard like a rock, it’s likely because the dough was overworked or the butter got too warm. When you over process the flour, you develop gluten, which acts like a rubber band, pulling the crust down the sides of the pan as it heats up.
Keep everything cold and pulse only as much as necessary.
| Problem | Root Cause | Solution |
|---|---|---|
| Grainy Ganache | Cream was too hot or stirred too fast | Add 1 tsp of cold cream and stir very gently to bring it back |
| Soggy Crust | Filling poured into a warm crust | Ensure the tart shell is completely cold before adding ganache |
| Ganache won't set | Too much cream or low-fat chocolate | Re heat gently and add 2 oz more chopped dark chocolate |
Another common issue is air bubbles on the surface. While they don't affect the flavor, they ruin that "mirror" finish. To fix this, once you pour the ganache, hold the tart pan about an inch above the counter and drop it flat. Do this three or four times.
The vibration forces the bubbles to the surface where they will pop.
Common Mistakes Checklist:
- ✓ Always use cold butter for the crust; if it's soft, your crust will be greasy.
- ✓ Do not let the cream reach a rolling boil; it will scorch the chocolate.
- ✓ Stir the ganache with a spatula, never a whisk, to avoid bubbles.
- ✓ Let the crust cool 100% before filling; even a little warmth can melt the ganache prematurely.
- ✓ Use a sharp, hot knife to slice the tart for those clean, professional edges.
Simple Ways to Adjust for Dietary Needs
While this is a classic indulgent dessert, you can easily tweak it to fit different needs. If you want a more intense flavor, you can add a tablespoon of espresso powder to the crust. The bitterness of the coffee deepens the chocolate notes without making the tart taste like coffee.
If you are looking for a different texture, you could try a different base. For a similar chocolate heavy experience with a different vibe, check out my Butterfinger Pie recipe which uses a nuttier profile. For this specific tart, you can swap the heavy cream for full fat coconut milk (the canned kind) to create a dairy-free version, though it will add a slight tropical note.
| Original Ingredient | Substitute | Why It Works |
|---|---|---|
| All purpose Flour | Almond Flour | Makes a denser, gluten-free crust. Note: Reduce butter by 2 tbsp. |
| Heavy Cream | Coconut Milk (Full Fat) | Provides the necessary fat for an emulsion. Note: Adds coconut flavor. |
| Vanilla Bean Paste | Spiced Rum | Adds a warm, complex kick. Note: Use 1 tbsp only. |
If you decide to use a gluten-free flour blend, look for one that contains xanthan gum. This helps the crust hold together since we aren't using much egg. The result will be slightly more crumbly than the original, but the rich ganache more than makes up for it.
Adjusting the Recipe for Different Sizes
Sometimes a full 9 inch tart is too much, or perhaps you're hosting a massive party and need to double the batch. Scaling a tart is relatively simple as long as you keep the ratios of chocolate to cream consistent. If the ratio of fat to liquid changes, the ganache won't set.
For a smaller gathering, you might want a Small Chocolate Cake instead, but if you're stuck on the tart, you can halve this recipe for a 6 inch pan. When halving, beat the egg yolk first and use only half of it. Reduce the baking time for the crust by about 5 minutes, as the smaller surface area will heat through faster.
When doubling the recipe for two 9 inch tarts, don't just double the salt and vanilla. Use about 1.5 times the salt and spices to avoid overwhelming the flavor. You'll need to work in batches for the crust if your food processor isn't large enough, as overcrowding the bowl will lead to uneven butter distribution and a patchy bake.
Debunking Common Kitchen Myths
There are a few myths about chocolate that often scare people away from making a Chocolate Ganache Tart. The first is that you must use a double boiler to melt the chocolate. This is actually unnecessary and often leads to steam getting into the chocolate, which causes it to "seize" and turn into a clump.
The hot cream method used here is much safer and more reliable for home cooks.
Another myth is that you need "baking chocolate" rather than "eating chocolate." In reality, high-quality dark chocolate bars (like Ghirardelli or Lindt) often taste better and melt more smoothly than the cheap blocks sold in the baking aisle. As long as the cocoa percentage is high, it will work perfectly.
Finally, some people think you have to temper the chocolate for a ganache. Tempering is only necessary for chocolate that needs to stay snappy at room temperature (like a chocolate bar).
Because ganache is an emulsion of chocolate and cream, it will naturally have a beautiful sheen and a soft set as long as you don't overheat the cream.
Keeping Your Tart Fresh and Savoring Leftovers
Because of the high fat and sugar content, this tart stores remarkably well. In fact, many people (myself included) think it tastes even better the next day once the flavors have had time to fully marry.
Storage: Keep the tart in the refrigerator, loosely covered with plastic wrap or in an airtight container. It will stay fresh and silky for up to 3 days. Any longer and the crust may start to soften from the moisture in the fridge.
Freezing: You can freeze the entire tart! Wrap it tightly in several layers of plastic wrap and then foil. It will keep for up to 2 months. To serve, thaw it slowly in the fridge overnight. Never thaw it on the counter, or condensation will form on the surface, ruining the glossy finish.
Zero Waste Tip: If you have leftover dough scraps from trimming the tart edges, don't throw them away! Roll them into small balls, flatten them, and bake them alongside the tart. You’ve just made chocolate shortbread cookies for a snack while you wait for the tart to chill.
If you have leftover ganache, let it firm up in the fridge, then roll it into balls and coat in cocoa powder to make quick chocolate truffles.
Perfect Pairings and Garnishes for Elegant Presentation
The final look of your Chocolate Ganache Tart is what takes it from "home cooked" to "gourmet." While the Maldon salt is a classic, you can get creative with how you serve it. The richness of the chocolate cries out for something acidic or creamy to cut through the density.
I love serving a slice with a dollop of unsweetened whipped cream or a spoonful of creme fraiche. The slight tang of the creme fraiche balances the dark cocoa perfectly. If you want a pop of color, fresh raspberries or a quick strawberry coulis provides a bright contrast that looks stunning against the dark filling.
- For a Winter Vibe
- Add a light dusting of gold luster dust or crushed candy canes.
- For a Summer Twist
- Serve with a side of mango sorbet and fresh mint leaves.
- For a Sophisticated Finish
- Use edible dried rose petals or a very thin drizzle of salted caramel.
The most important part of serving is the temperature. While the tart must be stored in the fridge, let your slice sit on the plate for about 10 minutes before eating. This allows the ganache to soften just enough to achieve that legendary "velvety" texture that makes this recipe so special.
Enjoy every bite you've earned it!

Recipe FAQs
What is chocolate ganache tart?
It is a decadent dessert featuring a crisp cocoa infused pastry shell filled with a silky, rich chocolate cream. The ganache is made by emulsifying hot heavy cream with bittersweet chocolate to achieve a smooth, melt-in-the-mouth texture.
What is ganache pastry?
Ganache pastry refers to the chocolate based crust that houses the filling. We create this by pulsing flour, cocoa powder, powdered sugar, sea salt, and cold butter until it reaches a sandy consistency, then binding it with egg yolk and heavy cream.
What are the three types of chocolate ganache?
The three primary types are defined by the ratio of chocolate to cream, ranging from pourable glazes to pipeable consistencies and firm truffles. If you enjoyed mastering the stable emulsion required for this ganache, you can apply the same precise whisking technique to achieve perfect textures in other chocolate based frostings.
What kind of chocolate is best for the tart?
Bittersweet chocolate with 60% to 70% cacao is ideal. Using high-quality chocolate ensures the ganache sets properly and maintains a sophisticated, balanced flavor profile without being overly sweet.
How to ensure the tart crust remains crisp?
Blind bake the crust at 350°F (175°C) using pie weights for 15 minutes, then remove the weights and bake for 5 more minutes. This process ensures the dough is fully dried and crisp before adding the moist ganache filling.
How to achieve a glossy ganache finish?
Stir the hot cream and chocolate mixture slowly from the center outward to create a stable emulsion, then gently stir in room temperature butter. This final addition of butter adds a signature shine and velvety mouthfeel to the finished tart.
Is it necessary to chill the tart for 4 hours?
Yes, chilling for at least 4 hours is essential for the structure. This time allows the ganache to firm up to the perfect sliceable consistency while the flavors fully meld together.
Dark Chocolate Ganache Tart

Ingredients:
Instructions:
Nutrition Facts:
| Calories | 465 kcal |
|---|---|
| Protein | 5.3 g |
| Fat | 35.8 g |
| Carbs | 32.1 g |
| Fiber | 3.8 g |
| Sugar | 19.5 g |
| Sodium | 65 mg |
