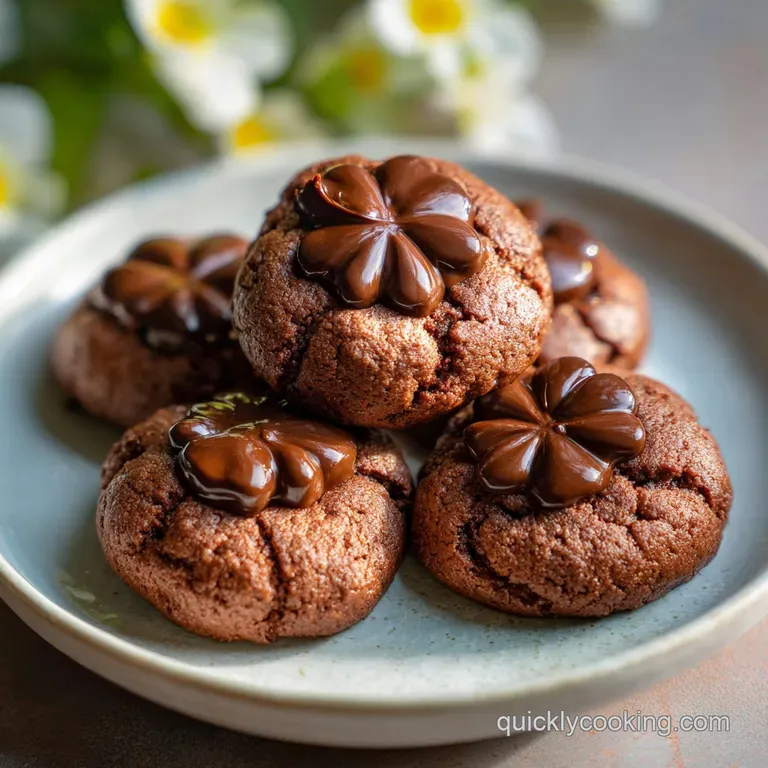
Fudgy Chocolate Blossom Cookies Recipe
- Time: Active 20 mins, Passive 1 hour 10 mins, Total 1 hour 30 mins
- Flavor/Texture Hook: Fudgy, cocoa intense centers with a sugary, crackling exterior.
- Perfect for: Holiday cookie swaps, last minute bake sales, or rainy afternoon treats.
- Achieving the Perfect Texture in Chocolate Blossom Cookies
- Essential Specs for Fast and Reliable Baking Results
- Selecting Your Ingredients for Deepest Cocoa Flavor Profiles
- Streamlined Tools Needed for a Mess Free Kitchen
- Mastering the Step by Step Process for Fudgy Results
- Resolving Common Baking Hurdles for Consistent Cookie Success
- Creative Flavor Twists to Refresh This Classic Treat
- Keeping Your Cookies Fresh and Ready for Snacking
- Scaling the Recipe for Large Crowds or Solo Sessions
- Myths Regarding the Perfect Blossom
- Ideal Pairings to Complete Your Dessert Spread
- Recipe FAQs
- 📝 Recipe Card
Achieving the Perfect Texture in Chocolate Blossom Cookies
The air in my kitchen currently smells like a high end chocolate boutique, and honestly, I am not mad about it. There is something so satisfying about the ritual of unwrapping those silver foils while the oven hums in the background.
I remember the first time I tried making these; I was in such a rush that I skipped the chilling step entirely. I ended up with chocolate puddles that looked more like sad pancakes than festive treats. It was a mess, but it taught me everything about the importance of dough stability.
You are here because you want that specific, velvety bite that only happens when the cocoa is high-quality and the bake time is dialed in to the second. We aren't just making "sweets" today; we are crafting a balanced cookie that isn't cloyingly sugary but has enough depth to keep you reaching for "just one more." The contrast between the granulated sugar coating and the soft, slightly melting chocolate crown is what makes this Chocolate Blossom Cookies recipe a staple in my house.
We've all been there staring at a tray of cookies that spread too much or, worse, chocolate kisses that slumped into a puddle of goo. I've spent enough time testing temperatures to tell you that the secret isn't just in the ingredients, but in the timing.
We're going to move fast where it counts and be patient where it matters. Let's get into the mechanics of why this specific version works so much better than the back of-the bag instructions you might have seen before.
The Physics of the Chocolate Seat
Heat Conduction: Placing the chocolate kiss on a hot cookie creates a controlled melt at the base, acting as "culinary glue" while the cool room air preserves the tip's structure. This prevents the chocolate from collapsing into a flat mess while ensuring it stays attached to the fudgy base.
Chef Tip: Freeze your chocolate kisses for 15 minutes before unwrapping; this gives you a larger margin of error so they don't melt the second they touch the warm dough.
| Method | Total Time | Resulting Texture | Best Use Case |
|---|---|---|---|
| Traditional Oven | 1 hour 30 mins | Soft, uniform crumb with a crisp exterior | Large batches and holiday gifts |
| Cast Iron Skillet | 45 mins | Ultra chewy edges and gooey, molten center | Immediate dessert for two |
| Air Fryer | 25 mins | Rapid crust formation and extra fudgy middle | Quick cravings or small 4 cookie batches |
While the oven is the gold standard for getting that even rise, I sometimes toss a few dough balls into a preheated cast iron skillet on the stovetop for a "giant cookie" vibe. It changes the texture to something much more dense, but if you're in a hurry and only want one big treat, it's a brilliant shortcut.
Just keep the heat low and cover it to mimic the oven's ambient temperature.
Essential Specs for Fast and Reliable Baking Results
When we talk about efficiency, we need to talk about numbers. Guesswork is the enemy of a consistent bake. I use three specific checkpoints to make sure I am on track. First, your butter should be exactly 65°F pliable but still holding its shape.
Second, the dough must chill for a minimum of 60 minutes to prevent the sugars from dissolving too quickly in the heat. Finally, the bake time is 10 minutes sharp; even 60 seconds over will turn these from fudgy to dry.
Controlling Spread with Temperature
The temperature of your kitchen plays a bigger role than you think. If it’s a humid summer day, that dough is going to slacken fast. I always recommend using a heavy duty baking sheet because thin, flimsy pans warp and cause uneven heat distribution.
If you want to see that beautiful crinkle on the surface, you need the baking soda to react quickly with the acidic Dutch process cocoa.
I’ve found that using a mix of coconut sugar and light brown sugar provides a much more complex sweetness than just plain white sugar. The coconut sugar has a lower melting point, which helps create those tiny fissures on the top of the cookie as it expands. It’s a subtle shift, but once you taste the difference, you won't go back. This technique is actually quite similar to the one I use in my Blueberry Muffin Cookies recipe to get that perfect muffin top crackle.
Balancing the Cocoa Ratio
Finding the sweet spot between flour and cocoa is where most recipes fail. Too much flour and you have a hockey puck; too much cocoa and the structure collapses. By using exactly 0.5 cup of Dutch process cocoa, we get that dark, intense flavor without sacrificing the "chew" factor.
The cocoa acts as a drying agent, so we balance it with a large egg to keep the protein structure strong.
| Ingredient | Science Role | Pro Secret |
|---|---|---|
| Dutch process Cocoa | Neutralized acidity | Bloom it with the butter for a deeper, darker color |
| Coconut Sugar | Moisture retention | Provides a subtle caramel undertone that mimics expensive vanilla |
| Baking Soda | Leavening/Browning | Always whisk into the flour first to avoid bitter "hot spots" |
Selecting Your Ingredients for Deepest Cocoa Flavor Profiles
You don't need a pantry full of specialty items, but the quality of your chocolate matters. Since the Hershey's Kisses are the star of the show, make sure they are fresh. Old chocolate gets a white "bloom" on it that looks dusty and won't melt smoothly.
For the base, Dutch process cocoa is non negotiable here because it has been treated with alkali to reduce bitterness, making it the perfect partner for the sugars we're using.
- 1.5 cups All Purpose Flour: Provides the essential gluten structure.
- 0.5 cup Dutch process cocoa powder: Delivers the deep, dark chocolate base. Why this? It's less acidic than natural cocoa, ensuring a fudgy texture.
- 1 tsp Baking soda: The lifting agent that creates the crinkle.
- 0.5 tsp Fine sea salt: Crucial for cutting through the sugar.
- 0.5 cup Unsalted butter, softened: The fat source for a velvety mouthfeel.
- 0.5 cup Coconut sugar: Adds a toasted, nutty sweetness.
- 0.5 cup Light brown sugar, packed: Provides moisture and chewiness.
- 1 Large egg, room temperature: Binds everything together. Why this? Cold eggs can seize the softened butter.
- 1.5 tsp Pure vanilla extract: Enhances the cocoa notes.
- 0.25 cup Granulated sugar: For rolling and creating that sparkling crust.
- 24 Hershey's Kisses, unwrapped: The iconic "blossom" center.
If you find yourself running low on the specific sugars, you can swap them out, but be mindful of how it changes the final result. For example, using all granulated sugar will result in a much crispier, flatter cookie that lacks the fudgy soul of the original.
| Original Ingredient | Substitute | Why It Works |
|---|---|---|
| Coconut Sugar | Dark Brown Sugar | Similar moisture; Note: Will be slightly sweeter |
| Unsalted Butter | Virgin Coconut Oil (Solid) | Same fat ratio; Note: Adds a faint tropical aroma |
| Dutch process Cocoa | Natural Cocoa + 1/4 tsp extra soda | Mimics the pH balance; Note: Result will be lighter in color |
Streamlined Tools Needed for a Mess Free Kitchen
To keep things high efficiency, I skip the fancy sifting. A simple whisk does the job of aerating the flour and cocoa without the extra dishes. I also highly recommend a small cookie scoop (about 1 tablespoon size).
Not only does it keep your hands clean, but it ensures every single cookie is the same size, which means they all finish baking at the exact same time.
I’ve made the mistake of hand rolling without a scoop before, and half my tray was burnt while the other half was raw. Never again. Also, grab some parchment paper or a silicone baking mat. These cookies are high in sugar, and they will stick to a bare pan like superglue. If you’re looking to expand your baking arsenal after this, you might love the texture possibilities in The Chocolate Chip recipe, which uses similar leveling techniques.
For the Dry Foundation
Keep your dry ingredients in a separate medium bowl. I like to whisk the flour, cocoa, soda, and salt together for at least 30 seconds. You’re looking for a uniform, sandy brown color. If you see lumps of cocoa, press them out with the back of a spoon.
This prevents you from biting into a bitter pocket of raw cocoa later.
For the Wet Components
In your main mixing bowl, we’re going to work the butter and sugars. If you have a stand mixer, use the paddle attachment. If not, a sturdy spatula and some elbow grease work just fine. We aren't trying to whip a ton of air into this like a sponge cake; we just want a smooth, homogenous paste.
This is the foundation for that fudgy center we're after.
Mastering the step-by-step Process for Fudgy Results
- Prep the oven. Preheat to 350°F and line your sheets. Note: A hot oven is vital for that initial rise.
- Whisk the dry. Combine 1.5 cups flour, 0.5 cup cocoa, 1 tsp baking soda, and 0.5 tsp salt.
- Cream the fats. Beat 0.5 cup butter with 0.5 cup coconut sugar and 0.5 cup brown sugar until pale and fluffy.
- Add liquids. Mix in 1 egg and 1.5 tsp vanilla. Note: Scrape the sides to ensure no butter streaks remain.
- Merge the two. Slowly fold the dry mix into the wet until no white streaks are visible.
- Chill the dough. Cover and refrigerate for 60 minutes. Note: This is the most important step for preventing spread.
- Scoop and roll. Form 1 inch balls, then roll them in the 0.25 cup granulated sugar until heavily coated.
- Bake the base. Space them 2 inches apart and bake for 10 minutes until the edges are set and tops are cracked.
- The Crown. Remove from oven and immediately press one Hershey's Kiss into the center of each.
- Set the chocolate. Let them sit on the pan for 5 minutes until the chocolate base softens and sticks.
Don't be tempted to touch the chocolate kisses while they are in that "softened" state right after pressing. They will look glossy and beautiful, but if you poke them, they’ll collapse. Transfer them carefully to a wire rack to finish cooling completely.
The residual heat from the cookie is what does the work here.
Resolving Common Baking Hurdles for Consistent Cookie Success

The most common issue I hear about is the "puddle effect." If your cookies came out flat, your butter was likely too warm when you started, or you skipped the fridge time. Remember, the fat needs to be cold enough to hold the flour structure up until the heat of the oven sets the proteins.
Preventing Cookie Spreading
If you’ve chilled the dough and they are still spreading, check your oven temperature with a separate thermometer. Many ovens run 25°F hot, which melts the fat before the structure can set.
Another trick is to use a "cold" baking sheet if you're doing batches, never put raw dough on a hot pan that just came out of the oven. This is a classic mistake that ruins the bottom texture of the cookie.
Avoiding Melting the Chocolate Too Fast
If your chocolate kisses are turning into a pool of liquid, you might be pressing them in too early or your kitchen is too warm. I’ve found that letting the cookies sit for exactly 60 seconds after pulling them from the oven just enough time for the "sizzle" to stop is the perfect window. For more complex chocolate textures, you can see how we handle different melting points in our Small Chocolate Cake recipe.
| Problem | Root Cause | Solution |
|---|---|---|
| Cookies are dry/crumbly | Too much flour or overbaked | Measure flour by weight or use the "spoon and level" method |
| Chocolate won't stick | Cookies cooled too much before pressing | Press the kisses in within 2 minutes of exiting the oven |
| Dough is too sticky to roll | Butter was too soft or not chilled long enough | Return dough to the freezer for 15 mins to firm up quickly |
Common Mistakes Checklist
- ✓ Using "spread" or margarine instead of real butter (too much water content).
- ✓ Forgetting to unwrap the chocolate kisses before the cookies come out of the oven.
- ✓ Over mixing the flour, which develops too much gluten and makes them tough.
- ✓ Not rolling the balls in enough sugar; that sugar layer actually helps the crinkle form.
- ✓ Placing the dough balls too close together on the baking sheet.
Creative Flavor Twists to Refresh This Classic Treat
Once you've mastered the base, you can start playing with the "Blossom" part. I love making a batch of Christmas Chocolate Blossom Cookies by using the striped peppermint kisses. The red and white contrast against the dark chocolate base is stunning.
Crafting Peppermint Variations
For this, I add a tiny drop of peppermint extract to the dough along with the vanilla. It gives it that "thin mint" vibe that everyone loves during the holidays. If you're feeling adventurous, try rolling the dough balls in crushed candy canes instead of granulated sugar for an extra crunch.
Creating Peanut Butter Swaps
While this is a chocolate based recipe, you can easily pivot to a Peanut Butter Blossom Cookies Recipe style by replacing half the butter with creamy peanut butter. You'll need to reduce the cocoa powder slightly to maintain the moisture balance. It's a classic for a reason!
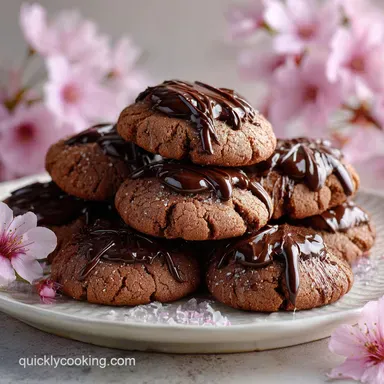
Adding a Dark Chocolate Dip
If you want to go over the top, wait for the cookies to cool completely, then dip the bottom half in melted dark chocolate and sprinkle with sea salt. It adds a "gourmet" feel to a very simple cookie. Trust me, it's a total crowd pleaser at parties.
Keeping Your Cookies Fresh and Ready for Snacking
Storage is where people often go wrong. Because these cookies have a soft chocolate center, you can't just stack them in a jar the second they are cool. The chocolate takes a long time to fully re solidify.
I usually leave them out on the counter for at least 4 hours before attempting to put them in a container.
- Room Temp
- Store in an airtight container for up to 5 days. Place a piece of parchment paper between layers to prevent the kisses from smudging.
- Freezer
- These freeze beautifully! Freeze the baked cookies on a tray first, then move to a zip top bag. They’ll last 3 months. To eat, just let them thaw on the counter for 20 minutes.
- Zero Waste Tip
- If you have leftover cocoa powder or sugar crumbs from the rolling bowl, don't toss them! Stir them into your morning coffee or oatmeal for a "mocha" start to the day. If you have broken cookie bits, they make the best topping for vanilla ice cream.
Scaling the Recipe for Large Crowds or Solo Sessions
If you're making these for a big event, you can easily double the recipe. However, don't double the baking soda 1:1. Use 1.5x the amount instead to avoid a metallic taste. For liquids like vanilla, keep the ratio the same.
If you're scaling down for a solo night, use half an egg by whisking it in a small bowl first and measuring out 2 tablespoons.
| Goal | Adjustment | Note |
|---|---|---|
| Double Batch (48) | 2x ingredients, but only 1.5x baking soda | Work in batches; keep half the dough in the fridge |
| Half Batch (12) | Use 2 tbsp whisked egg and 1/4 cup butter | Use a smaller bowl for mixing to ensure even aeration |
| High Altitude | Add 2 tbsp flour and reduce sugar by 1 tbsp | Prevents the cookie from collapsing in thin air |
Myths Regarding the Perfect Blossom
There’s a common myth that you have to put the chocolate kisses in the oven with the cookies. Please, don't do this. The chocolate will seize, lose its shine, and potentially burn. The residual heat method is the only way to get that professional look.
Another misconception is that you need "special" expensive butter. While high fat European butter is great, standard supermarket unsalted butter works perfectly here because we are relying on the cocoa and sugars for the primary flavor profile. Save the fancy butter for your shortbread!
Finally,, some people think you can't over chill the dough. Actually, if it sits in the fridge for more than 24 hours, the flour can hydrate too much, leading to a "gummy" texture. 1 to 4 hours is the sweet spot for the best results.
Ideal Pairings to Complete Your Dessert Spread
These cookies are quite rich, so they pair best with something that has a bit of acidity or bitterness to balance the palate. A cold glass of whole milk is the traditional choice, but a sharp espresso or a tart raspberry coulis on the side takes it to another level.
If you’re setting up a dessert board, I like to serve these alongside some lighter options. The contrast with the airy texture of a Blueberry Muffin Cookies recipe or a fruit based tart works wonders. It keeps the meal from feeling too heavy while still satisfying that deep chocolate craving.
Right then, I think you're ready to hit the kitchen. Just remember: chill that dough, unwrap those kisses early, and don't overbake. You've got this! Let me know how the crinkle turns out it’s the most satisfying part of the whole process. Happy baking!

Recipe FAQs
Can I substitute the Hershey's Kisses with chocolate chips?
No, you shouldn't for the classic result. Chocolate chips are designed to hold their shape while baking, whereas Kisses melt just enough to adhere but retain their iconic crown shape.
How long must the dough chill before rolling out for best texture?
Chill the dough for a minimum of 60 minutes. This chilling period is crucial; it prevents the fat from melting too fast, which stops the cookies from spreading into flat puddles.
How do I prevent the finished cookies from sticking severely to the baking sheet?
Always line the pan with parchment paper or a silicone mat. Sugar heavy cookies like these will glue themselves to a bare metal pan due to the high sugar content caramelizing.
Is it true that pressing the chocolate kiss into the cookie while it’s hot ruins the shine?
No, this is a common misconception. Pressing the kiss immediately after baking uses the residual heat to soften the base, ensuring it sticks perfectly while the cool room air preserves the tip’s structure.
What happens if I skip rolling the dough balls in granulated sugar?
You lose the signature crackled exterior. The granulated sugar creates a crisp crust that fissures as the cookie spreads slightly, which is essential for the classic blossom appearance.
How do I successfully freeze the baked cookies without damaging the chocolate tops?
Flash freeze the baked cookies first, then bag them. Place the cooled cookies on a tray for one hour until the chocolate is rock solid; then transfer them to an airtight bag to prevent freezer burn.
What is the best substitute for coconut sugar if I need a fudgier result?
Substitute with light brown sugar, packed, for a similar moisture profile. If you master the dough handling technique here, you can apply the same principles to reduce spread in our mm cookies in recipe.
Fudgy Chocolate Blossom Cookies
Ingredients:
Instructions:
Nutrition Facts:
| Calories | 132 kcal |
|---|---|
| Protein | 1.7 g |
| Fat | 5.6 g |
| Carbs | 19.7 g |
| Fiber | 0.6 g |
| Sugar | 12.6 g |
| Sodium | 102 mg |
