No Bake Cream Cheese Peanut Butter: Guilt-Free
- Time:20 minutes active + 4 hours chilling = Total 4 hours 20 mins
- Flavor/Texture Hook: Velvety filling with a shattering chocolate cookie crust
- Perfect for: Last minute potlucks, budget-friendly celebrations, or a low stress weekend treat
- No bake cream cheese peanut butter tips
- Recipe Specs
- The Secret to Success
- Component Analysis
- Shopping List Breakdown
- Equipment Needed
- How to Make It
- How to Fix Common Problems
- Troubleshooting Common Issues
- Make It Your Own
- Scaling the Recipe
- Truths About No Bake Pies
- Storage Guidelines
- What to Serve This With
- Recipe FAQs
- 📝 Recipe Card
No bake cream cheese peanut butter tips
Imagine walking into the kitchen and being hit with that heavy, nutty scent of peanut butter mixed with a hint of vanilla. I remember the first time I tried a "shortcut" pie for a family get together, and it was a total disaster - a puddle of sugary goo that refused to set.
I spent the whole night apologizing while everyone ate the crust with spoons. That's when I realized the balance of fat and air is everything.
This is the ultimate no bake cream cheese peanut butter pie with chocolate whipped cream. It's designed for those of us who don't want to hover over a hot oven or spend a fortune on fancy ingredients.
Instead of fighting with a temperamental baked cheesecake, we're using a chilled setting method that gives you a clean slice every single time.
You can expect a texture that feels like a cloud but tastes like a decadent peanut butter cup. It's rich, but the addition of Greek yogurt keeps it from feeling too heavy. Trust me on this - the wait for the chill is the hardest part, but it's what makes the texture velvety rather than mushy.
Recipe Specs
When you're putting this together, you need to be mindful of the temperature of your ingredients. I've learned the hard way that if your cream cheese is even slightly cold, you'll end up with those tiny little white lumps that just won't go away, no matter how much you beat them. Soften that cheese completely.
The timing is non negotiable here. We've got 20 minutes of active work, but the 4 hours in the fridge is where the magic happens. The fats in the peanut butter and cream cheese need to stabilize at a low temperature to create that structural integrity.
If you try to cut into it after two hours, you're basically making a peanut butter dip, not a pie.
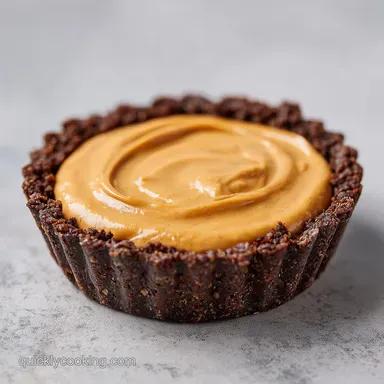
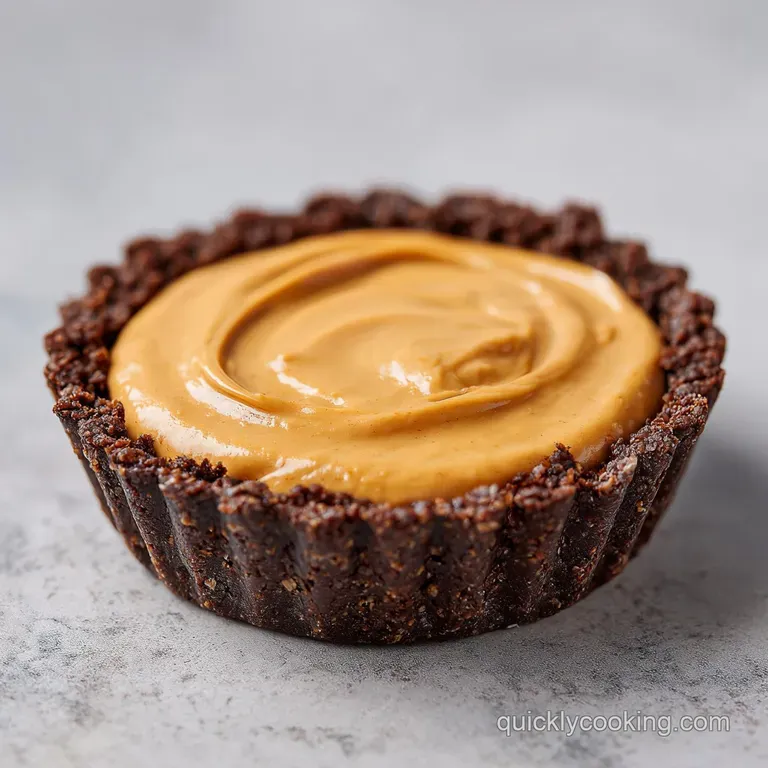
Let's look at the basic framework of this build. It's a three layer system: a dense, buttery cookie base, a fluffy peanut butter center, and a light chocolate crown. Each layer serves a purpose, from the crunch of the base to the airiness of the topping.
The Secret to Success
The reason this works is all about managing the air and the fat. Since we aren't using eggs or heat to set the filling, we rely on the natural stability of chilled fats and the structure of whipped cream.
Fat Stability: The cream cheese and peanut butter provide a dense base that firms up in the cold. This creates a "skeleton" for the pie.
Air Incorporation: By folding in stiff peaked whipped cream, we introduce millions of tiny air bubbles. This transforms a heavy paste into a light, mousse like filling.
Acid Balance: The Greek yogurt adds a subtle tang. This cuts through the richness of the honey and peanut butter so the flavor doesn't become one dimensional.
Moisture Control: The coconut sugar in the crust absorbs a tiny bit of the melted butter, preventing the base from becoming a greasy mess.
Since this is a no bake project, it's helpful to see how it stacks up against the baked versions you might see in cookbooks.
| Feature | No Bake Method | Baked Method | Best For |
|---|---|---|---|
| Prep Time | Fast (20 mins) | Slow (Prep + Bake) | Busy schedules |
| Texture | Velvety/Mousse | Dense/Cakey | Personal preference |
| Risk | Low (Setting issues) | High (Cracking/Overcooking) | Beginners |
| Temperature | Cold/Refreshing | Warm/Heavy | Summer months |
This comparison shows why the no bake route is so budget friendly and fast. You save on energy costs and avoid the stress of a water bath.
Component Analysis
Understanding your ingredients helps you troubleshoot on the fly. I used to just throw things in the bowl, but once I understood the role of each part, my results became much more consistent.
| Ingredient | Science Role | Pro Secret |
|---|---|---|
| low-fat Cream Cheese | Structural Base | Use room temp to avoid lumps |
| Heavy Whipping Cream | Aeration/Volume | Keep ice cold for maximum lift |
| Honey | Binder & Sweetener | Room temp honey blends smoother |
| Chocolate Cookies | Texture/Contrast | Pulse into a fine sand, not powder |
Wait, why use low-fat cream cheese? According to USDA FoodData, the protein to fat ratio in different cheese types affects how they hold air. In a no bake setting, a slightly lower fat content can actually prevent the pie from feeling too "greasy" on the tongue while still providing the necessary thickness.
Shopping List Breakdown
Keep it simple. You don't need gourmet brands for this to taste high end. Most of these are pantry staples or quick trips to the dairy aisle.
- 1.5 cups (150g) chocolate cookie crumbs Why this? Provides a deep, cocoa base (Sub: crushed Oreos)
- 5 tbsp (70g) unsalted butter, melted Why this? Binds crumbs together (Sub: coconut oil)
- 1 tbsp (12g) coconut sugar Why this? Adds a caramel note (Sub: brown sugar)
- 8 oz (225g) low-fat cream cheese, softened Why this? Creates the creamy structure (Sub: full fat for richness)
- 0.5 cup (125g) natural creamy peanut butter Why this? The star flavor profile (Sub: almond butter)
- 1/3 cup (80ml) honey Why this? Natural, thick sweetener (Sub: maple syrup)
- 0.25 cup (60g) plain Greek yogurt Why this? Adds tang and smoothness (Sub: sour cream)
- 1 tsp (5ml) vanilla extract Why this? Rounds out the flavors (Sub: almond extract)
- 2 cups (480ml) heavy whipping cream, chilled (divided) Why this? Provides lift and air (Sub: coconut cream)
- 3 tbsp (25g) unsweetened cocoa powder Why this? Pure chocolate intensity (Sub: melted dark chocolate)
- 3 tbsp (35g) powdered sugar Why this? Dissolves instantly in cream (Sub: superfine sugar)
- 0.5 tsp (2.5ml) vanilla extract Why this? Enhances the chocolate top (Sub: espresso powder)
Equipment Needed
You don't need a professional kitchen for this. I actually make this with a basic hand mixer and a few bowls. If you have a stand mixer such as KitchenAid, it'll save your arm some work, but it's not mandatory.
- 9 inch pie dish (glass or ceramic works best)
- Hand mixer or stand mixer
- Large mixing bowl (for the filling)
- Medium mixing bowl (for the chocolate cream)
- Rubber spatula (essential for folding)
- Measuring cups and spoons
- Small microwave safe bowl (for melting butter)
How to Make It
Right then, let's get into the actual assembly. This is where we turn a few basic ingredients into something that looks and tastes like it came from a boutique bakery.
Phase 1: Pressing the Base
- Combine chocolate cookie crumbs, melted butter, and coconut sugar in a bowl. Mix until it looks like wet sand.
- Press the mixture firmly into the bottom and up the sides of a 9 inch pie dish. Note: Use the bottom of a flat glass to pack it tight.
- Freeze for 10 minutes until the base feels solid to the touch.
Phase 2: Whipping the Filling
- Beat softened low-fat cream cheese, natural peanut butter, honey, Greek yogurt, and 1 tsp vanilla extract in a bowl. Mix until completely smooth and velvety.
- In a separate bowl, whip 1 cup of heavy whipping cream on medium high. Beat until stiff peaks form (the cream should stand straight up when you lift the whisk).
- Gently fold the whipped cream into the peanut butter mixture using a rubber spatula. Note: Do not stir vigorously or you'll deflate the air.
- Pour the filling into the chilled crust and smooth the top with a spatula.
Phase 3: Crowning with Chocolate
- Combine the remaining 1 cup of heavy cream, cocoa powder, powdered sugar, and 0.5 tsp vanilla extract in a clean bowl.
- Whip on high speed until the mixture is thick, airy, and holds its shape.
- Spoon the chocolate cream over the peanut butter layer and create decorative swirls.
- Refrigerate for at least 4 hours until the filling is firm and slices cleanly.
Chef's Tip: To get those professional swirls on top, use the back of a teaspoon to drag the chocolate cream in a spiral pattern from the center outwards.
How to Fix Common Problems
Even with a simple no bake cream cheese peanut butter pie, things can go sideways. Usually, it's a temperature issue or a mixing error.
Troubleshooting Common Issues
| Issue | Solution |
|---|---|
| Why Your Filling is Runny | If your pie feels more like a pudding than a cake, you likely over mixed the whipped cream or didn't chill it long enough. According to guidelines from Serious Eats, ove |
| Why Your Crust is Crumbling | A crumbling crust usually means there wasn't enough butter or it wasn't pressed firmly enough. If the crumbs are too coarse, they won't bond. Make sure you're using a flat object to compress the base. |
| Why Your Topping is Grainy | Grainy chocolate cream happens when the powdered sugar isn't fully incorporated or the cocoa powder is clumpy. Sifting your cocoa powder through a fine mesh strainer before adding it to the cream is a |
Make It Your Own
The beauty of this recipe is that it's a canvas. Once you've mastered the base, you can start playing with the flavors to fit your mood or whatever is in your pantry.
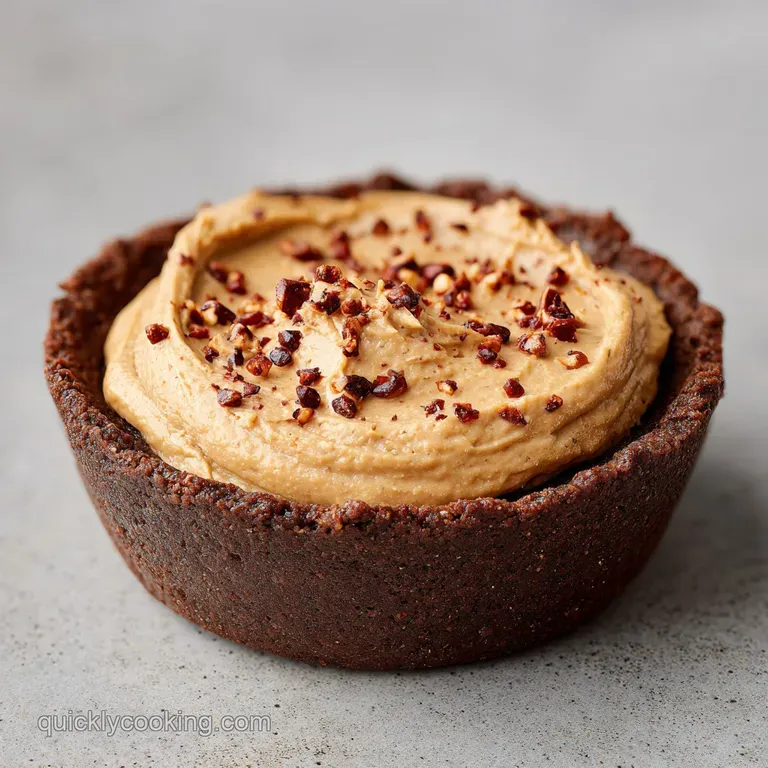
For a Salted Caramel Twist Drizzle a bit of store-bought salted caramel over the peanut butter layer before adding the chocolate cream. The saltiness makes the peanut butter pop.
For Added Crunch Fold in 1/4 cup of chopped roasted peanuts or mini chocolate chips into the filling. It adds a nice contrast to the velvety texture.
For a Low Carb Alternative Substitute the chocolate cookies with almond flour and cocoa powder, and use a sugar-free maple syrup instead of honey. It won't be exactly the same, but it satisfies the craving.
If you love this kind of ease, you might also enjoy my Biscoff Truffles, which use a similar no bake logic but with a cookie butter twist.
Scaling the Recipe
Depending on the crowd, you might need to adjust the size. Just remember that scaling a no bake dessert isn't always linear because of the volume of air you're whipping in.
Scaling Down (Half Batch) Use a smaller 6 inch springform pan. Reduce the chilling time by about 20%, as a smaller mass cools faster. Since you'll be using half an egg's worth of cream (metaphorically), just measure by weight to keep the ratios exact.
Scaling Up (Double Batch) If you're making two pies, do not whip all the cream in one bowl unless you have a very large professional mixer. Work in batches to ensure you get those stiff peaks. For salt or vanilla, only increase to 1.5x instead of 2x to avoid overpowering the peanut butter.
| Variation | Pan Size | Chill Time | Adjustment |
|---|---|---|---|
| Single | 9 inch | 4 hours | Standard |
| Half | 6 inch | 3 hours | Divide all by 2 |
| Double | 2x 9 inch | 4 hours | Mix filling in batches |
This ensures that the air stays in the mousse and the crust doesn't become too thick or too thin.
Truths About No Bake Pies
There are a few myths floating around that make people nervous about no bake desserts. Let's set the record straight.
Myth: No bake means it won't be stable. The truth is that chilled fats are incredibly stable. As long as you use enough cream cheese and peanut butter, the pie will hold its shape perfectly. The "set" comes from the cold, not from heat.
Myth: low-fat cream cheese ruins the texture. Actually, in a no bake recipe, low-fat cream cheese can be a blessing. It's often slightly firmer when chilled than some ultra premium full fat versions, which helps the pie stay upright.
Myth: You have to use a store-bought crust. Homemade is always better. The chocolate cookie and butter combo provides a "shatter" effect that store-bought graham cracker crusts just can't match.
Storage Guidelines
This pie keeps remarkably well, but because of the dairy, you have to be smart about how you store it.
Fridge Storage Keep the pie in the refrigerator, covered with plastic wrap or in an airtight container. It will stay fresh and velvety for up to 5 days. In fact, some people find that the flavors meld even better on day two.
Freezing Instructions You can freeze this pie for up to 2 months. To do this, freeze the pie uncovered for 2 hours to set the top, then wrap it tightly in foil and plastic wrap. When you're ready to eat, thaw it in the fridge overnight.
Don't thaw it on the counter, or you'll get condensation on the chocolate cream.
Zero Waste Tips If you have leftover cookie crumbs, don't toss them. Mix them into your morning yogurt or use them as a topping for vanilla ice cream. Any leftover whipped chocolate cream can be dolloped onto fresh strawberries for a quick snack.
What to Serve This With
Because this no bake cream cheese peanut butter pie is so rich, you want to pair it with things that provide contrast.
Fresh Berries A side of tart raspberries or sliced strawberries cuts through the heaviness of the peanut butter and adds a pop of color to the plate.
Strong Coffee A bold espresso or a dark roast coffee is the perfect companion. The bitterness of the coffee balances the sweetness of the honey and chocolate.
Other No Bake Treats If you're putting together a dessert platter, pair this with some Butterfinger Balls for a themed "peanut butter and chocolate" feast.
Right then, you're all set. Just remember: soften that cheese, whip that cream until it's stiff, and for the love of all things sweet, wait the full 4 hours before you dive in. Happy eating!
Recipe FAQs
How long does this pie need to set in the refrigerator?
Refrigerate for at least 4 hours. This allows the peanut butter and chocolate cream layers to firm up sufficiently for clean slicing.
Why is my filling runny instead of firm?
You likely overmixed the whipped cream or didn't chill it long enough. Over mixing collapses the air bubbles, which ruins the structure of the filling.
Why is my chocolate cookie crust crumbling?
The mixture wasn't pressed firmly enough or lacked sufficient butter. Use a flat bottomed object to compress the crumbs tightly into the pie dish to ensure a solid bond.
Is it true this pie needs to be baked to set?
No, this is a common misconception. The pie sets through refrigeration, using the fats in the cream cheese and whipped cream for stability.
Can I substitute honey with another liquid sweetener?
Yes, maple syrup or agave are great alternatives. If you enjoy balancing sweet and salty flavors, see how we use a similar profile in our caramel bars.
Why is my chocolate cream topping grainy?
The cocoa powder or powdered sugar wasn't fully incorporated. Whip the mixture on high speed until it is thick, airy, and completely smooth.
How to prepare the peanut butter layer?
Beat softened cream cheese, natural peanut butter, honey, Greek yogurt, and vanilla until smooth. Gently fold in stiff peaked whipped cream with a rubber spatula before pouring it into the crust.
No Bake Peanut Butter Pie