Best Crusty Italian Bread: Shatter-Crisp Crust
- Time: 20 min active + 2 hours 45 mins resting/baking = Total 3 hours 5 mins
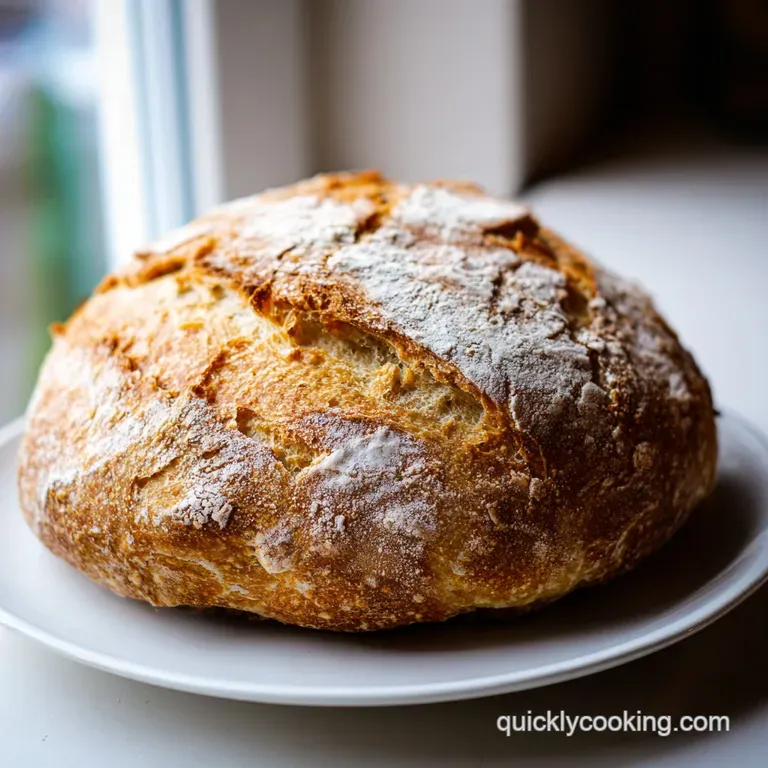
- Flavor/Texture Hook: Deep mahogany crust that shatters on impact with a velvety, open crumb
- Perfect for: Weekend brunch, dinner parties, or anyone tired of store-bought loaves
Best Crusty Italian Bread
There is nothing more frustrating than spending hours on a loaf only to pull out something that looks like a giant, pale biscuit. I remember the first time I tried a "no knead" version from a random blog, and it came out with a gummy, rubbery center and a bottom that felt like a wet sponge.
It was a total disaster, and I almost gave up on home baking entirely because I thought my oven just wasn't "professional" enough.
The real problem wasn't my oven, but the lack of steam. Without a trapped, humid environment during the first half of the bake, the crust sets too quickly, trapping the bread and preventing it from expanding. This recipe fixes that by using a preheated Dutch oven.
It creates a mini steam chamber that allows the dough to expand fully before the crust hardens, giving you that authentic, rustic look and feel.
You can expect a loaf that sounds hollow when you tap the bottom and smells like a professional bakery. We are going for a deep, dark brown color, not a light tan. Trust me, the darkness is where the flavor lives. Let's get into the flow and get this bread in the oven.
The Secret To Great Texture
To get that professional result, we have to focus on how the ingredients interact under heat. This isn't about complex chemistry, just a few simple mechanical wins.
- Steam Trapping: The lid on the pot keeps the water evaporating from the dough inside, which keeps the surface moist and stretchy for longer.
- Yeast Fuel: A pinch of sugar gives the yeast an immediate energy boost, ensuring a vigorous rise even if your kitchen is a bit chilly.
- Controlled Heat: High heat (450°F) creates a rapid expansion of gases, which pushes the dough upward and creates those airy holes.
- Slow Cooling: Letting the bread rest on a wire rack prevents the bottom from steaming itself back into a soggy mess.
| Method | Time | Texture | Best For |
|---|---|---|---|
| Open Baking Sheet | 45 mins | Tougher, thicker crust | Baguettes |
| Dutch Oven | 45 mins | Shattering crust, airy crumb | Rustic Loaves |
| Bread Machine | 3 hours | Uniform, softer crust | Daily Sandwich Bread |
Component Analysis
I've found that using the right flour is the biggest variable here. According to King Arthur Baking, the protein content in your flour determines how much gluten forms, which is what gives the bread its structure. For this recipe, standard all purpose works, but bread flour will give you a slightly chewier result.
| Ingredient | Science Role | Pro Secret |
|---|---|---|
| All Purpose Flour | Structure | Sift it if you see clumps to avoid "flour pockets" |
| Active Dry Yeast | Leavening | Use a thermometer; water over 120°F kills the yeast |
| Sea Salt | Flavor/Control | Mix salt with flour, not directly on yeast |
| Olive Oil | Crumb Texture | Adds a slight richness and helps the dough handle better |
The Component List
Gather everything before you start. There is nothing worse than realizing you're out of yeast halfway through the mixing process.
- 3 cups (375g) all purpose flour Why this? Balanced protein for a tender but sturdy crumb
- 1.5 cups (355ml) warm water Why this? Activates yeast without scorching it
- 1 packet (7g) active dry yeast Why this? Reliable, consistent lift
- 1.5 tsp (9g) sea salt Why this? Enhances flavor and regulates yeast growth
- 1 tsp (5g) granulated sugar Why this? Feeds the yeast for a faster start
- 1 tbsp (15ml) extra virgin olive oil Why this? Keeps the interior velvety
- 2 tbsp (20g) cornmeal Why this? Prevents sticking and adds a rustic crunch
| Original Ingredient | Substitute | Why It Works |
|---|---|---|
| All Purpose Flour | Bread Flour | Higher protein. Note: Results in a chewier, taller loaf |
| Sea Salt | Kosher Salt | Similar saltiness. Note: Use slightly more as grains are larger |
| Olive Oil | Melted Butter | Similar fat content. Note: Adds a buttery, richer flavor profile |
Right then, before we start the steps, here is the plan. We've got a prep flow (mixing), a cooking flow (the heat), and the finish (the cool down).
The Baking Process

Let's crack on with the actual making. I prefer a "shaggy" approach here - don't overwork the dough or you'll end up with a brick instead of a cloud.
1. Activating the Base
Combine warm water, sugar, and yeast in a mixing bowl. Let sit for 5-10 minutes until the mixture becomes foamy and smells like beer. If it doesn't foam, your yeast is dead - start over.
2. Mixing the Shaggy Dough
Stir in the flour and salt using a wooden spoon until a shaggy dough forms and no dry flour streaks remain. Note: It should look messy, not smooth.
3. Managing the First Rise
Cover the bowl with a damp cloth and leave in a warm, draft free spot for approximately 2 hours, or until the dough has doubled in size. Check for a "jiggle" when you shake the bowl.
4. Shaping and Preheating
Preheat the oven to 450°F (230°C) with the Dutch oven inside. Gently fold the dough over itself on a floured surface to form a round boule and place it on parchment paper.
5. Baking for the Shattering Crust
Carefully lift the parchment and dough into the preheated Dutch oven. Cover with the lid and bake for 30 minutes. Note: The lid is doing all the hard work here.
6. The Final Brown
Remove the lid and bake for another 15 minutes until the crust is a deep mahogany brown and the loaf sounds hollow when tapped on the bottom.
Chef's Tip: To get those professional looking "ears" or cracks on top, use a very sharp knife or a razor to slash a cross into the top of the dough just before it goes into the pot.
Precision Checkpoints
- Temperature: The oven must hit 450°F (230°C) before the bread goes in.
- Volume: The dough must be exactly double in size after the 2 hour rise.
- Sound: The bottom must sound like a drum when tapped to ensure it's not gummy.
Common Baking Failures
Even with a simple recipe, things can go sideways. Usually, it's a matter of temperature or timing.
Fixing a Flat Loaf
If your bread didn't rise and looks like a pancake, it's usually because the yeast was killed by water that was too hot or the environment was too cold during the rise. Trust me, a drafty window can kill a rise in minutes.
Preventing a Burnt Bottom
Some Dutch ovens have thinner bottoms that scorch the bread. If this happens, add a layer of cornmeal or a piece of parchment paper to create a buffer.
Avoiding a Dense Crumb
Under proofing is the main culprit here. If you don't wait the full 2 hours, the air pockets won't form, and you'll get a dense, heavy loaf.
| Problem | Root Cause | Solution |
|---|---|---|
| Pale Crust | Oven too cool | Check temp with an oven thermometer |
| Gummy Center | Underbaked | Bake for 5 more mins without the lid |
| No Rise | Dead Yeast | Test yeast in warm water before adding flour |
Common Mistakes Checklist
- ✓ Did you use water that was too hot? (Should feel like bath water)
- ✓ Did you forget to preheat the pot? (Crucial for the "spring")
- ✓ Did you over knead the dough? (Keep it shaggy)
- ✓ Did you slice it while hot? (Wait 30 mins or the inside will collapse)
Adjusting Batch Sizes
If you're just baking for yourself, a full loaf of the best crusty italian bread is a lot. But if you're hosting, you might need more.
Scaling Down (½ batch): Use 1.5 cups of flour and 0.75 cups of water. Use half a packet of yeast (about 3.5g). Use a smaller pot, like a 2 quart saucepan with a lid, and reduce the "lid on" bake time by about 5 minutes.
Scaling Up (2x batch): Double the flour and water, but only increase the salt and sugar to 1.5x. Using too much salt can actually slow down the yeast. Work in two separate Dutch ovens or bake in batches.
Lower the oven temp to 425°F (220°C) and extend the bake time by 10 minutes to ensure the larger mass cooks through.
Decision Shortcut
- If you want a thinner, crunchier crust, bake for 20 mins without the lid instead of 15.
- If you want a softer interior, add 1 extra tsp of olive oil.
- If you have time, let the dough rise in the fridge for 24 hours for a sourdough like flavor.
Bread Myths Debunked
I've seen a lot of "rules" about bread that are actually just myths. Let's clear those up.
The "Kneading for Hours" Myth: Many people think you need to spend 20 minutes pummeling dough to get a good rise. In reality, for a rustic loaf, the long rise time does the "kneading" for you by developing gluten slowly.
The "Sugar is for Taste" Myth: You won't actually taste the 1 tsp of sugar in the final loaf. Its only job is to wake up the yeast quickly so you can get to the eating part faster.
The "Professional Oven" Myth: You don't need a steam injection oven. A $30 Dutch oven from a thrift store does the exact same thing by trapping the bread's own moisture.
Storage And Waste Tips
Homemade bread doesn't have the preservatives of store-bought loaves, so it stales faster. To keep it fresh, store the loaf cut side down on a wooden board covered with a linen towel for 2 days. For longer storage, slice it and freeze it in a zip lock bag for up to 3 months.
Reheat slices in a toaster or a pan with butter for that fresh baked feel.
To avoid waste, never throw away a stale loaf. Once it gets hard, slice it thin, brush with olive oil, and bake at 350°F for 10 minutes to make the best croutons you've ever had. Alternatively, if you're into more experimental doughs, you can check out a Neapolitan Pizza Dough recipe to see how a similar base can be turned into a thin crust masterpiece.
Ways To Serve It
This bread is a blank canvas. The classic way is to slice it warm and serve it with a bowl of extra virgin olive oil and a pinch of flaky sea salt. It's simple and lets the wheat flavor shine.
For a more filling meal, this is the ultimate side for a Chicken Gnocchi Soup, as the crusty exterior is perfect for scooping up that velvety broth. You can also slice it lengthwise, add garlic butter and mozzarella, and broil it for 5 minutes to make a quick garlic bread that puts any restaurant version to shame.
Ultimately, the best crusty italian bread is all about the contrast between that hard, mahogany shell and the soft, steaming center. Once you nail the Dutch oven technique, you'll never go back to the bakery aisle again. Happy baking!
Recipe FAQs
What is the crunchy Italian bread called?
Ciabatta and Pane di Casa are the most common. This specific recipe creates a rustic, crusty boule similar to traditional homemade Italian country bread.
What is the bread they use at Italian restaurants?
Usually a rustic white loaf or focaccia. Most restaurants serve a crusty, airy bread designed to be torn and dipped in olive oil.
How to get a mahogany brown crust?
Bake at 450°F in a preheated Dutch oven. Keep the lid on for 30 minutes to trap steam, then bake for another 15 minutes without the lid to brown the exterior.
Why didn't my dough double in size?
The water temperature was likely incorrect. Ensure the water is warm to properly activate the yeast, and leave the bowl in a draft free spot for the full 2 hours.
Is it true I must have a sourdough starter for crusty Italian bread?
No, this is a common misconception. This recipe uses active dry yeast and sugar to achieve a professional rise and crunch without needing a starter.
How to store homemade bread to keep it fresh?
Place the loaf cut side down on a wooden board. Cover it with a linen towel for up to 2 days, or freeze slices in a zip lock bag for up to 3 months.
What should I do with a stale loaf?
Turn it into homemade croutons. Slice the bread thin, brush with olive oil, and bake at 350°F for 10 minutes; these pair perfectly with a homemade Caesar dressing.
Best Crusty Italian Bread

