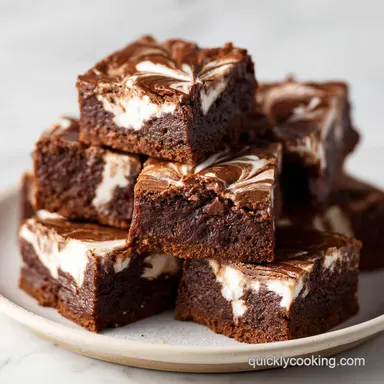
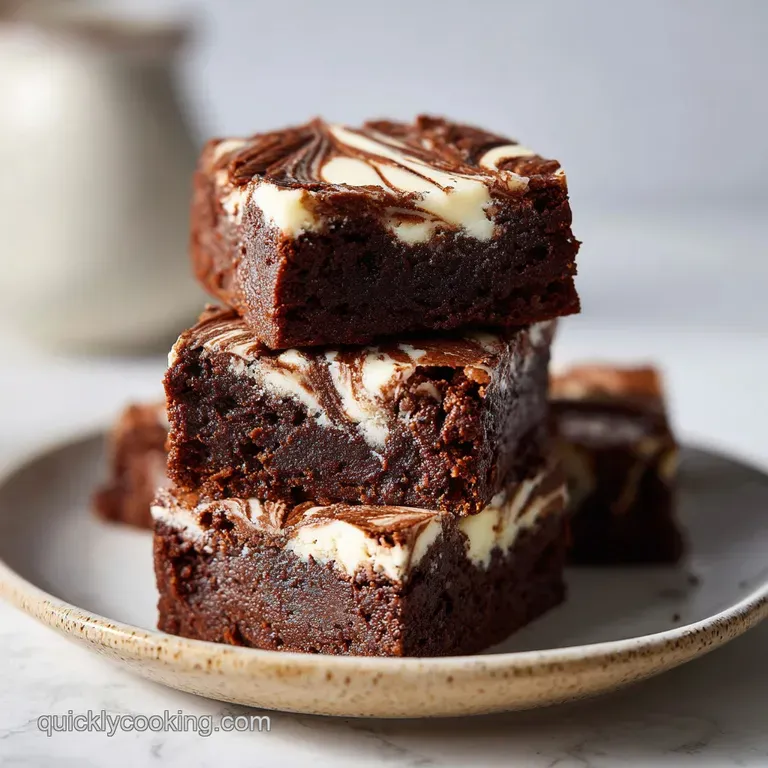
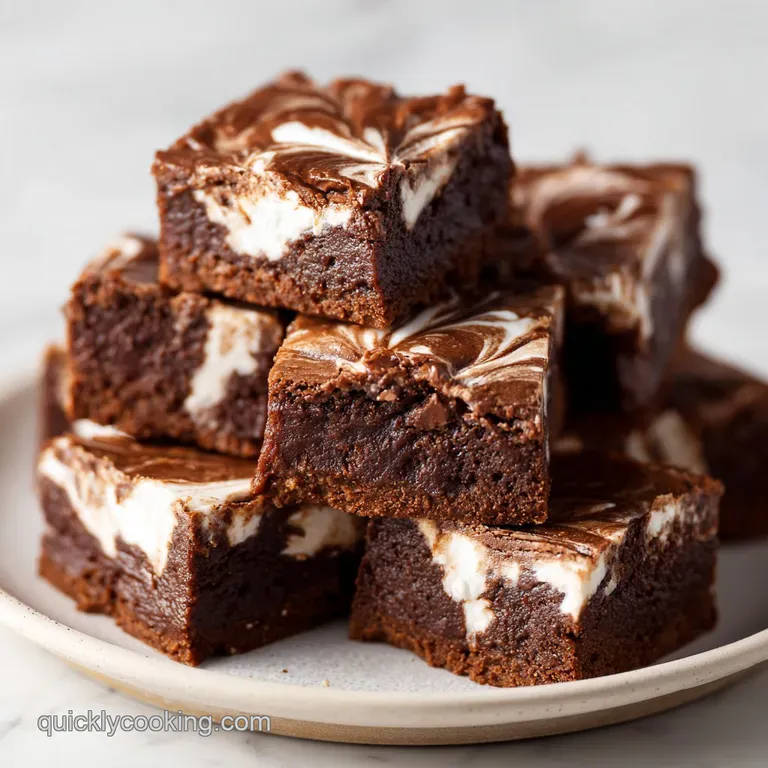
Toll House Famous Fudge Recipe: Glossy and Smooth
- Time:20 minutes active + 2 hours chilling = Total 2 hours 20 mins
- Flavor/Texture Hook: Glossy, smooth, and melts instantly on the tongue
- Perfect for: Holiday gift platters, neighborhood bake sales, or a quick sweet fix
- Getting a Smooth Result with toll house famous fudge recipe
- Quick Glance at the Fudge Basics
- The Best Budget-Friendly Flavor Mix
- Simple Tools for Easy Cleanup
- Step by Step Cooking Flow
- Fixing Texture and Setting Issues
- Easy Twists for Different Tastes
- Keeping Your Treats Fresh Longer
- Pairing Your Fudge with Drinks
- Recipe FAQs
- 📝 Recipe Card
Getting a Smooth Result with toll house famous fudge recipe
The smell of bubbling sugar and melted chocolate hitting a hot pan is, for me, the official scent of December. Every year, my kitchen becomes a chaos zone of parchment paper and mixing spoons because this fudge is the one thing my cousins actually fight over.
I remember one year I tried to rush the cooling process by sticking the pan in the freezer, and the edges crystallized into something that felt like eating sweetened gravel. Now, I stick to the rules.
Trust me on this, the beauty of this specific recipe is that it doesn't require a fancy candy thermometer. You just need a timer and some patience. It's the kind of treat that feels expensive and decadent but actually uses a few basic pantry staples, making it a total win for anyone on a budget.
You can expect a fudge that is dense and velvety, not grainy or crumbly. We're going for a finish that looks like polished mahogany and tastes like a childhood memory. Let's get into the flow of things so you can get this into the fridge and start counting down the minutes until it's set.
Quick Glance at the Fudge Basics
To get this right, you have to follow a specific flow: the prep, the boil, and the set. If you mess up the timing of the boil, the fudge won't set, and you'll end up with a very expensive chocolate soup.
- 1. Prep Flow (10 minutes)
- Lining the pan and measuring ingredients.
- 2. Cooking Flow (10 minutes)
- The rolling boil and the vigorous stir.
- 3. Finish Flow (2 hours)
- Room temp cooling followed by a deep chill.
Since this is such a rich treat, it's a great companion to other easy sweets. If you have a bit more time, you might want to whip up some Fudgy Chewy Brookies to round out a dessert platter.
| Method | Time | Texture | Best For |
|---|---|---|---|
| Stovetop (This one) | 20 min active | Velvety & Dense | Traditional taste |
| No Bake (Condensed) | 10 min active | Softer & Creamier | Ultra fast prep |
| Microwave | 5 min active | Slightly Grainier | Last minute emergencies |
The Best Budget Friendly Flavor Mix
The magic here is in the balance of fats and sugars. We aren't using fancy couverture chocolate or expensive creams, but the combination of evaporated milk and marshmallows creates a structure that mimics high end confectionery.
The Secret to Texture: The marshmallows don't just add sweetness, they act as a stabilizer that prevents the sugar from crystallizing into grains.
Component Analysis
| Ingredient | Science Role | Pro Secret |
|---|---|---|
| Evaporated Milk | Provides concentrated protein | Prevents the fudge from separating |
| Granulated Sugar | Creates the structure | Don't stir too much before the boil |
| Marshmallows | Stabilizes the emulsion | Use mini ones for faster melting |
| Semi Sweet Chips | Adds fat and depth | Use a brand with cocoa butter for better shine |
For the Sugar Base
The base is where the "set" happens. If the sugar doesn't reach the right concentration, the fudge stays soft. We use 1.5 cups (300g) of sugar and 2/3 cup (155ml) of evaporated milk to hit that sweet spot.
For the Texture & Flavor
The addition of 2 cups (60g) of miniature marshmallows is what separates this from a basic chocolate square. Combined with 1.5 cups (255g) of semi sweet chocolate chips, you get a result that is silky rather than sticky.
Simple Tools for Easy Cleanup
You don't need a professional kitchen for this, but using the right pan prevents a disaster. A heavy bottomed saucepan is non negotiable because thin pans create "hot spots" that burn the sugar.
I always recommend a stainless steel or heavy aluminum pot. Avoid non stick if you can, as it's harder to see the sugar crystals forming on the sides. For the pan, an 8x8 inch square is the standard.
The Essential Kit:
- Heavy bottomed saucepan
- Heat resistant spatula or wooden spoon
- 8x8 inch baking pan
- Parchment paper (don't skip the overhang!)
- Kitchen timer
Step by step Cooking Flow
Right then, let's get to the actual cooking. The most important part of this entire process is the 5 minute window. Do not guess the time.
- Prep the pan. Line your 8x8 inch baking pan with parchment paper, leaving an overhang on the sides. Note: This lets you lift the whole block out without fighting the pan.
- Combine base ingredients. Put 1.5 cups (300g) granulated sugar, 2/3 cup (155ml) evaporated milk, 2 tbsp (28g) unsalted butter, and 1/4 tsp (1.5g) salt into your saucepan.
- Reach a boil. Turn the heat to medium and bring the mixture to a rolling boil. Wait until the bubbles are large and don't stop when you stir.
- The Timing Window. Once it hits that full boil, stir constantly for exactly 5 minutes. Note: This is where the sugar concentrates to ensure the fudge sets.
- Kill the heat. Remove the pan from the burner immediately.
- Add solids. Quickly stir in 2 cups (60g) miniature marshmallows and 1.5 cups (255g) semi sweet chocolate chips.
- Emulsify. Stir vigorously until the batter is glossy, smooth, and no white marshmallow streaks remain.
- Transfer. Pour the mixture into your prepared pan and smooth the top with a spatula.
- Initial Cool. Let it sit at room temperature for 30 minutes.
- Final Set. Place in the fridge for at least 2 hours before slicing into 36 squares.
Fixing Texture and Setting Issues
Even for experienced cooks, fudge can be finicky. Most problems come down to temperature or stirring habits.
Why Your Fudge Stayed Soft
If your fudge is more like a thick syrup than a solid square, it usually means the sugar didn't reach the correct concentration. This happens if the "rolling boil" didn't actually start before you began your 5 minute timer.
| Problem | Root Cause | Solution |
|---|---|---|
| Soft/Gooey | Didn't boil long enough | Re heat carefully or use as a dip |
| Grainy Texture | Stirred too much early on | Add a pinch of corn syrup next time |
| Dull Finish | Overcooked the sugar | Stir in a teaspoon of butter at the end |
Avoiding Separation
If the fat from the butter or chocolate separates, you'll see oily streaks on top. This usually happens if the heat is too aggressive when adding the chocolate.
Common Mistakes Checklist
- ✓ Use a heavy pot to avoid burning the milk
- ✓ Ensure the boil is "rolling" before starting the timer
- ✓ Stir constantly during the 5 minute boil to prevent crystals
- ✓ Don't peek in the fridge every 10 minutes - let it set!
- ✓ Use parchment paper to avoid sticking to the pan
Easy Twists for Different Tastes
Once you've nailed the base, you can play around with the additions. If you're looking for something even simpler, you can try Butterfinger Balls for a no cook alternative.
For this recipe, try adding a handful of toasted pecans or walnuts during step 6. If you want a deeper flavor, a teaspoon of instant espresso powder stirred into the sugar base makes the chocolate taste more intense.
Substitution Options
| Original Ingredient | Substitute | Why It Works |
|---|---|---|
| Semi Sweet Chips | Dark Chocolate (60%) | Bolder flavor. Note: Results in a less sweet fudge |
| Evaporated Milk | Sweetened Condensed Milk | Creamier texture. Note: Reduce granulated sugar by 1/2 cup |
| Unsalted Butter | Coconut Oil | Vegan friendly fat. Note: Adds a very slight coconut hint |
For those who want a "Toll House fudge recipe without marshmallows," you can substitute the marshmallows with an extra 1/4 cup of butter and a tablespoon of corn syrup. This changes the texture from "velvety" to "traditional fudge," which is slightly more crumbly.
Keeping Your Treats Fresh Longer
Fudge is surprisingly stable because of the high sugar content, but it can dry out if left uncovered. I always store mine in an airtight container with parchment paper between layers.
Storage Guidelines
- Fridge: Store for up to 2 weeks. This keeps the texture snappy and fresh.
- Freezer: Wrap individual squares in foil and freeze for up to 3 months.
- Reheating: Never microwave fudge! If it's too hard from the freezer, let it sit at room temperature for 15 minutes.
Zero Waste Tip: If you have a bit of fudge left in the pan that's too messy to cut, don't toss it. Chop it into small bits and stir it into warm milk for a decadent homemade hot chocolate.
Pairing Your Fudge with Drinks
Because this is so rich, you need something to cut through the sweetness. I've found that the saltier or more bitter the drink, the better the fudge tastes.
A strong, black coffee or a double espresso is the gold standard here. The bitterness of the roast balances the sugar perfectly. If you're serving this at a party, a glass of cold whole milk or a tart raspberry tea also works wonders.
For a more "adult" pairing, a small glass of aged rum or a salty peanut butter cracker on the side creates a great contrast in flavors. Right then, you're all set to make the best batch of fudge your family has ever had!
Recipe FAQs
What is the secret to perfect fudge?
The 5-minute rolling boil. Stirring the sugar, evaporated milk, butter, and salt constantly for exactly 5 minutes ensures the mixture reaches the precise consistency needed to set.
How to ensure a smooth, non-grainy texture?
Stir vigorously after removing from heat. Quickly blend in the marshmallows and chocolate chips until the batter is glossy and the marshmallows have completely vanished.
How to prevent the fudge from sticking to the pan?
Line the pan with parchment paper. Leave an overhang on the sides of your 8x8 inch pan so you can lift the entire block out easily once chilled.
What are the common mistakes when making fudge?
Guessing the boiling time. Boiling for too little or too long will cause the fudge to either fail to set or become unpleasantly hard.
Do I need a candy thermometer for this recipe?
No, a thermometer isn't required. This specific method relies on precise timing of the rolling boil rather than tracking specific temperature degrees.
Why didn't my fudge set properly?
Refrigerate for at least 2 hours. While the fudge cools at room temperature for 30 minutes first, the refrigeration period is essential to fully solidify the structure.
Can I make this into a bite sized snack?
Cut the set block into 36 small squares. If you enjoyed the quick prep nature of these sweets, see how the same efficiency works in our peanut butter bites.
Toll House Famous Fudge