Cheesy Garlic Crescent Rolls: Shatter Crisp and Velvety
- Time: 10 min active + 15 min bake = Total 25 mins
- Flavor/Texture Hook: Shatter crisp edges with a velvety, melted center
- Perfect for: Game day apps, last minute dinner sides, or budget-friendly party snacks
- Cheesy Garlic Crescent Rolls
- The Magic Behind the Melt
- Component Analysis
- Gathering Your Essentials
- Equipment Needed
- Putting It All Together
- Fixes for Common Mistakes
- Troubleshooting Common Issues
- Mix ins and Ingredient Swaps
- Budget-friendly Scaling
- Truths About Crescent Rolls
- Storage and Waste Tips
- Plating and Serving Ideas
- Recipe FAQs
- 📝 Recipe Card
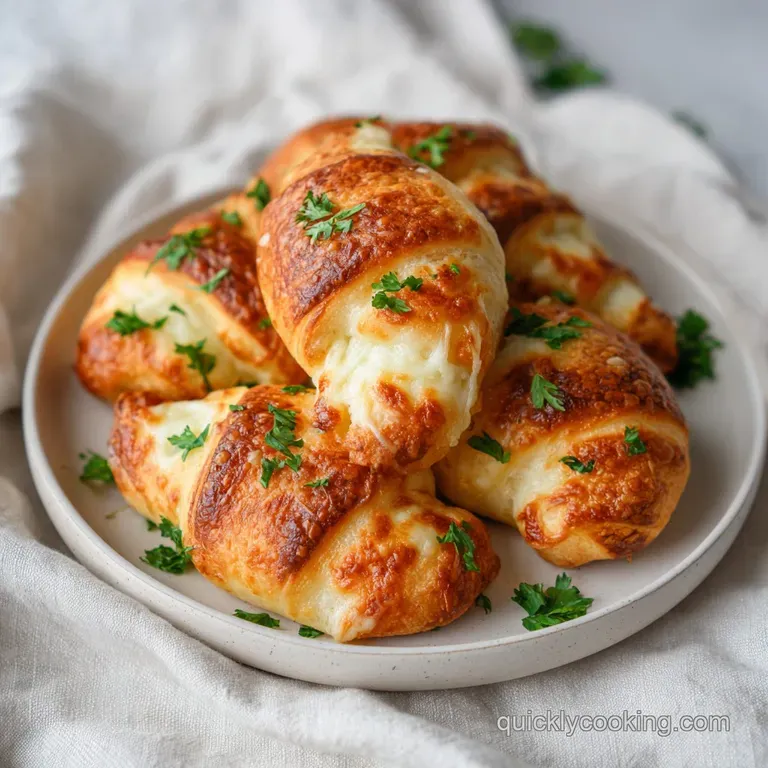
Cheesy Garlic Crescent Rolls
The second that melted garlic butter hits the oven, the whole house smells like a high end Italian bakery. It's that heavy, savory aroma that makes everyone in the room suddenly very interested in what's happening in the kitchen.
I remember making these for a casual get together a few years back when I realized I'd completely forgotten to make a side dish. I had about twenty minutes before guests arrived and a can of dough in the fridge.
I didn't have time for a fancy yeast bread, so I just threw together some butter, garlic, and whatever cheese was in the drawer. When I pulled them out, the tops were a deep mahogany color and the cheese had fused the rolls together into one giant, pull apart mass.
My friends didn't even touch the main course first; they just hovered around the tray, ripping off pieces of the warm, salty bread.
You can expect a snack that feels way more expensive than it actually is. These Cheesy Garlic Crescent Rolls are all about the contrast between the flaky, buttery layers of the dough and the sharp, salty hit of the parmesan.
It's a budget friendly hack that tastes like you spent hours kneading dough and prepping a compound butter, but in reality, you're just assembling a few simple ingredients.
The Magic Behind the Melt
I've always wondered why some rolls stay soft while others turn into rocks. It comes down to how we handle the fat and the heat.
- Fat Barrier: The melted butter creates a shield around the dough, preventing it from drying out too quickly in the oven.
- Cheese Bridging: Mozzarella acts as a structural glue, fusing the rolls together as it melts, which creates that classic pull apart effect.
- Garlic Infusion: Mixing the garlic directly into the fat ensures the flavor is distributed evenly rather than having one roll taste like a garlic bomb and another taste like nothing.
- Steam pockets: The tight rolling technique traps tiny amounts of moisture inside, which puffs up the dough as it heats.
Since we're using a shortcut dough, the goal is to maximize the surface area exposed to the butter. This is why we brush both the inside and the top. If you're curious about how different fats affect crust browning, Serious Eats has some great deep dives on how butter behaves under high heat.
| Method | Time | Texture | Best For |
|---|---|---|---|
| store-bought Dough | 25 mins | Flaky & Uniform | Quick weeknight sides |
| Homemade Yeast Dough | 3 hours | Airy & Chewy | Sunday family dinners |
| Puff Pastry | 30 mins | Shatter crisp | Fancy appetizers |
Component Analysis
Understanding what each ingredient does helps when you need to swap things out on the fly.
| Ingredient | Science Role | Pro Secret |
|---|---|---|
| Melted Butter | Moisture & Browning | Use salted butter if you want a more punchy flavor profile |
| Mozzarella | Stretch & Binding | Use low moisture shreds to avoid soggy bottoms |
| Garlic | Aromatic Base | Mince it into a paste for a more intense, uniform flavor |
| Parmesan | Salt & Umami | The fine grain helps it stick to the dough without sliding off |
Gathering Your Essentials
Keep it simple. You don't need a pantry full of specialty items for this. I usually grab the store brand crescent rolls because they're budget friendly and work just as well as the name brands.
For the Dough & Filling
- 1 can (8 oz) refrigerated crescent roll doughWhy this? Fast, consistent rise and built in butter layers
- 1 cup shredded mozzarella cheeseWhy this? Best melt factor for that pull apart stretch
- 1/4 cup grated parmesan cheeseWhy this? Adds a salty, nutty contrast to the mild mozzarella
For the Garlic Butter Glaze
- 4 tbsp unsalted butter, meltedWhy this? Carries the garlic flavor into every layer
- 3 cloves garlic, finely mincedWhy this? Fresh garlic provides a sharper, more authentic bite
- 1 tbsp fresh parsley, choppedWhy this? Adds a pop of color and cuts through the richness
- 1/4 tsp saltWhy this? Enhances the natural flavor of the butter and garlic
If you're looking for other ways to use cheese in a quick snack, my Baked Mozzarella Sticks use a similar cheese blend that's just as satisfying.
Equipment Needed
You don't need a professional kitchen for this. A few basics will do the trick:
- 9x9-inch Baking Dish: This keeps the rolls snug, which is the secret to the pull apart texture.
- Pizza Cutter: Way faster and cleaner than a knife for slicing the dough.
- Small Bowl: For mixing your garlic butter.
- Pastry Brush: To get that butter in every nook and cranny.
- Baking Sheet: If you prefer them spread out rather than in a dish.
Putting It All Together
Right then, let's get into it. Follow these steps and you'll have these on the table in no time.
1. Crafting the Flavor Base
In a small bowl, combine the melted butter, minced garlic, chopped parsley, and salt. Stir until the garlic is fully suspended in the fat. Set aside half of this mixture for the final brush. Note: Using a whisk ensures the parsley doesn't clump together.
2. Layering and Rolling
Unroll the crescent dough onto a clean surface to form a rectangle. Brush the first half of the garlic butter across the entire surface of the dough. Evenly sprinkle the mozzarella and parmesan over the butter.
3. Shaping the Rolls
Using a pizza cutter, slice the dough into 8 equal strips. Carefully roll each strip tightly from the wide end to the point. Note: Rolling tightly prevents the cheese from leaking out too early.
4. The Final Bake
Place the rolls in a 9x9-inch baking dish or rimmed baking sheet, snugging them against each other for a pull apart effect. Brush the remaining garlic butter over the tops of the rolls.
Bake at 375°F (190°C) for 12–15 minutes until the tops are mahogany gold and the cheese in the crevices is bubbling and browned.
Chef's Tip: If you want a truly shatter crisp bottom, preheat your baking dish in the oven for 5 minutes before adding the rolls. The immediate heat sear prevents the dough from sticking.
Fixes for Common Mistakes
Even the easiest recipes can go sideways. Here is how to handle the most common hiccups.
Troubleshooting Common Issues
| Issue | Solution |
|---|---|
| Why are my rolls soggy on the bottom | This usually happens because of too much moisture in the cheese or the butter pooling at the bottom of the pan. If you use fresh mozzarella (the kind in water), it releases too much liquid. Stick to t |
| Why did the cheese burn before the dough cooked | Your oven might be running hot, or the cheese was sprinkled too heavily on the very top. Keep the bulk of the cheese inside the rolls or in the gaps, and only use the butter glaze for the top finish. |
| Why didn't they pull apart | If the rolls aren't touching, they won't fuse. Make sure they are practically hugging each other in the dish. The cheese acts as the bridge that connects them. |
Common Mistakes Checklist
- ✓ Avoid over brushing the butter; too much makes the dough greasy instead of flaky.
- ✓ Ensure garlic is minced very fine so it doesn't create "holes" in the dough.
- ✓ Don't overcrowd a baking sheet if you aren't using a dish; they need a little air if not touching.
- ✓ Use a timer. 2 minutes is the difference between mahogany gold and burnt.
Mix ins and Ingredient Swaps
If you're missing something or want to change the vibe, these swaps work without ruining the structure of the Cheesy Garlic Crescent Rolls.
| Original Ingredient | Substitute | Why It Works |
|---|---|---|
| Mozzarella (1 cup) | Monterey Jack (1 cup) | Similar melt, but adds a slightly creamier, buttery taste |
| Fresh Garlic (3 cloves) | Garlic Powder (1 tsp) | Convenient. Note: Less pungent than fresh garlic |
| Unsalted Butter (4 tbsp) | Melted Margarine (4 tbsp) | budget friendly. Note: May taste slightly more "artificial" |
| Fresh Parsley (1 tbsp) | Dried Oregano (1 tsp) | Adds an earthy, herbal note. Note: More intense than parsley |
If you love the combination of garlic and cheese, you might also enjoy my Easy Homemade Cheese Bread for a more substantial loaf.
But what about the air fryer? You can absolutely do these in an air fryer. Just place the rolls in a small air fryer safe cake pan or in a tight circle. Cook at 350°F for 8–10 minutes. Since the heat is more concentrated, check them early so the cheese doesn't char.
For a spicy version, add a pinch of red pepper flakes to the butter mixture. Or, for a "cheesy garlic pull apart bread" style, use a larger pan and slice the dough into smaller squares instead of strips, stacking them like a puzzle.
Budget friendly Scaling
When you're feeding a crowd, you don't want to spend all day in the kitchen. Scaling this recipe is straightforward, but there are a few rules to keep the quality high.
Scaling Down (Half Batch) If you only have 4 people, use a half can of dough (though it's easier to just make the full batch and freeze half). Use a smaller 5x5 or 6x6 dish to keep the rolls snug. Reduce the bake time by about 2 minutes, as a smaller mass of dough heats through faster.
- - Temperature
- Drop the oven to 350°F (175°C).
- - Time
- Extend the baking time to 18
- - Seasoning
- Only increase the salt and garlic to 1.5x. Too much salt in large batches can actually inhibit the dough's rise.
Truths About Crescent Rolls
There are a few things people get wrong about these quick breads. Let's clear them up.
Myth: You have to use expensive organic butter. Truth: In a recipe with this much garlic and parmesan, the difference between high end butter and a budget friendly store brand is negligible. The flavor comes from the aromatics, not the butter's pedigree.
Myth: store-bought dough is "unhealthy" and shouldn't be used. Truth: While homemade is great, the goal here is speed and budget. According to the USDA FoodData, the caloric difference between a homemade flour butter dough and store-bought is minimal. It's all about the occasion.
Storage and Waste Tips
You probably won't have leftovers because these disappear fast, but if you do, here is how to handle them.
Storage Guidelines - Fridge: Keep them in an airtight container for up to 3 days. - Freezer: You can freeze the baked rolls for up to 2 months. Wrap them tightly in foil to prevent freezer burn.
Reheating for Texture Never use a microwave; it turns the crust rubbery. Instead, pop them back in the oven at 350°F for 5 minutes or use a toaster oven. This brings back that shatter crisp exterior and makes the cheese velvety again.
Zero Waste Hacks If you have leftover garlic butter in the bowl, don't toss it. Brush it on a piece of toast or stir it into some steamed broccoli for an instant side dish.
If you have a bit of leftover crescent dough, roll it into a tiny ball, top it with a pinch of cinnamon sugar, and bake it as a mini treat.
Plating and Serving Ideas
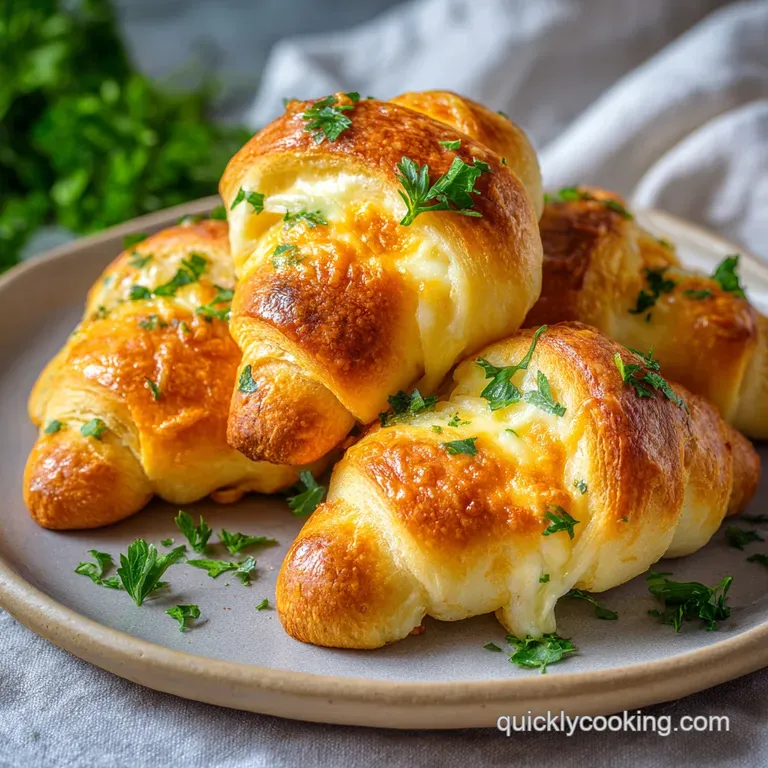
Presentation is everything, even for a budget snack. Since these Cheesy Garlic Crescent Rolls have a rich, mahogany color, you want to contrast that with something bright.
I love serving these on a wooden cutting board right out of the oven. The rustic look fits the "pull apart" nature of the dish. Garnish with a bit more fresh parsley or a sprinkle of extra parmesan while they are still sizzling.
Pair them with a side of warm marinara sauce or a creamy garlic dip for dipping. If you're serving them as part of a larger meal, they go beautifully with a crisp garden salad to balance out the richness of the butter and cheese.
Trust me, once you put them in the center of the table, they'll be the first thing people reach for.
Recipe FAQs
Can I use fresh mozzarella?
No, avoid it. Fresh mozzarella releases too much moisture, which makes the rolls soggy. Stick to shredded, low-moisture mozzarella.
Why are my rolls soggy on the bottom?
Use low-moisture cheese. This occurs when butter pools in the pan or high moisture cheese releases liquid. Ensure you don't over brush the bottom surface.
How to reheat these for best texture?
Bake at 350°F for 5 minutes. Microwaving turns the crust rubbery. An oven or toaster oven restores the shatter crisp exterior.
Is it true I should put the cheese on top of the rolls for better browning?
No, this is a common misconception. Heavy cheese on top often burns before the dough cooks through. Keep the cheese inside the rolls or in the gaps.
How to store leftovers?
Store in an airtight container. They last 3 days in the fridge or 2 months in the freezer if wrapped in foil.
Can I serve these as a party appetizer?
Yes, they are ideal for crowds. They pair well with hearty mains. If you enjoyed working with this type of dough, see how the same logic applies to our pizza roll breadsticks.
Why did the cheese burn before the dough cooked?
Your oven may be running too hot. This also happens when cheese is placed on top rather than inside. Focus the cheese in the crevices for better results.
Cheesy Garlic Crescent Rolls