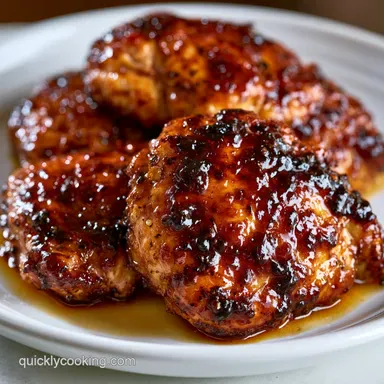
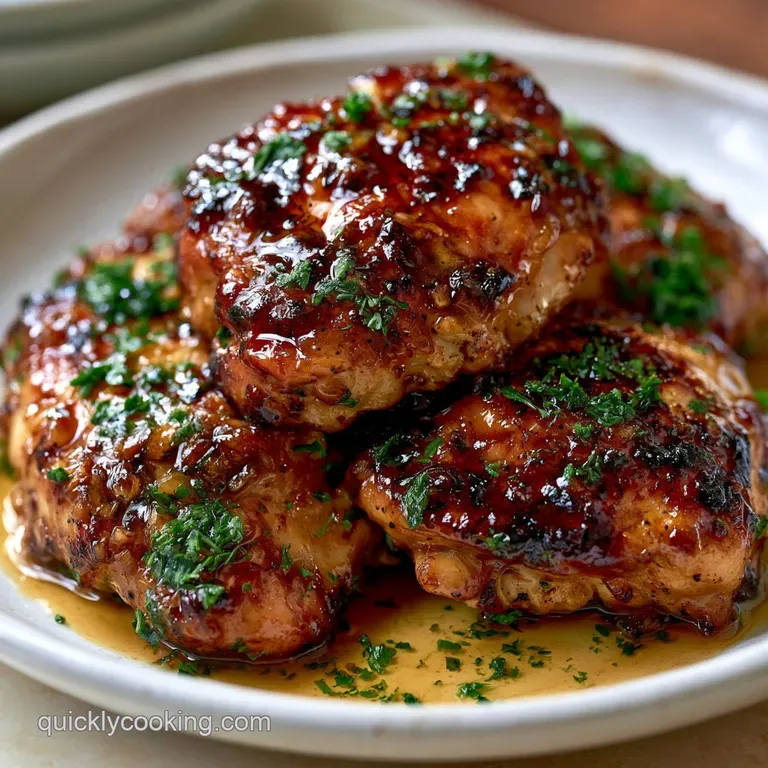
Baked Honey Garlic Boneless Chicken Thighs
- Time:10 mins active + 25 mins cooking = Total 35 mins
- Flavor/Texture Hook: Velvety, sticky glaze with a charred, golden edge
- Perfect for: High speed weeknight dinners or easy meal prep
- Baked Honey Garlic Boneless Chicken Thighs
- Secrets to the Sticky Glaze
- Understanding Every Ingredient
- Essential Kitchen Gear
- Step-by-Step Cooking Flow
- Fixing Common Cooking Errors
- Troubleshooting Common Issues
- Easy Swaps and Twists
- Dispelling Kitchen Myths
- Storage and Leftover Ideas
- Best Ways to Serve
- Recipe FAQs
- 📝 Recipe Card
That first sizzle when the meat hits the hot oil is everything. I remember trying to make this in a slow cooker a few years back, thinking I was being "efficient." I ended up with grey, rubbery chicken swimming in a watery syrup that tasted like honey flavored sadness. It was a total disaster.
The trick is the hybrid approach. By searing first and finishing in the oven, you get that deep, golden crust and a sauce that actually clings to the meat instead of sliding off. You get a result that feels like it took hours, but it's actually done in under 40 minutes.
Expect a dish where the sauce is thick and glossy, and the meat is incredibly juicy. These baked honey garlic boneless chicken thighs are a total win for anyone who wants a heavy hitting flavor without spending the whole evening over a stove.
Baked Honey Garlic Boneless Chicken Thighs
The goal here is a specific balance between the salt of the soy and the sweetness of the honey. Most recipes just toss everything in a pan and hope for the best, but that leads to burnt sugar or undercooked centers.
We're using a planned flow to ensure the chicken stays tender while the glaze reduces into a velvety coating.
To get this right, we focus on the prep flow. Your station should be set up before the heat even touches the pan. If you're chopping garlic while the chicken is searing, you're risking a burnt pan. Set your glaze ingredients in one bowl and your seasoned meat on a plate.
This streamlined approach is how you avoid the mid cook panic.
Once the chicken is in the oven, you have a small window of time to clean up or prep a side. Because we're using boneless thighs, the cooking time is consistent and fast. You don't have to worry about the "bone in gamble" where the meat is done but the joint is still raw.
Secrets to the Sticky Glaze
The Sugar Melt: Honey contains fructose and glucose that caramelize quickly at 400°F. This creates those dark, sticky patches that provide a deep, toasted flavor.
Acid Balance: The apple cider vinegar breaks down the heavy sweetness of the honey. It cuts through the fat of the chicken thighs, preventing the dish from feeling cloying.
Salt Integration: Soy sauce provides more than just salt, it adds umami. This creates a savory backbone that allows the garlic to pop without tasting too sharp.
Surface Tension: Searing the meat first creates a textured surface. This allows the glaze to "grip" the chicken rather than pooling at the bottom of the pan.
| Method | Total Time | Texture | Best For |
|---|---|---|---|
| Stovetop Only | 20 mins | Softer, more sauce | Quick lunches |
| Oven Bake | 40 mins | Charred, concentrated | Family dinner |
| Hybrid (This) | 35 mins | Glossy, balanced | Maximum flavor |
Understanding Every Ingredient
The components of this recipe aren't just for flavor; they each play a structural role in how the final dish presents. Using the wrong honey or a different vinegar can change the viscosity of the sauce.
| Ingredient | Science Role | Pro Secret |
|---|---|---|
| Honey | Glaze Thickener | Use a runny honey for better coating |
| Apple Cider Vinegar | pH Balancer | Adds a subtle fruitiness that white vinegar lacks |
| Soy Sauce | Umami Base | Low sodium lets you control the salt levels |
| Garlic | Aromatic | Mince it fine to avoid large, burnt chunks |
Essential Kitchen Gear
You'll need an oven safe skillet. Cast iron is the gold standard here because it holds heat better than stainless steel, giving you a more consistent sear. If you don't have one, a stainless steel pan works, but you might need to sear in smaller batches to keep the temperature up.
A whisk is mandatory for the glaze. You want the honey and soy sauce completely integrated so you don't end up with "salt pockets" in the sauce. A simple silicone spatula is also handy for basting the chicken halfway through the bake.
Finally, a digital meat thermometer is the only way to guarantee tenderness. Boneless thighs are forgiving, but there's a narrow window between "juicy" and "dry." Aim for exactly 165°F.
Step-by-step Cooking Flow
Follow this order to maintain speed and efficiency.
- Pat the chicken thighs completely dry with paper towels. Note: Moisture on the surface creates steam, which prevents a golden crust.
- Season both sides evenly with 1/2 tsp kosher salt and 1/2 tsp ground black pepper.
- Heat 1 tbsp olive oil in your oven safe skillet over medium high heat.
- Sear chicken thighs for 3-5 minutes per side until golden brown and sizzling.
- Whisk together 1/3 cup honey, 3 tbsp low sodium soy sauce, 4 cloves minced garlic, 1 tbsp apple cider vinegar, and 1/2 tsp onion powder in a bowl.
- Pour the honey garlic glaze over the seared chicken. Note: Ensure every inch of the meat is coated to prevent dry spots.
- Transfer the skillet to a preheated 400°F (200°C) oven.
- Bake for 15-20 minutes, spooning the sauce over the chicken halfway through until the sauce is glossy and the internal temperature hits 165°F.
- Remove from oven and let the meat rest for 5 minutes. Note: This allows the juices to redistribute so the meat stays velvety.
Fixing Common Cooking Errors

The most common issue is a glaze that is either too thin or completely burnt. Honey is volatile; it can go from "golden" to "black" in about 60 seconds if the heat is too high or the chicken is too thin.
Troubleshooting Common Issues
| Issue | Solution |
|---|---|
| Why Your Glaze is Watery | This usually happens if you didn't sear the chicken long enough or if you used too much vinegar. The sear reduces the initial moisture, and the oven time concentrates the sugars. If it's too thin, you |
| Why Your Garlic Tastes Bitter | Bitter garlic is the result of burning the minced bits during the sear phase. That's why we whisk the garlic into the sauce and add it after the searing is done. The oven temperature is gentle enoug |
| Why The Chicken is Dry | Overcooking is the enemy. Even though thighs are more resilient than breasts, they can still toughen up. Always pull the meat at 165°F. |
Common Mistakes Checklist
- ✓ Patting meat bone dry before seasoning
- ✓ Preheating the oven fully to 400°F
- ✓ Searing over medium high, not medium
- ✓ Basting the chicken halfway through the bake
- ✓ Resting the meat for 5 mins before slicing
Easy Swaps and Twists
If you're looking for a different vibe, you can tweak the glaze. For a spicy kick, add a teaspoon of sriracha or red pepper flakes to the whisking step. This cuts through the honey and adds a layer of heat that works great with rice.
For a gluten-free version, simply swap the soy sauce for tamari or coconut aminos. The result is nearly identical, though coconut aminos are slightly sweeter, so you might want to reduce the honey by a teaspoon. If you're craving a different protein, you can use the same glaze for air fryer chicken, though the texture will be more of a "nugget" style than a succulent thigh.
| Original Ingredient | Substitute | Why It Works |
|---|---|---|
| Honey (1/3 cup) | Maple Syrup (1/3 cup) | Similar sugar profile. Note: Adds a woody, autumnal flavor |
| Soy Sauce (3 tbsp) | Tamari (3 tbsp) | Same salty profile. Note: gluten-free alternative |
| Apple Cider Vinegar (1 tbsp) | Rice Vinegar (1 tbsp) | Similar acidity. Note: Milder, more traditional Asian profile |
Keep in mind that if you use maple syrup, the sauce may thin out slightly more than it does with honey. You might need an extra 2 minutes in the oven to get that same thick, clinging consistency.
Dispelling Kitchen Myths
Many people think that searing the chicken "seals in the juices." This is a myth. Searing is actually about flavor development and creating a crust through browning. Moisture loss happens regardless of whether you sear or not, but the trade off for that flavor is worth it.
Another common belief is that you need to flour the chicken before searing for a better crust. For this specific recipe, flour actually gets in the way of the glaze. The honey garlic sauce needs a clean, seared surface to bond to. Flour creates a barrier that can make the sauce slide off or become gummy.
Storage and Leftover Ideas
Store these thighs in an airtight container in the fridge for up to 4 days. The sauce actually thickens as it cools, making it even stickier the next day. To reheat, I recommend a splash of water or a tiny bit of butter in a skillet over medium heat. This loosens the glaze without burning the sugars.
For freezing, you can freeze the cooked chicken in the sauce for up to 2 months. Thaw overnight in the fridge before reheating.
To avoid waste, use the leftover glaze in the pan as a base for a stir fry. Toss in some snap peas, carrots, and pre cooked rice. The concentrated honey and garlic flavors make a great instant sauce. If you have leftover chicken, shred it and put it in tacos with a bit of fresh lime to cut the sweetness.
Best Ways to Serve
This dish is quite rich, so you need sides that provide a fresh or neutral contrast. Steamed broccoli or roasted asparagus are the best bets because they soak up the extra glaze without competing with the flavor.
If you want a heartier meal, serve these over a bed of jasmine rice or quinoa. The grains act as a sponge for the sauce. For a total comfort meal, I love serving these alongside some garlic knots recipe to mop up every last drop of that velvety glaze.
For a low carb approach, serve the chicken over cauliflower rice or a bed of sautéed spinach. The bitterness of the spinach balances the honey perfectly. Just make sure not to over salt your sides, as the soy sauce in the chicken provides plenty of sodium for the whole plate.
Recipe FAQs
How to cook honey garlic chicken thighs in the oven?
Sear chicken for 3-5 minutes per side, add the honey garlic glaze, and bake at 400°F for 15-20 minutes. Ensure the internal temperature reaches 165°F before removing from the oven.
Is it better to bake chicken thighs at 400 or 425?
Stick with 400°F. This temperature allows the honey to caramelize without burning before the chicken is fully cooked.
Are chicken thighs good for diabetics?
No, not in this recipe. The honey in the glaze creates a high sugar content that can cause blood glucose spikes.
Should you bake boneless chicken thighs covered or uncovered?
Bake them uncovered. Leaving the skillet open allows the sauce to reduce and thicken into a sticky glaze.
Is it true that I should sauté the garlic before adding the honey?
No, this is a common misconception. Sautéing minced garlic often makes it bitter; whisking it into the glaze and adding it after searing preserves the flavor.
How to prevent the chicken from drying out?
Use a meat thermometer. Remove the thighs from the oven the moment they hit 165°F and let them rest for 5 minutes to lock in juices.
What should I serve with these chicken thighs?
Pair with steamed broccoli or white rice. These neutral sides balance the sweetness of the honey garlic glaze. If you need another quick meal idea, try a tuna melt sandwich.
Honey Garlic Chicken Thighs